
Configuring coexistence of a Theme UI Kit service request
7 Tasks
5 mins
Scenario
A new regional branch of U+Bank uses a Constellation-based Pega Customer Service™ application. To streamline their operations, they want to quickly incorporate the existing UI-Kit-based Report lost or stolen card service request. A system administrator is tasked with configuring coexistence for the service request.
Use the following credentials to log in to the exercise system:
| Role | User name | Password |
|---|---|---|
| Customer Service system administrator | CSSysAdmin | password123! |
Your assignment consists of the following tasks:
Task 1: Configure the remote Theme UI Kit application and expose the Report lost or stolen card service request
In the Theme UI-Kit application, turn on the coexistence toggle. Then, create a Web mashup channel for the Report a lost or stolen card service request and copy the mashup code. Next, add the PegaCS-C11NConnector ruleset to the application ruleset stack. To configure a unified work list and workbasket, override the cyRemoteAppEndpointUrl application settings rule and the cyMyWorkListForRemote, cyMyWorkbasketsForRemote, and czMyTeamWorklistForRemote report definitions in your application. Update the application settings rule with the URL of your remote Theme UI-Kit application.
Task 2: Configure the local Constellation application and proxy case
In the Constellation application, turn on the coexistence toggle. Then, create a proxy case type for the remote Report a lost or stolen card service request. Next, connect your Constellation application with the Web mashup channel created in the Theme UI-Kit application.
Task 3: Enable access to remote case type data and application settings
In the Theme UI-Kit application, update the cySetCaseTypesToUpdateProxyCase decision table to access the remote case type data in the Constellation application. Then, override the cyProxyRemoteEndPointURL application settings rule and update it with the URL of the Constellation application's environment.
Task 4: Configure authentication of the Web mashup
In the Constellation application, override and update the cyRemoteMashupURLForProxy application settings rule and the cySetMashUpGadgetAttributes data transform.
Task 5: Configure authentication in both applications
In the Constellation application, in the CS_OAuth_ProxyRemote Oauth 2.0 Client Registration rule, regenerate the client secret and update client credentials. In the Theme UI-Kit application, update the CS_OAuth_ProxyRemote authentication profile with the information from the client secret. Then, regenerate the client secret and update client credentials in the Theme UI-Kit CS_OAuth_RemoteWork Oauth 2.0 Client Registration rule. Back in the Constellation application, update the CS_OAuth_RemoteWork authentication profile with the information from the client secret file. Next, override and update the cyRemoteDataViewsURL application settings rule. Lastly, optimize the cxRemoteCaseID property for reporting.
Task 6: Add the service request to the Interaction Task Categories
To enable launching the Report a lost or stolen card service request from the Constellation application Interaction Portal, add it to the General task category of interactions.
Task 7: Optimize the cxRemoteCase property
Optimize the cxRemoteCaseID property for the interaction and service cases tables in the Constellation application.
Task 8: Confirm your work
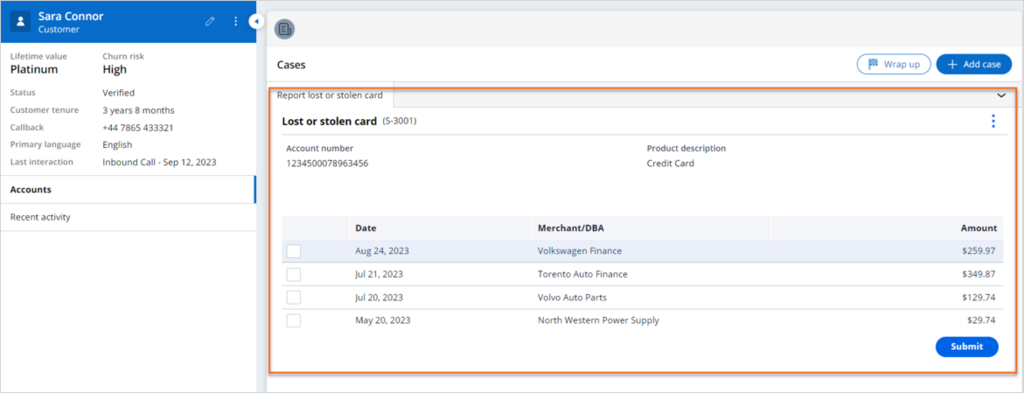
In the Constellation application Interaction Portal, start an interaction with Sara Connor and run the Report a lost or stolen card service request.
Challenge Walkthrough
Detailed Tasks
1 Configure the remote Theme UI Kit application and expose the Report lost or stolen card service request
- Log in as a Customer Service System Administrator:
- In the User name field, enter CSSysAdmin.
- In the Password field, enter password123!.
- In the header of Dev Studio, click Configure > System > Release > Toggles.
- On the Toggle Management tab, in the Application context column, in the row for Pega Customer Service with the EnableCoexistence identifyer, click Edit.
- In the Edit toggle dialog box, click Enable toggle for all, and then click Submit.
- In the header of Dev Studio, click Application > Channels and interfaces.
- In the Create new channel interface section, click Web mashup.

- Configure the web mashup:
- In the Basic options section, in the Name field, enter Report lost or stolen card.
- In the Action list, select Create a new case.
- In the Case type list, select Return a lost or stolen card.
- Turn on the Allow passing dynamic parameters switch.
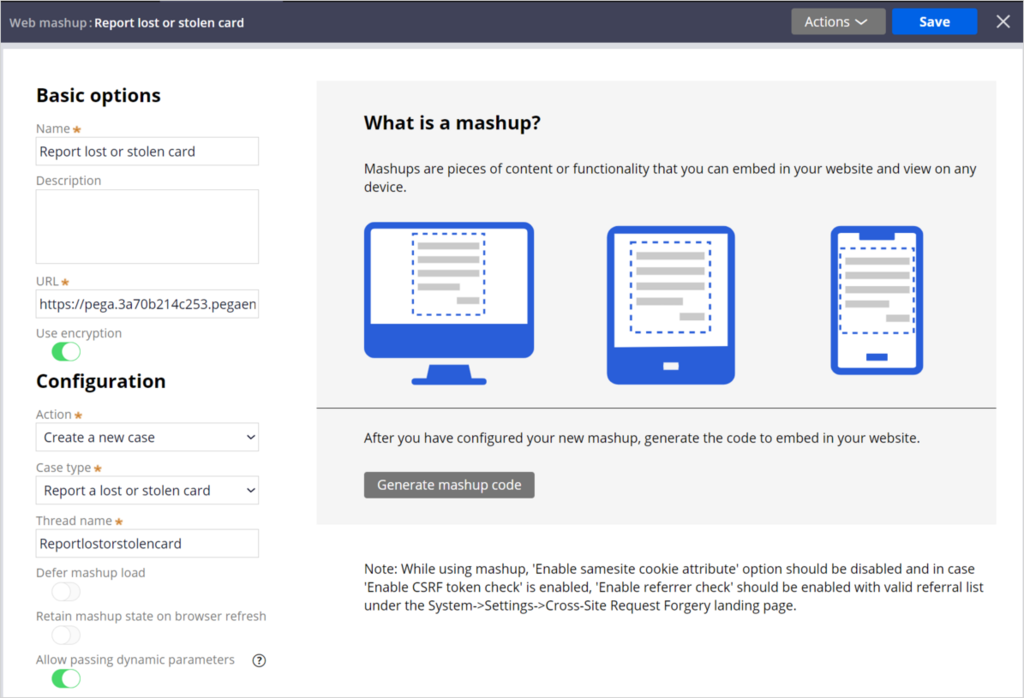
- Click Save, and then close the web mashup.
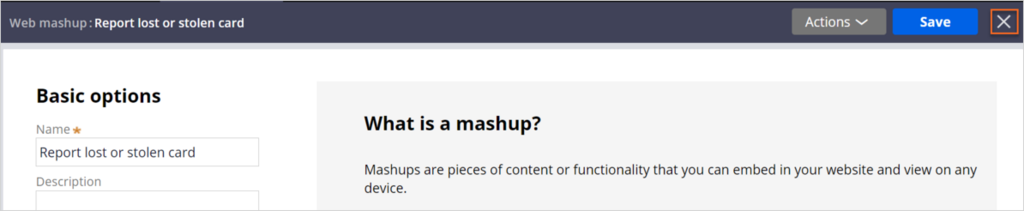
- On the Channels and interfaces tab, in the Current channel interfaces section, click the Report lost or stolen card channel icon to re-open the channel.
- In the What is a mashup? section, click Generate mashup code.
- In the Mashup code dialog box, in the Web mashup section, click Copy.
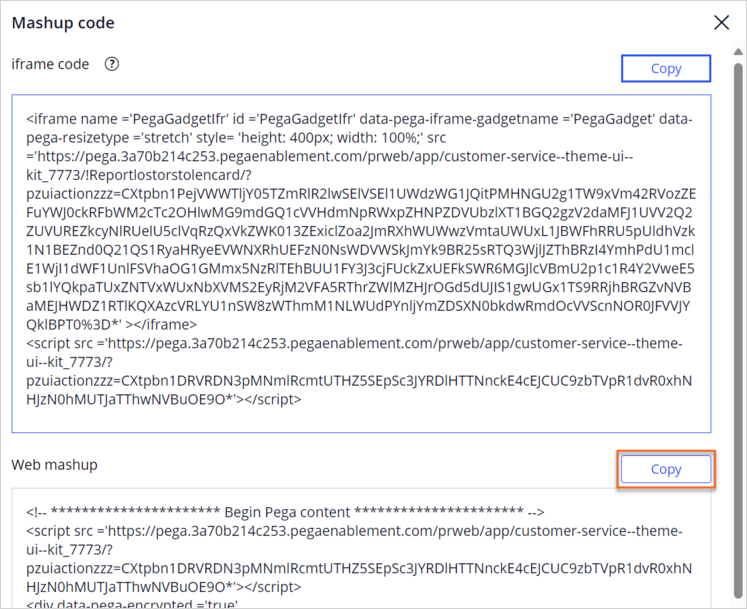
- Save the mashup code into a text file, and then close the code.
- In the header of Dev Studio, click Application > Definition.
- In the Application rulesets section, click Add ruleset.
- In the Open Rule field, enter PegaCS-C11NConnector:08-23, and then click Save.

- In the header of Dev Studio, search for and open the cyRemoteAppEndpointUrl application settings rule.

- On the Application Settings configuration tab, click Save as, and then click Create and open.
- On the Application Settings configuration tab, on the Settings tab, in the Value per production level section, in the Value field for each of the production levels, enter the URL of Theme UI-Kit application in the following format: https://pega.xxx.pegaenablement.com/prweb/app/customer-service--theme-ui--kit.
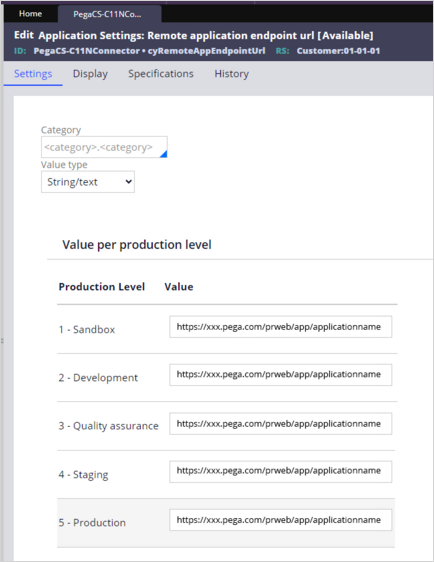
- Click Save.
- In the header of Dev Studio, search for and open the cyMyWorkListForRemote report definition.
- In the Report definition configuration tab, click Save as, and then click Create and open.
- Repeat steps 19–20 with the cyMyWorkbasketsForRemote and cyMyTeamWorklistForRemote report definitions.
2 Configure the local Constellation application and proxy case
- In the header of Dev Studio, click Application > Switch Application > Customer Service – Constellation.
- In the header of Dev Studio, click Configure > System > Release > Toggles.
- On the Toggle Management tab, in the Application context column, in the row for CustomerService-Infrastructure with the EnableCoexistence identifier, click Edit.
- In the Edit toggle dialog box, click Enable toggle for all, and then click Submit.
- In the navigation pane of Dev Studio, click Case types > Add a case type.
- In the Create Case Type dialog box, configure the details:
- In the Case type name field, enter Report lost or stolen card.
- In the Template list, select Customer Service Remote Template.
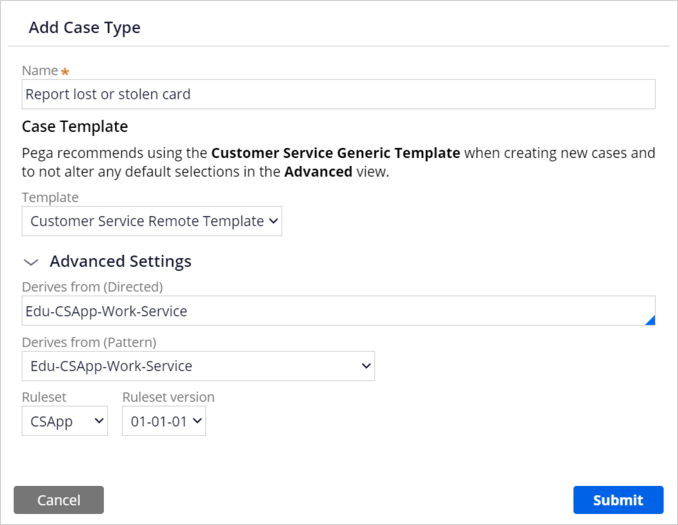
- Click Submit.
- In the navigation pane of Dev Studio, click Records > Data Model > Data Transform.
- In the Data Transform Instances tab, in the Name column, click the Filter icon.
- In the search text field, enter cySetMashUpGadgetAttributes, and then click Apply.

- Click the cySetMashUpGadgetAttributes data transform.
- On the Data Transform configuration tab, click Save as.
- On the Data Transform Record Configuration tab, in the Context section, in the Apply to list, enter Edu-CSApp-Work-Service-ReportLostOrStolenCard.
- Click Create and open.
- Populate the following rows in the data transform definition table with the values from the Web mashup code from the remote Theme UI-Kit application:
- For the Target value of pyClassName, in the Source field, enter the value of the
data-pega-action-param-classnameelement from the Web mashup code. - For the Target value of cxMashUpChannelID, in the Source field, enter the value of the
data-pega-channelIDelement from the Web mashup code. - For the Target value of cxRemoteAppSkinName, in the Source field, enter the value of the
pzSkinNameelement from the Web mashup code.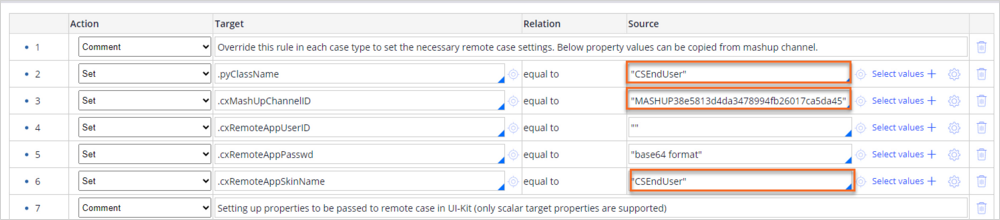
- For the Target value of pyClassName, in the Source field, enter the value of the
- Click Save.
3 Enable access to remote case type data and application settings
- In the header of Dev Studio, click the Application > Switch Application > Customer Service – Theme UI-Kit.
- In the header of Dev Studio, search for and open the cySetCaseTypesToUpdateProxyCase decision table.
- Click Save as, and then click Create and open.
- On the Table tab, in the Case type class column, enter the case type class of the Theme UI-Kit service request: Edu-Customer-Work-LostStolenCard.
- In the Return column, enter the corresponding Constellation application proxy case class: Edu-CSApp-Work-Service-ReportLostOrStolenCard.
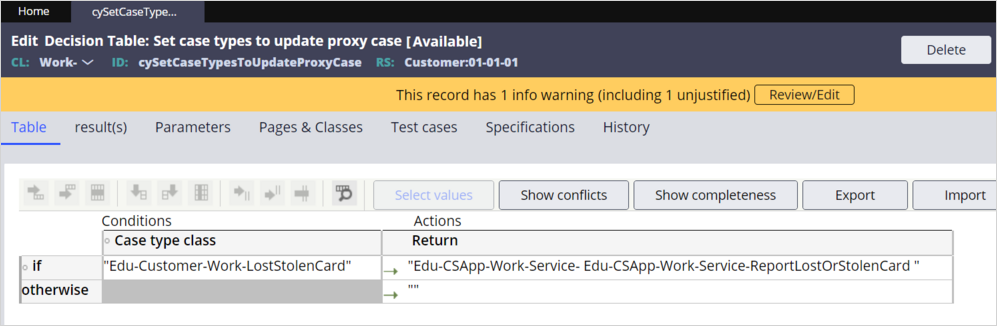
- Click Save.
- In the header of Dev Studio, search for and open the cyProxyRemoteEndPointURL application settings rule.
- In the Application Settings configuration tab, click Save as.
- Click Create and open.
- On the Application Settings configuration tab, on the Settings tab, in the Value per production level section, in the Value field for each of the production levels, enter the URL of the Constellation application's environment in the following format: https://pega.xxx.pegaenablement.com/prweb.

- Click Save.
4 Configure authentication of the Web mashup
- In the header of Dev Studio, click the Application > Switch Application > Customer Service – Constellation.
- In the header of Dev Studio, search for and open the cyRemoteMashupURLForProxy application settings rule.
- On the Application Settings configuration tab, click Save as, and then click Create and open.
- On the Application Settings configuration tab, on the Settings tab, in the Value per production level section, in the Value field for each of the production levels, enter the value of the
data-pega-urlelement from the Web mashup code. - Click Save.
- In the header of Dev Studio, search for and open the cySetMashUpGadgetAttributes data transform that you saved into the Edu-CSApp-Work-Service-ReportLostOrStolenCard class.
- In the Definition tab, in step 4 of the definition table, in the Source field, enter "CSSysAdmin".
- In step 5 of the definition table, in the Source field, enter the operator password in base64 format: "cGFzc3dvcmQxMjMh".
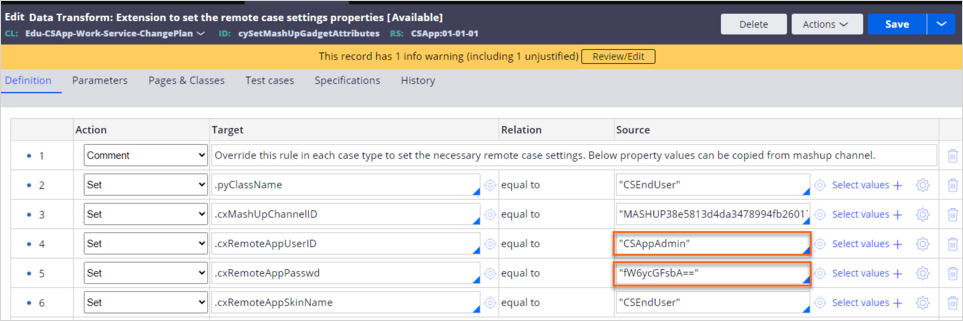
- Click Save.
5 Configure authentication in both applications
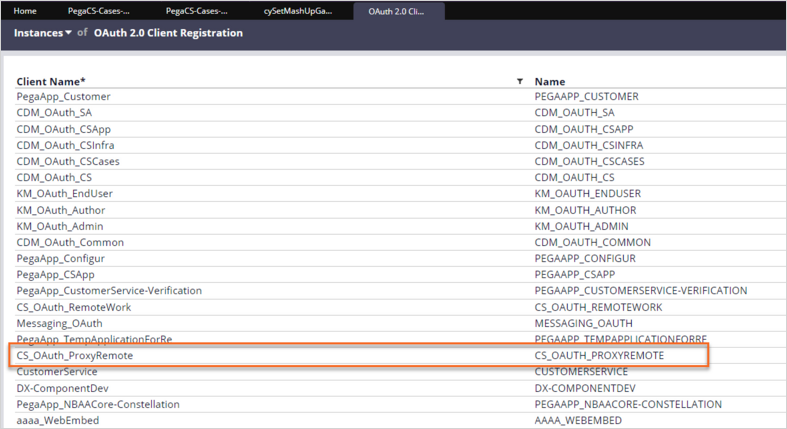
- In the navigation pane of Dev Studio, click Records > Security > Oauth 2.0 Client Registration.
- On the Instances tab, click CS_OAuth_ProxyRemote.
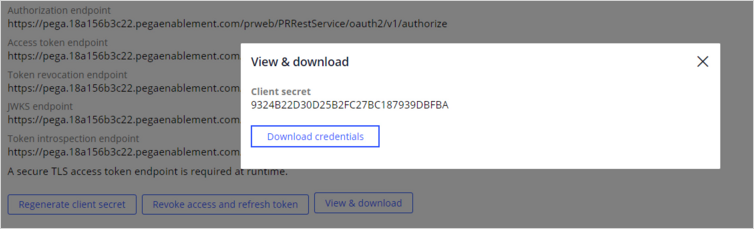
- On the Client Information tab, in the Client Credentials section, click Regenerate client secret.
- On the Regenerate client secret dialog box, click Regenerate.

- On the Client Information tab, in the Client Credentials section, click View & download.
- In the View & download dialog box, click Download credentials.
- On the Client Information tab, in the Supported grant types section, ensure that the selection for the Client credentials checkbox is active.
- In the Access group field, enter CSApp:AppAdmin, and then click Save.

- In the header of Dev Studio, click the Application > Switch Application > Customer Service – Theme UI-Kit.
- In the header of Dev Studio, search for and open the CS_OAuth_ProxyRemote authentication profile.
- Update the client configuration:
- In the Client secret field, enter the password from the text file downloaded in step 6.
- In the Endpoint configuration section, in the Access token endpoint field, enter the corresponding value from the text file downloaded in step 6.
- In the Revoke token endpoint field, enter the corresponding value from the text file downloaded in step 6.
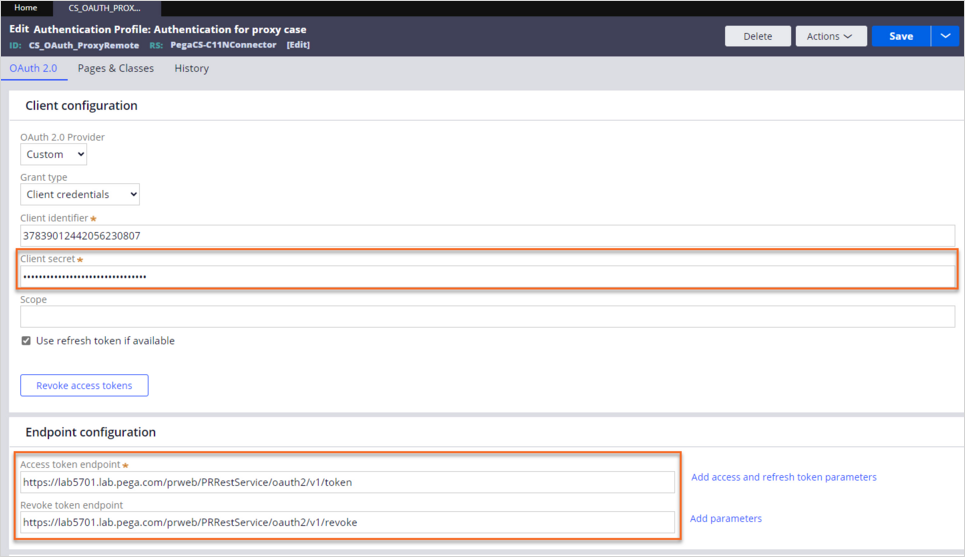
- Click Save.
- In the navigation pane of Dev Studio, click Records > Security > Oauth 2.0 Client Registration.
- On the Instances tab, click CS_OAuth_RemoteWork.
- In the Client Credentials section, click Regenerate client secret.
- On the Regenerate client secret dialog box, click Regenerate.
- On the Client Information tab, in the Client Credentials section, click View & download.
- In the View & download dialog box, click Download credentials.
- On the Client Information tab, in the Supported grant types section, ensure that the selection for the Client credentials checkbox is active.
- In the Access group field, enter CSApp:AppAdmin, and then click Save.
- In the header of Dev Studio, click the Application > Switch Application > Customer Service – Constellation.
- In the header of Dev Studio, search for and open the CS_OAuth_RemoteWork authentication profile.
- Update the client configuration:
- In the Client configuration section, update the Client secret field with the password from the text file downloaded in step 17.
- In the Endpoint configuration section, in the Access token endpoint field, enter the corresponding value from the text file downloaded in step 17.
- In the Revoke token endpoint field, enter the corresponding value from the text file downloaded in step 17.
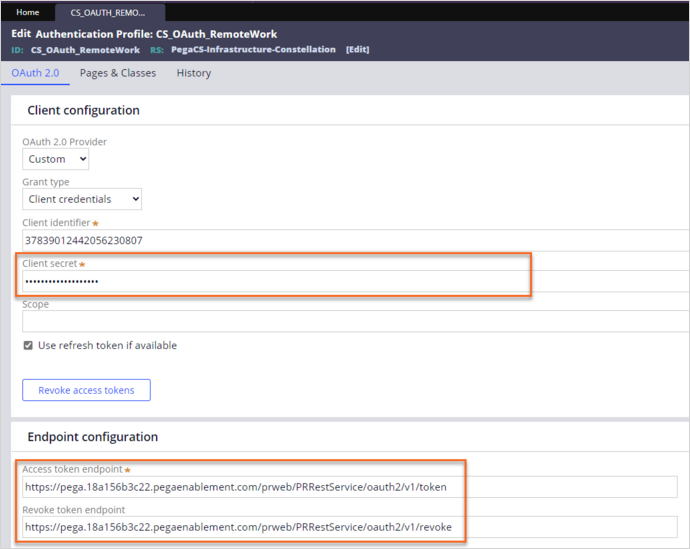
- Click Save.
- In the header of Dev Studio, search for and open the cyRemoteDataViewsURL application settings rule.
- In the Application Settings configuration tab, click Save as, and then click Create and open.
- On the Application Settings configuration tab, on the Settings tab, in the Value per production level section, in the Value field for each of the production levels, enter the URL of Theme UI-Kit application in the following format: https://pega.xxx.pegaenablement.com/prweb.
- Click Save.
6 Optimize the cxRemoteCase property
- In the navigation pane of Dev Studio, click App.
- In the application explorer pane, on the Classes tab, in the search field, enter Service-Work.
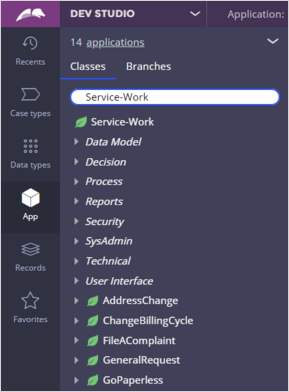
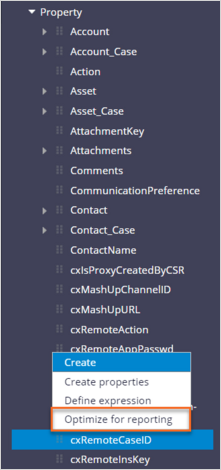
- In the Service-Work class, click Data Model > Property.
- In the list of properties, right-click cxRemoteCaseID, and then select Optimize for reporting.
- On the Property Optimization tab, select the Edu-CSApp-Work-Service group of classes.
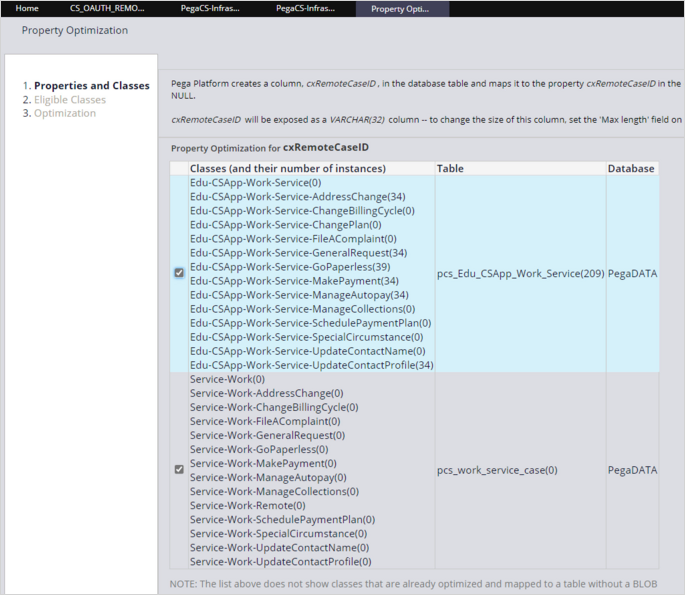
- Click Next twice.
- Click Finish.
7 Add the service request to the Interaction Task Categories
- In the navigation pane of Dev Studio, click Case Types > Interaction.
- Click Settings > Task categories.
- In the Task categories section, in the General row, click the Update category icon.
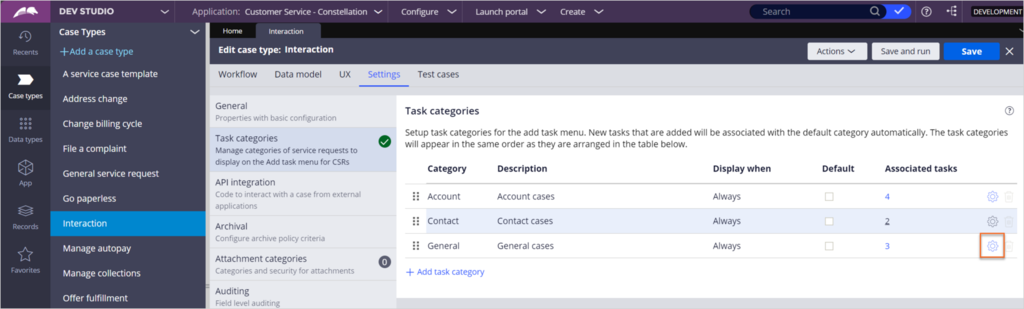
- In the Task category dialog box, in the Associated tasks section, click Add task and select Report lost or stolen card.
- Click Submit.
- Log out of the application.
Confirm your work
- Log in to the Interaction Portal as a Customer Service Representative:
- In the User name field, enter cscsr.
- In the Password field, enter password123!.
- Click + > Demo Pop: Sara Connor, not verified to begin a phone interaction.
- Click Accept to answer the call.
- In the Verify customer section of the composite, select Pass as the outcome of all verification questions.
- Click Add case to display the list of available tasks.
- Select Report lost or stolen card, and then click Submit.
- Verify if the case details render in the UI.
Available in the following mission:
If you are having problems with your training, please review the Pega Academy Support FAQs.
Want to help us improve this content?