
Configuring organization structure
5 Tasks
15 mins
Scenario
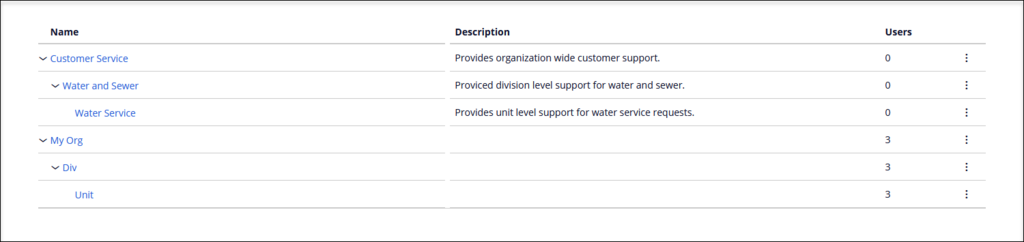
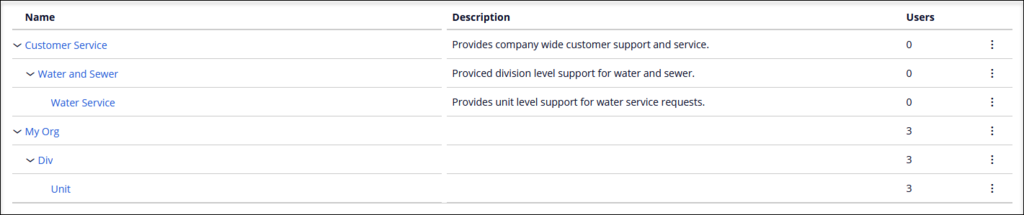
For Phase 2 of the application, a basic organizational structure for MyTown must be set up within Pega Robot Manager™. The structure allows users to complete QA testing with an attended robotic desktop automations (RDA) solution. MyTown has a primary Customer Service department that contains multiple sub-departments, including Water and Sewer and Parks and Recreation. The Water and Sewer sub-department contains another sub-department named Water Service, which allows the routing of work to users that work only on Water Service matters.
Detailed Tasks
1 Add departments
- Log in to the Pega Platform with Operator ID useradmin@mytownrm and password myt0wn@pp2.
- In the left upper corner click arrow next to
- From the Dev Studio header, click to open the Robot Manager portal.
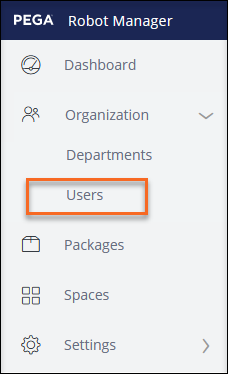
- In the left navigation panel, select Organization > Departments.
- In the Departments tab, click Actions > Add department to add a new top-level department to Pega Robot Manager.
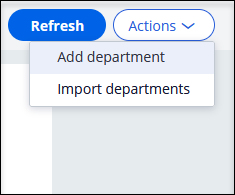
- In the Add new department dialog box, in the Name field, enter Customer Service.
- In the Description field, enter provides organization wide customer support.
- Click Submit to complete the process of adding the new top-level department.

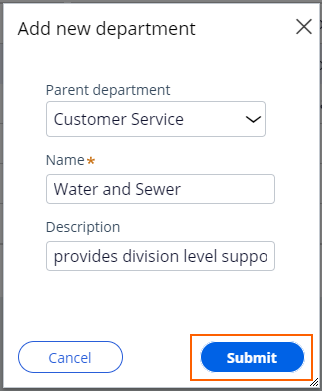
- In the Departments tab, to the right of Customer Service, click the More icon and select Add sub-department.

- In the Add new department dialog box, in the Name field, enter Water and Sewer.
- In the Description field, enter provides division level support for water and sewer.
- Click Submit to add the new sub-department.
- In the Departments tab, to the right of Water and Sewer, click the More icon to add new sub-department.
- In the Add new department dialog box, in the field, enter Water Service.
- In the Description field, enter provides unit level support for water service requests.
- Click Submit to add the sub-department.

- Verify that the Organization structure matches the setup in the following image.
2 Update the Customer Service department description
- In the Departments, to the right of Customer Service, click the More icon and then click Edit to modify the department.

- In the Edit department dialog box, in the Description field, enter provides company wide customer support and service.
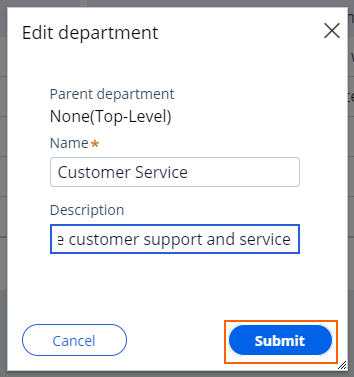
- Click Submit to update the department description.
- Verify that the new description is displayed.
3 Import the MyTown users
- Download the following file for importing a list of users.
MyTown users.zip (297 bytes)
- On your local drive, extract the MyTown users.zip file to a local directory
- In the left navigation panel, click Organization > Users.
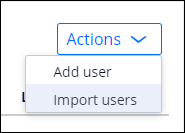
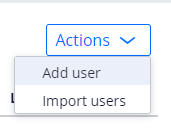
- Click Actions > Import users to add the list of users by using a template file.
- In the Import users dialog box, click Choose File to select the file from step 2 to import into Pega Robot Manager.
- Click Import to add the users in the template file.
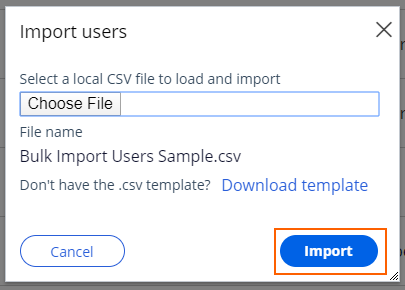
- Click Close to close the Import users dialog box.

- Verify that the additional two users are displayed.

Note: When you click the Download template link, the Import Users dialog box opens the standard template used for importing users. Once open, you can modify the file to include the necessary users for your organization.


4 Add a new user manually
- In the left navigation panel, click Organization > Users to display the Users landing page.
- On the Users landing page, click Actions > Add user to add a new user to Pega Robot Manager manually.
- In First Name field, enter Alex.
- In the Last Name field, enter Smith.
- In the Email address field, enter alex.smith@mytownrm.
- In the Department drop-down, select Water Service.
- In the Role drop-down, select Robot manager administrators.
- Click Submit.

- Verify that new user Alex Smith is displayed in the list of users.

5 Modify user role
- In the left navigation panel, click Organization > Users to display the Users landing page.
- On the Users landing page, click the user Alex Smith.

- On the Alex Smith user details page, click Actions > Edit to modify the user details.

- In the Role field, enter Robot Manager runtime user.
Note: The roles in the dropdown will default to select the option at the top of the list. Please verify the correct role has been selected before clicking Submit
- Click Submit to complete the update.
- Verify that Alex Smith has the Robot manager runtime user role.
Available in the following mission:
If you are having problems with your training, please review the Pega Academy Support FAQs.
Want to help us improve this content?