Configuring Primary Fields for BAs
4 Tasks
10 mins
Scenario
During Directly Capture Objectives (DCO) conversations, business stakeholders revealed that GoGoRoad's CSRs waste valuable time searching for basic information related to assistance requests when answering questions from service providers. As a result, a business requirement of the GoGoRoad project is to ensure that the most relevant Case-related information is always visible when accessing a Case.
As a Pega Business Architect, you propose including the most important fields of the Case in the default Details View of Constellation to satisfy this business requirement. After a conversation with a System Architect, you determine that fields sourced directly from user input should have a Primary designation and display automatically on the Details View. Fields that the system sources from data records should populate the Details View.
User story
As a member of the GoGoRoad Service team, I want the most important Case information related to the service type, customer, service address, and vehicle to be visible at all times during Case processing so that I can respond to Case-related questions more quickly and effectively.
Technical notes documented by the System Architect
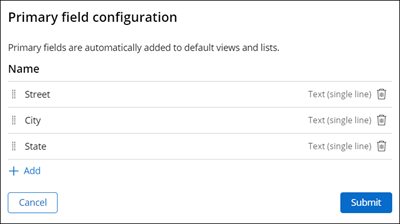
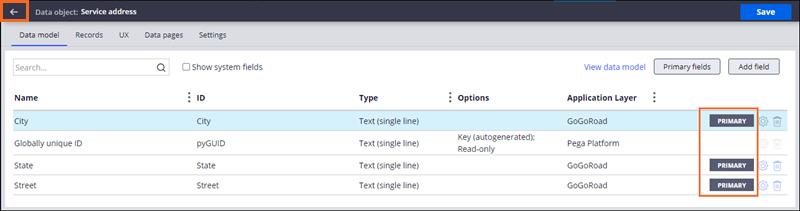
- The Service address data object has the following fields designated as Primary: Street, City, and State
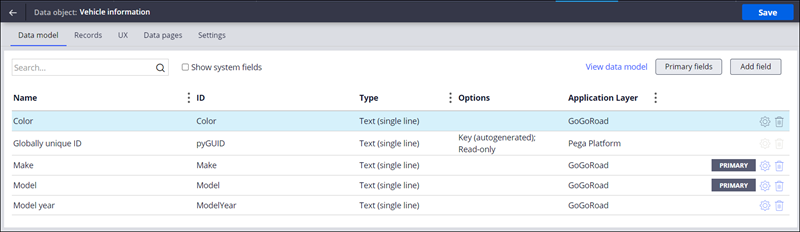
- The Vehicle information data object has the following fields designated as Primary: Make and Model
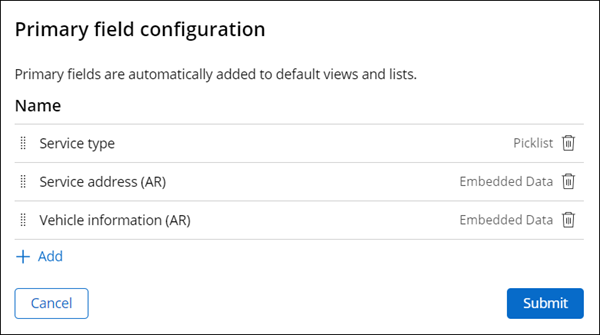
- The Service type field is designated as Primary.
- The Account ID field from the Customer (AR) data relationship field is included in Constellation's Details View.
The following table provides the credentials you need to complete the challenge:
| Role | User name | Password |
|---|---|---|
| Business Architect | author@gogoroad | pega123! |
Challenge Walkthrough
Detailed Tasks
1 Add Primary fields to the Service address data object
- In the Pega instance for the challenge, enter the following credentials:
- In the User name field, enter author@gogoroad.
- In the Password field, enter pega123!.
- In the navigation pane of App Studio, click to access the Data Model of the GoGoRoad application.
- Click Service address to access the fields that are associated with the Service address data object.
- In the upper-right corner of the Service address Data Model, click to access the list of Primary fields associated with the Service address data object.
- In the Primary field configuration dialog box, click .
- In the list of available fields, select City, State, and Street, and then click .
- Drag Street to the top of the list of Primary Fields.
- Click to return to the Service address data object.
- Click to access the list of data objects.
2 Add Primary fields to the Vehicle information data object
- In the list of data objects, click Vehicle information to access the fields associated with the Vehicle information data object.
- In the upper-right corner of the Vehicle information Data Model, click .
- In the Primary field configuration dialog box, click .
- In the list of available fields, select Make and Model, and then click .
- Click to return to the Vehicle information data object.
- In the upper-right corner, click to save your work.
3 Configure the Assistance Request Case Type Primary fields
- In the navigation pane of App Studio, click Case Types > Assistance Request to display the Assistance Request Case Life Cycle.
- In the Assistance Request Case Life Cycle, click the Data model tab.
- In the upper-right corner, click to access the list of Primary fields associated with the Assistance Request Case Type.
- In the Primary field configuration dialog box, click the Remove icon to remove the Label field from the list of Primary Fields.
- Repeat step 4 to remove the Description field from the list of Primary Fields.
- In the Primary fields configuration dialog box, click to add a new field to the list of Primary Fields.
- In the list of available fields, select Service address (AR), Service type, and Vehicle information (AR), and then click .
- Drag Service type to the top of the list of Primary Fields.
- Click .
4 Configure the Details View
- In the Assistance Request Case Life Cycle, click the UX tab.
- On the right of the UX tab, click the tab.
- In the Partial section, click Details to access the Details View.

- In the Edit View: Details window, in Region A, click Add > Views > Primary fields, and then click .
- In the Edit View: Details window, in Region A, in the Primary fields row, click the icon.
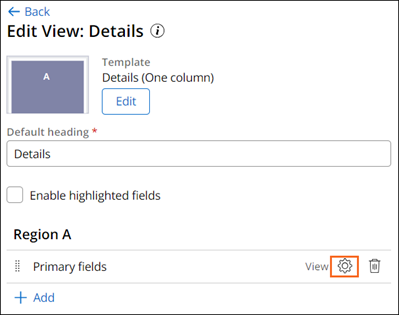
- Clear the Show heading checkbox, and then click .
- In Region A, click Add > Fields > Customer (AR), then click .
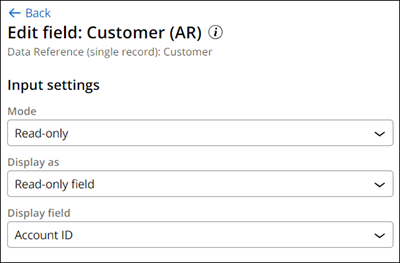
- In Region A, click Customer (AR).
- In the Edit field: Customer (AR) window, in the Display field list, select Account ID.
- Click Back to return to the Edit View: Details window.
- Drag the Customer (AR) data reference field above the Primary fields View.
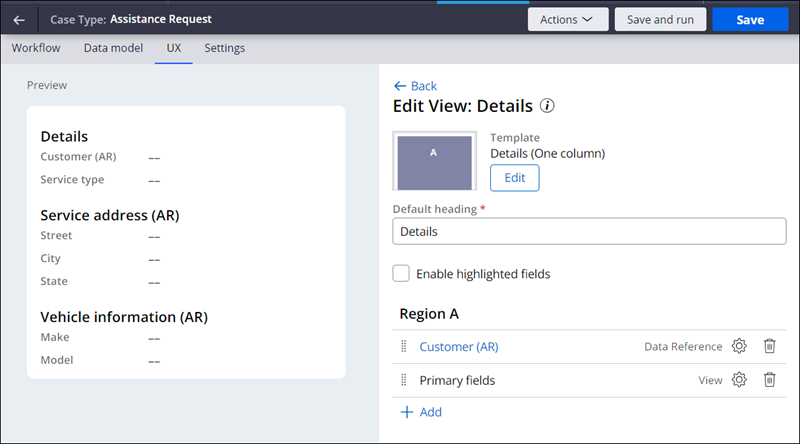
- In the upper-right corner, click .
Confirm your work
- In App Studio, click to create a new Assistance Request Case.
- In the Identify issue Step, select a service type, and then click .
- In the Identify customer Step, select a Customer ID, and then click .
- In the Identify location Step, enter values in the Street, City, and State fields, and then click .
- In the Identify vehicle Step, enter values in the Make and Model fields, and then click .
- Confirm that the information you have entered is displayed in the Details View in the Web Portal.

This Challenge is to practice what you learned in the following Module:
Available in the following mission:
If you are having problems with your training, please review the Pega Academy Support FAQs.
Want to help us improve this content?