Configuring a web chatbot
Archived
5 Tasks
20 mins
Scenario
The business wants to let customers open an account by using web chatbot. The chatbots can handle this type of request and allow agents to focus on other customer issues. If needed, a chatbot session can be transferred to an agent.
Use the following credentials to log in to the exercise system:
|
Role |
Username |
Password |
|
System Architect |
casysadmin |
rules |
Your assignment consists of the following tasks:
Task 1: Create a parallel flow for the Add a new account service case.
Task 2: Configure the conversation for the chatbot.
Task 3: Configure a web chatbot channel to recognize when someone wants to open an account.
Task 4: Build the conversation as follows:
|
Customer: I would like to open an account in the bank. Chatbot: Select the type of account you want to open:
Chatbot: Let me get some of your personal details. What is your full name? Chatbot: Please select your gender:
Chatbot: Please select your Date of Birth. Chatbot: What is your mobile number? (Please provide a valid phone number e.g. +91-9984124753) Chatbot: Enter your email address: (Please provide a valid email address e.g. [email protected]) Chatbot: Great. We have all the information we need. Our customer service agent will contact you with more information. Customer: Thank you! Chatbot: You’re welcome! |
Challenge Walkthrough
Detailed Tasks
1 Create a parallel flow
- Log in to the exercise environment with operator ID casysadmin using password rules.
- Click Case types, then click Add a new account to open the service case.
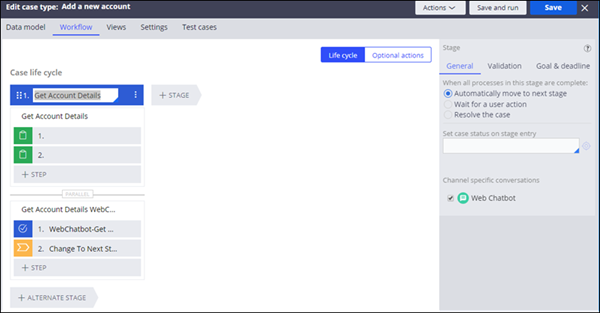
- In the case workflow, select the Get Acccount Details stage.
- In the Stage configuration panel to the right, select Web Chatbot and click Save. A parallel process for the web chatbot is added to the workflow.
2 Configure the conversation for the chatbot
- In the case life cycle, select the WebChatbot-Get Account Details step.
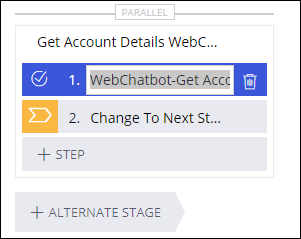
- In the step configuration panel to the right, click Open process.
- Click Check out to add questions to the flow.
- Right-click (on the canvas) and select Add > Automations > Question Shape to add a question shape to the flow.
- Double-click the new shape to open the configuration panel. In the Subprocess field, add a name for the question: Account Type.
- Add a name for your Question rule: Accounttype
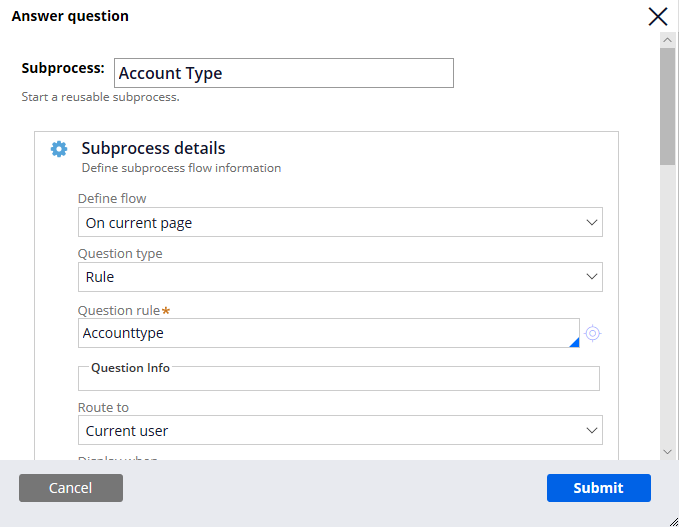
- Click the Crosshairs for the Question rule to create and configure the question.
- In the Context section page, enter the following information:
- Context: Customer service
- Add to ruleset: PegaCS-Sample
- Version: 08-03-02
- Click Create and open.
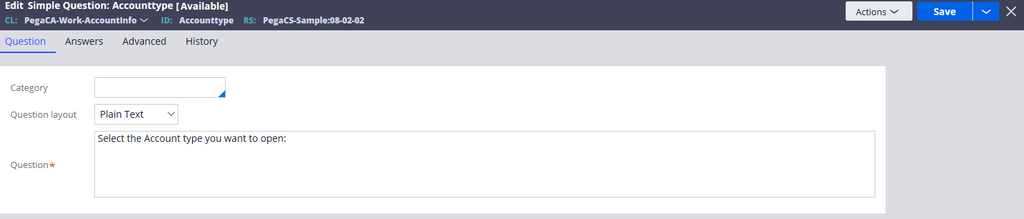
- Configure the Question section by using the following information:
- In the Question layout drop-down list, select Plain Text to use a plain text response without any dynamic data.
- In the Question, enter Select the type of account you want to open:
- Configure the Answers section by using the following information:
- In the Answer mode drop-down list, select Dropdown menu. The Dropdown Menu pauses the conversation and waits for the user to enter an answer.
- In the Map answer to property, enter or select the case property .AccountType to which the user's answer should be mapped.
- In the Display value fields, enter the values shown below: (Use the Plus icon to create additional conditional values.)
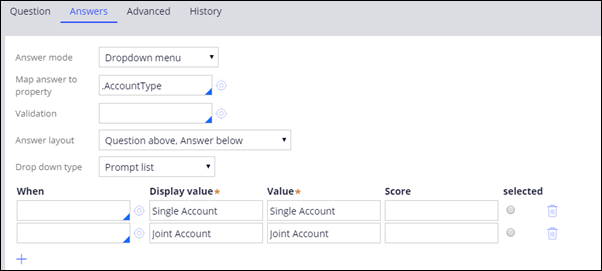
- Click Save.
- Go back to the GetAccountDetails tab, then click Submit to save the changes.
- Connect the configured questions to the flow.

3 Build the conversation
- Right-click (on the canvas) and select Add > Automations > Question Shape to add another question to the flow.
Question: Let me get some of your personal details. What is your full name?
- Repeat the steps 5-14 from the previous section using the data in the following steps.
- From the Answer mode drop-down list, select Freeform. This Freeform pauses the conversation and waits for the user to answer without any restrictions.
- In the Map answer to property, enter or select .Name.
- From the Format drop-down list, select Text.
- Click Save.
- Go back to the GetAccountDetails tab and click Submit to save the changes.
- Connect the configured question to the flow.
- Repeat the steps 5-14 for the Gender question below:
Question: Please select your gender:
Answer: For Answer mode, use Radio buttons; map answer to property .Contact.Gender; enter three Display values: Male, Female, Other.
- Repeat the steps 5-14 for the Date of Birth (DOB) question below:
Question: Please select your Date of Birth.
- In the Answers mode, select Freeform from the drop-down list.
- In the Map answer to property, select .Contact.DateOfBirth property.
- In the Format, select Date to allow the customer to select the date from the calendar.
- Click Save.
- Go back to the GetAccountDetails tab and click Submit to save the changes.
- Connect the configured question to the flow.
- Repeat the steps 5-14 for the following questions:
Question: What is your mobile number?
Please provide a valid phone number e.g. +91-9984124753
Answer: Map answer to property: .Contact.MobilePhone
Question: Enter your email address:
Please provide a valid email address e.g. [email protected]
Answer: Map answer to property: .Contact.Email
Question: Great. We have all the information we need.
Our customer service agent will contact you with more information.
Answer: Map answer to property: .WrapUpComments
When completed the flow should look similar to:
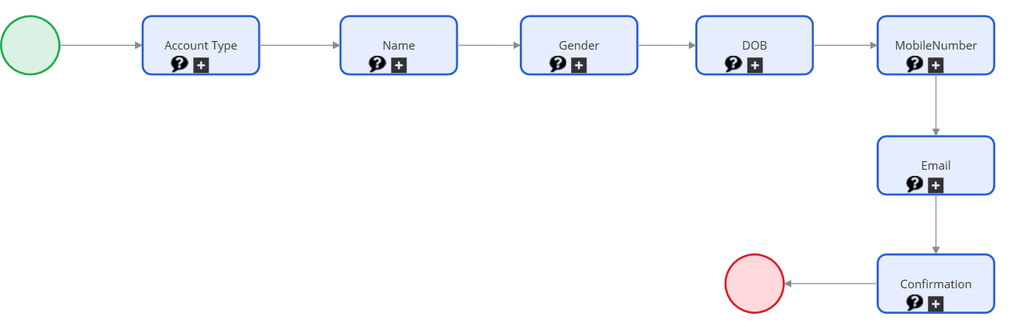
- Click Save to update the case.
- Click Check-in, add a comment (for example “Build out open account conversation”), then click Check-in. Now that you have successfully configured the parallel process for the webchat channel, you need to add the parallel process to your channel.
- Go back to the Add a new account tab (or open the Add a new account case type) and click Save.
4 Create a web chatbot channel
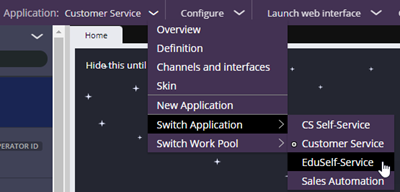
You create a web chatbot channel in the EduSelf Service application and configure the channel to use the Add new account chatbot conversation.
- Click Application > Switch Application > EduSelf Service to access the Edu Self Service application where you create a web chatbot.
- Click Application > Channels and interfaces to configure a web chatbot.
- In the Create new channel interface section, click the Web Chatbot icon.

- In the Configuration tab, enter a name for the Channel interface name.
- Click + Add case type to configure a new case type for the chatbot.
- Configure the Response for the case type as follows:
- Case type = Add a new account
- Create case command = Open an account
- Configure the Text analysis section as follows:
- Approximate match = open, create, account
- Click Submit to update the configuration.
- Click the Connection, then click the down arrow in the Template operator field and select CASysadmin.
- In the upper-right corner, click Save to update your chatbot configuration.
5 Verify your work
Test your chatbot in the preview console in the Configuration tab. Enter I would like to open an account. Doing so triggers your case. Verify that you are asked the questions you configured.