Creating and testing personas in Customer Decision Hub
3 Tasks
15 mins
Scenario
U+ Bank is cross-selling on the web by offering credit-card offers to its customers. The bank wants to investigate whether customer groups that are represented by personas receive appropriate, tailor-made offers. The business team wants to create and test personas in Customer Profile Viewer to verify this action.
Use the following credentials to log in to the exercise system:
| Role | User name | Password |
|---|---|---|
| Decisioning Architect | DecisioningArchitect | rules |
Your assignment consists of the following tasks:
Task 1: Create a persona from an existing customer
Create a new persona, Troy, based on the customer Troy profile. This persona represents a group of customers with the same or similar customer properties as Troy.
Note: Use the Persona Management landing page to create the Troy persona.
Task 2: Create a new channel context
Create a new channel context. The following table provides the information you need to create the channel context:
|
Name of the field to complete |
Input |
|
Direction |
Inbound |
|
Channel |
Web |
|
Real-time container |
TopOffers |
Note: Use the Persona Management landing page to create the Web Inbound channel context.
Task 3: Test the newly created persona in Customer Profile Viewer
Use the Explain filtering by feature option in Customer Profile Viewer to test the eligibility conditions for your persona.
Challenge Walkthrough
Detailed Tasks
1 Create a persona from an existing customer
- On the exercise system landing page, click Pega InfinityTM to log in to Pega Customer Decision HubTM.
- Log in to Customer Decision Hub as a Decisioning Architect:
- In the User name field, enter DecisioningArchitect.
- In the Password field, enter rules.
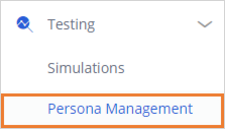
- In the navigation pane of Customer Decision Hub, click Testing > Persona Management to open the Configuration landing page.
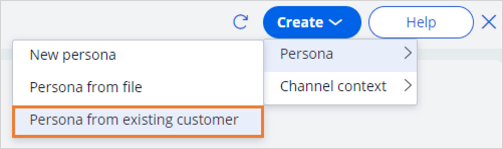
- On the Configuration landing page, click Create > Persona > Persona from existing customer to create a new persona based on the profile of the existing customer.
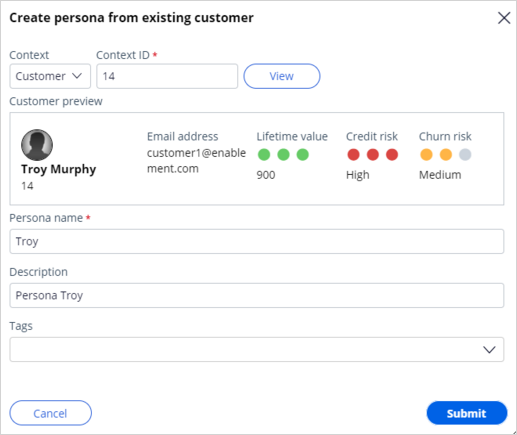
- In the Create persona from existing customer window, complete the following details:
- In the Context list, ensure that Customer is the active selection.
- In the Context ID field, enter 14.
- Click View to see the account details for Troy.
 Note: Each customer has a unique ID number. The ID number for Troy Murphy is 14.
- Complete the following details about the persona:
- In the Persona name field, enter Troy.
- In the Description field, enter Persona Troy.
- Click Submit.
- If the newly created persona does not automatically display on the Persona Management landing page, click the Refresh icon.

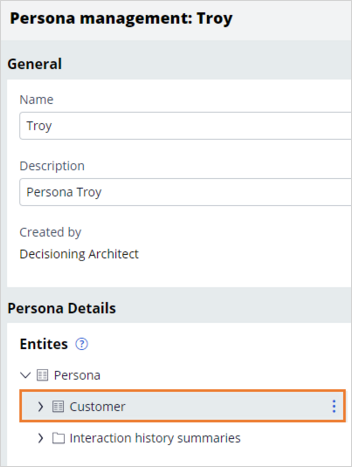
- Click Troy to open the persona.
- On the Persona management: Troy page, in the upper-right corner, click Edit.

- In the Persona Details/Entities section, click Customer to open customer properties.
- Check the following properties for Troy:
- Ensure that the value of the Debt-to-Income ratio field is 45.
- Ensure that the value of the Is financially vulnerable field is true.
- Ensure that the value of the Relationship length in days field is 88.
- In the General section, enter the following Tags for Troy, and then press the Enter key to input the tags: new_customer, financially_vulnerable, low_debt
 Note: Tags are the labels that you add to personas for identification and easier searching. Tags for Troy are based on the customer properties of the Troy customer, and they take into consideration engagement policy rules. The new_customer tag means that Troy has been a customer of the bank for less than or equal to 90 days. Financailly_vulnerable means that Troy does not meet the suitability condition Is financially vulnerable=false. Low_debt means that the Debt to income ratio for Troy is less than or equal to 48.
- Click Save to save the changes.
2 Create a new channel context
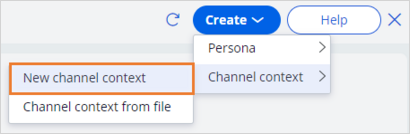
- On the Persona Management landing page, click Create > Channel context > New channel context to create a new channel context.
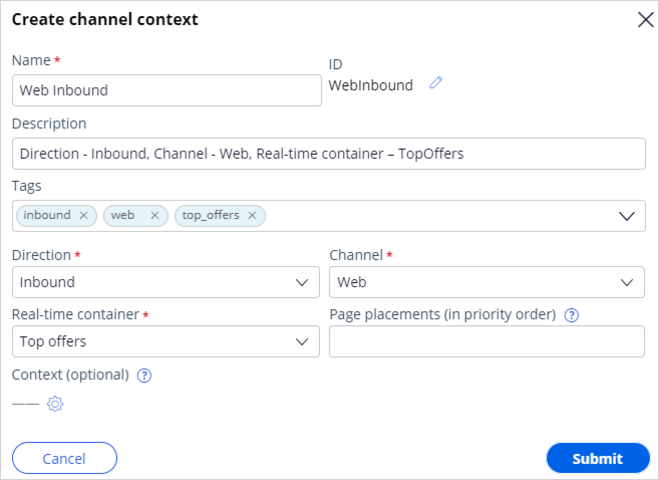
- In the Create channel context window, complete the following details:
- In the Name field, enter Web Inbound.
- In the Description field, enter Direction - Inbound, Channel - Web, Real-time container – TopOffers.
- In the Tags field, enter Inbound, Web, Top_offers.
- In the Direction list, select Inbound.
- In the Channel list, select Web.
- In the Real-time container list, select Top offers.
- Click Submit.
- Click the Channel Context tab to see the newly created channel context.

3 Test the newly created persona with the filter-testing feature
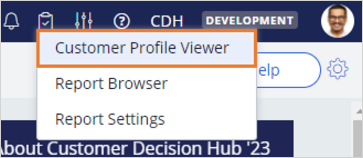
- In the upper-right corner of Customer Decision Hub, click the Reports icon, and then select Customer Profile Viewer.
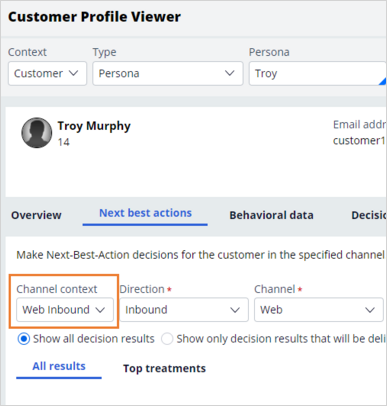
- In the Customer Profile Viewer, complete the following details:
- In the Type list, select Persona.
- In the Persona list, enter or select Troy, and then click View.

- In the Persona Troy profile, click Next best actions tab.
- On the Next best actions tab, in the Channel context list, select Web Inbound.
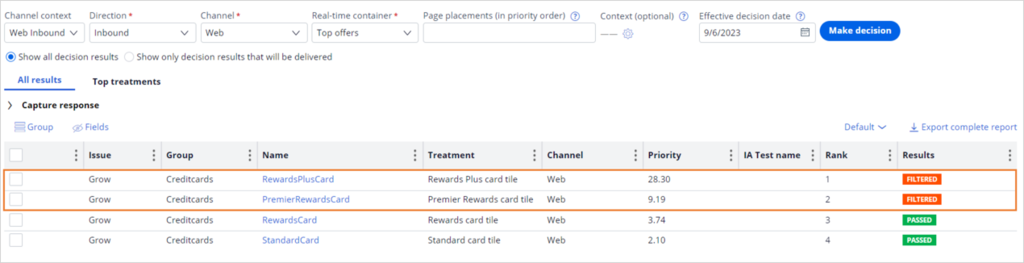
- Click Make decision to see the testing result table.
- In the table, observe that the system filtered two out of four credit cards for Persona Troy.
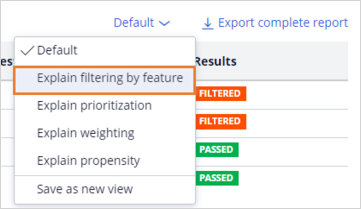
- Click Default > Explain filtering by feature to check the reason behind filtering out the two actions.
- Observe that the suitability rule excludes two actions.
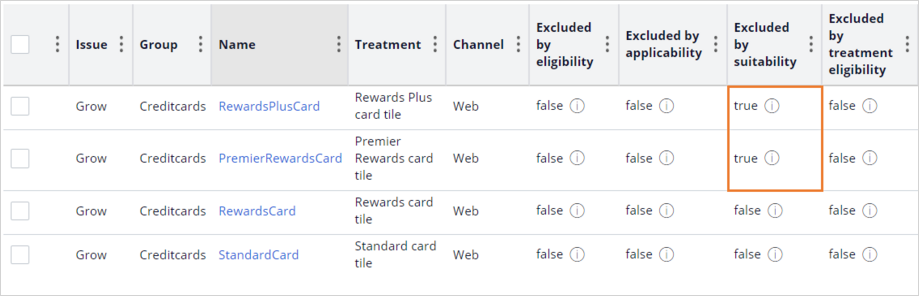
- In the table, in Excluded by suitability column, click the Information icon next to the true label to check the suitability explanation.
- In the Suitability explanation window, notice the reason behind excluding particular actions for a customer.
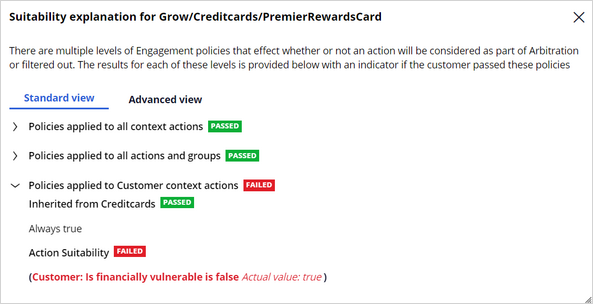 Note: The Explain filtering by feature option presents reasons why a rule excludes a particular action and does not display the action to a customer. Actions can run because of engagement policies, suppression rules, missing treatment, no active channel, and so on. In this case, two actions are excluded because of the suitability rule. The Premier Rewards and Rewards Plus credit cards use the Is financially vulnerable=false suitability rule. The Troy persona is financially vulnerable. As a result, this persona is unsuitable to receive Premier Rewards and Rewards Plus cards.
This Challenge is to practice what you learned in the following Module:
Available in the following mission:
If you are having problems with your training, please review the Pega Academy Support FAQs.
Want to help us improve this content?