Creating a child case
2 Tasks
10 mins
Scenario
InsCorp is launching a roadside assistance service as a coverage option for automobile insurance policies. Configure the Assistance request Case Type to create a Service Case during the Service Stage to perform the selected services.
Note: The framework of this challenge uses the Constellation architecture of Pega Platform™. To practice this challenge on the Traditional UI architecture, see the Creating a child case version 8.8 challenge.
The following table provides the credentials you need to complete the challenge.
| Role | User name | Password |
|---|---|---|
| Application Developer | author@gogoroad | pega123! |
Note: Your practice environment may support the completion of multiple challenges. As a result, the configuration shown in the challenge walkthrough may not match your environment exactly.
Challenge Walkthrough
Detailed Tasks
1 Create a Service Case as a child Case
- In the Pega instance for the challenge, enter the following credentials:
- In the User name field, enter author@gogoroad.
- In the Password field, enter pega123!.
- In the navigation pane of App Studio, click Case Types > Assistance Request to open the Assistance Request Case Type.
- Hover over the Service Stage, and then click More > Add Process > New Process.

- In the new Process field, enter Create Service Case.
- Under the Create Service Case Process, click Step to create a new Step in the Stage.
- Click More > Automations > Create Case, and then click Select to add the Create Case Step to the Process.

- In the Create Case Step, enter Create Service Case to replace the default text.
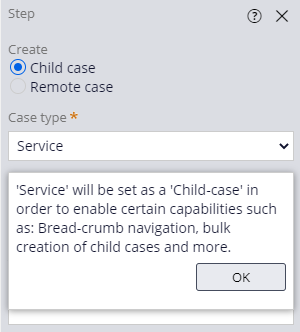
- In the contextual properties pane on the right, in the Case Type list, select Service to create a Service Case, and then click OK.
- Click Transfer information to new Case to display the Transfer information window.
- Select Customer ID, Service address, Vehicle information.
- Ensure that the Add mapped fields to 'Assistance Request Info' View (in 'Service' Case Type) check box is selected.
- Click OK to dismiss the Transfer information window.
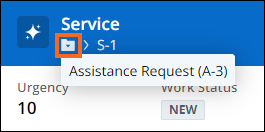
- On the Service (1) Step, click the delete icon to delete the Step. Ensure that the Service Stage matches the following image:

- Click Save to save the Assistance Request Case Life Cycle.
2 Configure the Service Case Type
- In the navigation pane of App Studio, click Case Types > Service to open the Service Case Type.
- Click Confirm request details, and then in the contextual properties pane on the right click Configure View.
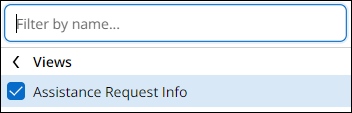
- In the Fields section, click Add > Views to display a list of Views.
- Click Assistance Request Info, and then Add.
- Click Submit to submit the changes to the Confirm request details View.
- Click the Settings tab to open the Service Case Type properties.
- In the General section, under Availability, confirm that the Make available for adding to create menu check box is cleared to disable Service Case creation in the create menu.

- Click Save to save the Service Case Type.
Confirm your work
- In the App Studio header, click to preview the application.
- In the navigation menu on the left side of the Web Portal, click Create and confirm the Service Case is not displayed.

- Click Assistance Request to create a new Assistance Request Case.
- Advance the Case to the Resolution Stage, and make note of the Assistance Request Case ID.
Note: In the Service Stage, if you see the error Create Child Case: The class of the child work object is not specified, open the Assistance Request Case Type, confirm that the Service Case is selected in the Create Service Case Step, and then save and run the Assistance Request Case Type.
- In the Review service summary View click Advance this Case to resolve the Assistance Request Case.
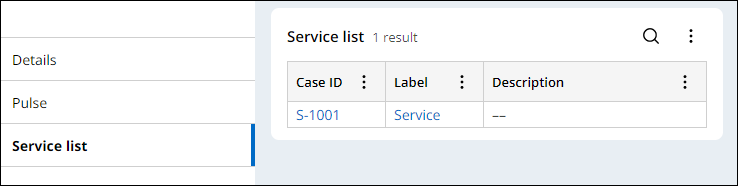
- Optional: In the left pane, click the Service list tab to display a list of child Cases.
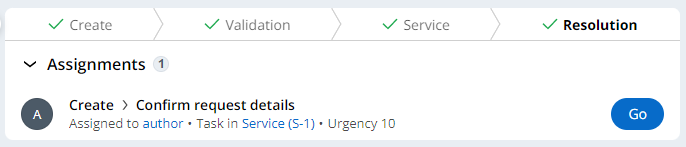
- In the Assignments section of the Case, to the right of the Confirm request details Assignment, click Go.
- In the Confirm request details View, click Submit.
- To the right of Service Case ID, click the Links to see the relationship between the parent Case and the child Case.
- Confirm that the previously noted Assistance Request Case ID is displayed.
This Challenge is to practice what you learned in the following Module:
Available in the following missions:
If you are having problems with your training, please review the Pega Academy Support FAQs.
Want to help us improve this content?