RoboticBanking-ExpenseTracker-Start.zip
(198.95 KB)
Creating an expense tracker using MS Office connectors
5 Tasks
30 mins
Scenario
The Robotic Banking company provides an expense tracker functionality that collects all spending for predefined categories, creates an Excel report, formats it, and saves it to a PDF file.
Complete the following tasks:
- Create an automation that handles a user request for expense tracking.
- Fill in an Excel spreadsheet with data for pre-defined categories.
- Format the spreadsheet using the Excel Connector.
- Save the report as a PDF file.
Note: Some automation and elements of the Globals tab have already been created in the starting project or included in automations for this exercise. The Windows Form was also created, to trigger the RequestExpenseReport automation.
Challenge Walkthrough
Detailed Tasks
1 Create a RequestExpenseReport automation that handles an operator request for expense tracking
- Download the Expense Tracker Challenge project:
- Save the file to your desktop and unzip the file to extract the project folder to your C:\Users\<username>\Documents\Pega Robot Studio\Projects\.
- On the Home screen in Pega Robot Studio, click Open Project, and then navigate to the projects folder and open RoboticBanking.pegaproject.
Note: The starter project includes a configured BankerInsight application. The value of the Path field must match the location of BankerInsight on your local computer for the project to function properly. In the BankerInsight application, change the value of the Path to the location of your BankerInsight application.
- In the Project Explorer, in the Expense tracker folder, open the RequestExpenseReport automation.
- On the automation surface, click and drag the gray dot that represents the output automation link to open the Toolbox dialog box.
- In the Toolbox dialog box, in the search field, enter InputBox.
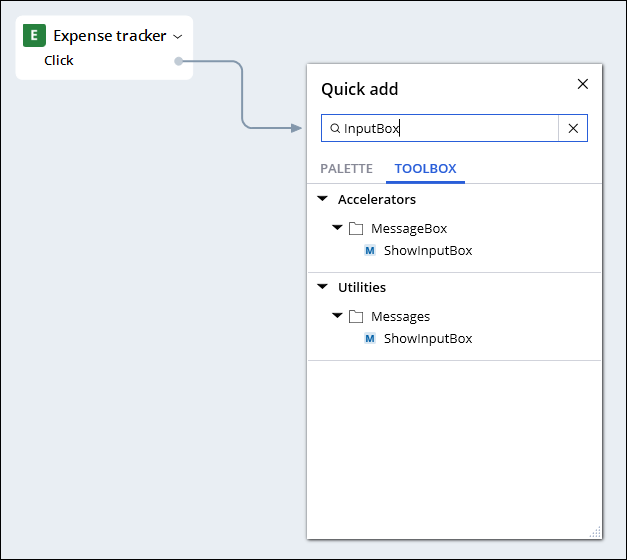
- In the Toolbox dialog box, in the Accelerators section, double-click the ShowInputBox method to add it to the automation surface.
Note: The ShowInputBox method is also listed in the Utilities section of the toolbox. This method is the same in both locations and is listed in multiple locations for convenience.
- Configure the InputBox variables with the following values by clicking each parameter name on the design block:
Variable Value Message Insert a customer ID
Title Expense tracking request
Default value
1234500078963456

- On the Palette, in the Automations section, drag the PrepareAppAndData automation to the design surface to open a Select action dialog box.
- In the Select action dialog box, select the Run method and then click to add a sub-automation to the automation surface.
Note: The PrepareAppAndData automation logs into the BankerInsight application, searches for a customer with a given customerId, and prepares default expense categories. Open the automation in Project Explorer to see more details.
- On the Palette, in the Globals section, drag the Categories Lookup Table to the automation surface to open a Select action dialog box.
- In the Select action dialog box, select the GetKeys method and then click to add it to the automation surface. The GetKeys method returns all tracing categories saved in the Lookup Table.
- In the Toolbox dialog box, in the search field, enter ListLoop.
- In the list of filtered results, drag List Loop to the automation surface.
- On the automation surface, connect the links as shown in the following example:

- Save the automation.
2 Add an Excel Connector to the project.
- Click the Project tab to open the Project Explorer.
- In the Project Explorer, click and open the Globals tab.
- In the Toolbox dialog box, in the search field, enter Excel to find ExcelConnector.
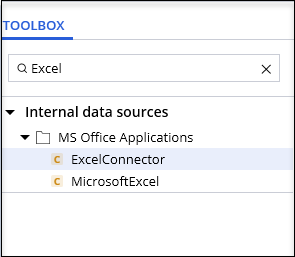
- Drag ExcelConnector to the Globals tab to add it to the project.
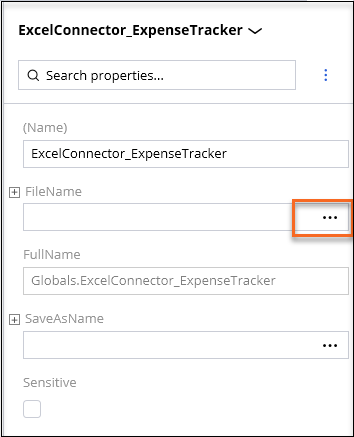
- On the Property Grid, change the name of ExcelConnector to ExcelConnector_ExpenseTracker.
- On the Property Grid, in the FileName property, click the icon to select a template Excel file.
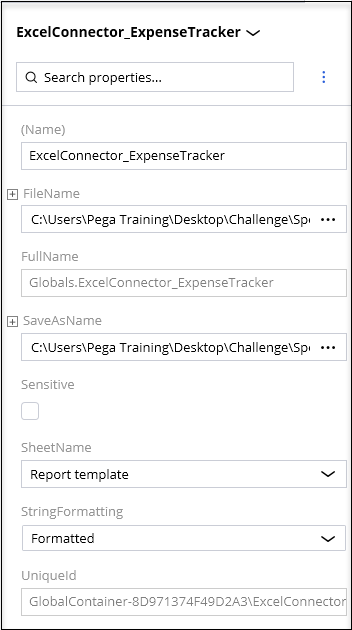
- in the Open dialog box, navigate to: C:\Users\<username>\Desktop\RobotStudioChallengeAssets, and select SpendingsReport file.
- On the Property Grid, in the SaveAsName property, click the icon to select the Excel file that stores the report.
- In the Open dialog box, navigate to: C:\Users\<username>\Desktop\RobotStudioChallengeAssets, and select SpendingsReport file.
- On the Property Grid, set the SheetName property to Report template.
- Save the changes on the Globals tab.
3 Update the AddAmountsToExcel automation that finds each category transaction and saves the amount to the excel file.
- Click the Project tab to open the Project Explorer.
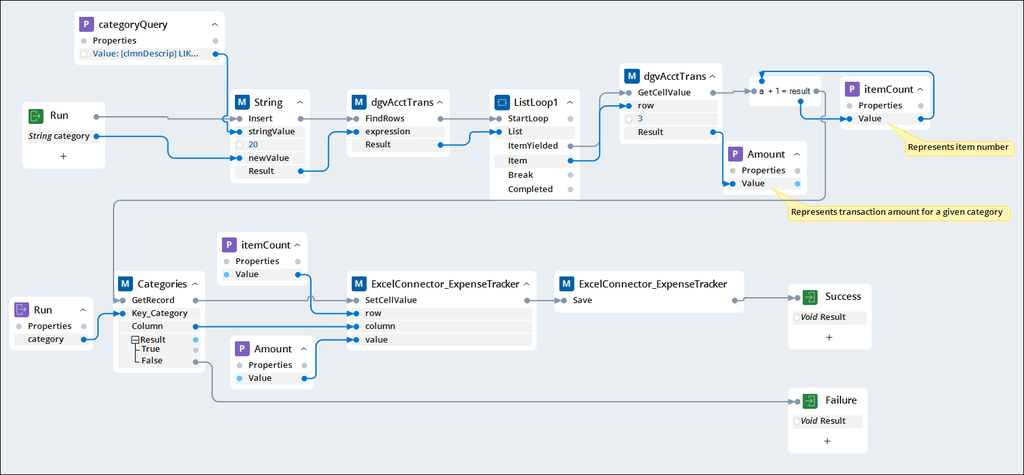
- In the Project Explorer, click and open the AddAmountsToExcel automation. The AddAmountsToExcel automation loops through transaction amounts for a given category.
- On the Palette, in the Globals section, drag ExcelConnector_ExpenseTracker to the automation surface to open the Select action dialog box.
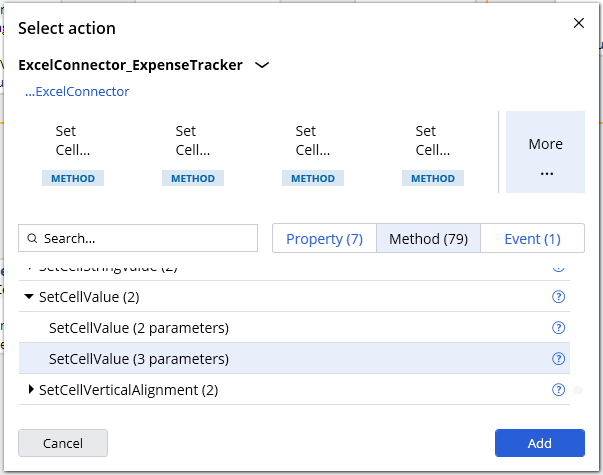
- In the Select action dialog box, in the search field, enter SetCellValue.
- In the list of search results, click the arrow to expand the functions group.
- In the Select action dialog box, select the SetCellValue (3 parameters) method and then click to add it to the automation surface.
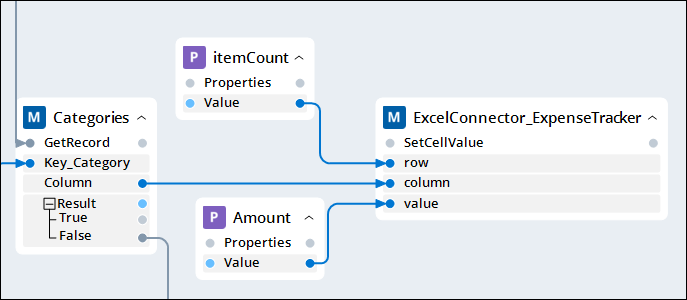
- On the Palette, in the Locals section, drag the itemCount variable to the automation surface to open the Select action dialog box.
- In the Select action dialog box, add the Value property to define a row for the amounts in the expense report.
- Repeat steps 7-8 to define the Value property for the Amount variable for the expense report.
- On the automation surface, connect the links as shown in the following example, to fill in the expense report:
- On the Palette, in the Globals section, drag the ExcelConnector_ExpenseTracker to the automation surface to pen the Select action dialog box.
- In the Select action dialog box, select the Save (no parameters) method, and then click to add it to the automation surface to save the changes made in the Excel file.
- On the automation surface, connect the links as shown in the following example:
Note: Keep in mind the dgvAcctTrans design block contains all of a specific customer’s transactions made using Robotic Banking.
- Save the automation.
4 Create the EditTrackingReport automation to format the expense report.
- Click the Project tab to open the Project Explorer.
- In the Project Explorer, click and open the EditTrackingReport automation.
- On the Palette, in the Globals section, drag ExcelConnector_ExpenseTracker to the automation surface to open the Select action dialog box.
- In the Select action dialog box, select the SetRowHeight method and then click to add it to the automation surface.
- Configure the SetRowHeight variables with the following values to create the report header. Click each parameter name on the design block to change its value.
Variable Value row 1 height 50 - On the Palette, in the Globals section, drag the ExcelConnector_ExpenseTracker item to the automation surface to open the Select action dialog box.
- In the Select action dialog box, select the SetCellBackgroundColor (2 parameters) method and then click to add it to the automation surface.
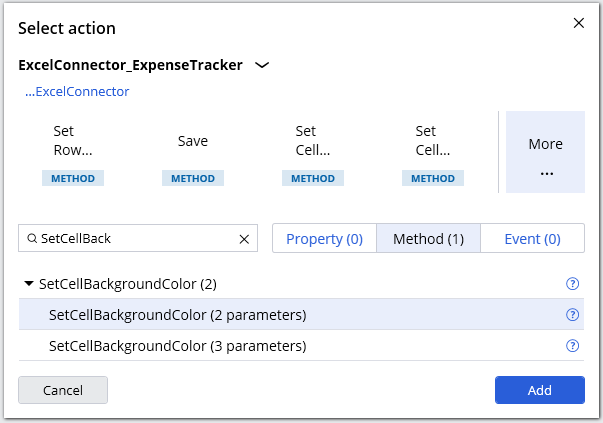
- Click inside each of the SetCellBackgroundColor variables to set the values with the following to format the report header:
Variable Value address A1 color 255, 128, 0 (select orange) - On the Palette, in the Globals section, drag the ExcelConnector_ExpenseTracker to the automation surface to open the Select action dialog box.
- In the Select action dialog box, select the SetCellStringValue (2 parameters) method and click to add it to the automation surface.
- Configure the SetCellStringValue variables with the following values to format the report header:
Variable Value address A1 value Expense tracking report - On the Palette tab, in the Globals section, drag the ExcelConnector_ExpenseTracker to the automation surface to open the Select action dialog box.
- In the Select action dialog box, select the Calculate (no parameters) method and click to add it to the automation surface to save the changes made in the Excel file.
- Repeat steps: 12-13 to add the Save method to the design surface.
- On the automation surface, connect the links as shown in the following example:
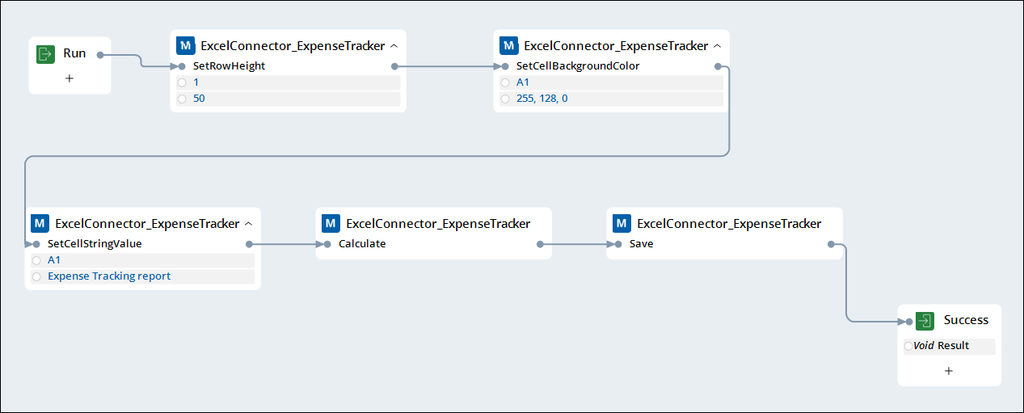
- Save the automation.
5 Update the RequestExpenseReport to use EditTrackingReport automation and to save the expense tracking report as PDF.
- Click the Project tab to open the Project Explorer.
- On Project Explorer, click and open the RequestExpenseReport automation.
- On the Palette, in the Automations section, drag the AddAmountsToExcel application to the automation surface to open the Select action dialog box.
- In the Select action dialog box, select the Run method and then click to add a sub-automation to the automation surface.
- Repeat steps 3-4 to add the EditTrackingReport automation to the automation surface.
- On the Palette, in the Globals section, drag ExcelConnector_ExpenseTracker to the automation surface to open the Select action dialog box.
- In the Select action dialog box, select the SaveToPDF (1 parameter) method and then click to add it to the automation surface to save the changes made in the Excel file as a PDF file.
- In the fileName parameter of the SaveToPDF method, enter C:\Users\<username>\Desktop\RobotStudioChallengeAssets\ExpenseTracking.pdf
- On the Toolbox, in the search field enter Toast and then add the Toast Notification to the automation surface.
- In the message parameter of the ToastNotification, enter Report saved to PDF.
- On the automation surface, connect the links as shown in the following example:

- Save the automation.
Confirm your work
- Click the Project tab to open the Project Explorer.
- In the Project Explorer, in the Expense tracker folder, open the RequestExpenseReport automation.
- Click the green Test button, and the blue Test button on the window to begin running the automation.
- On the displayed Design Form, click: Expense Tracker to trigger an automation.

- In the Expense tracking request dialog box, select .
- Wait till the Report saved to PDF toast notification displays.
- Select the Stop button in the toolbar to stop testing the automation.
- Open the created PDF file: C:\Users\<username>\Desktop\RobotStudioChallengeAssets\ExpenseTracking.pdf
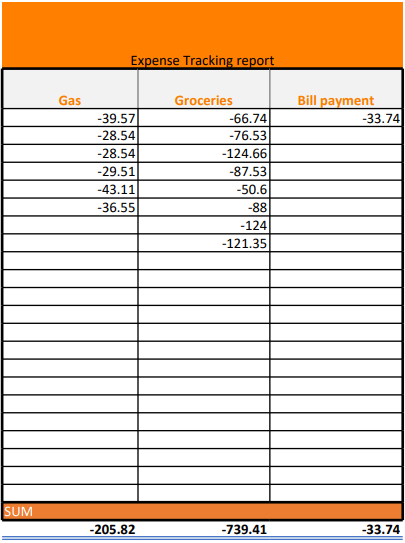
- Ensure the report is filled in and formatted like in the example below:
Note: If you run into issues while executing the project, revert the Excel file to the original version to prevent overwriting issues.
This Challenge is to practice what you learned in the following Module:
Available in the following mission:
If you are having problems with your training, please review the Pega Academy Support FAQs.
Want to help us improve this content?