Creating a new service request
4 Tasks
10 mins
Scenario
U+ Bank wants to offer its employees lunch services by creating a service request in which employees can select and then submit what they want to eat. In the request, employees can select the type of sandwich, sandwich toppings, and a beverage.
Use the following credentials to log in to the exercise system:
| Role | User name | Password |
|---|---|---|
| CS Administrator | CSAppAdmin | password123! |
| Customer Service Representative | CSCSR | password123! |
Your assignment consists of the following tasks:
Task 1: Create a new case type
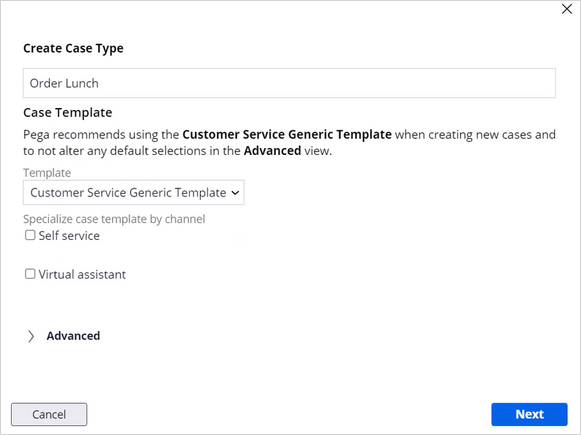
In App Studio, create a new case type named Order Lunch that uses the Customer Service Generic Template.
Task 2: Add properties to the data model
Add fields for Sandwich, Toppings, and Drink to the data model.
Task 3: Update the case views
Update the Case input and the Review of intake case views of the UX to add fields for the case.
Task 4: Add the case to the Interaction Task Categories
Ensure the case can be launched from the Interaction case type.
Challenge Walkthrough
Detailed Tasks
1 Create a new case type
- On the exercise system landing page, click Pega Infinity™ to log in to App Studio.
- In the Username field, enter CSAppAdmin.
- In the Password field, enter password123!.
- In the navigation pane of App Studio, click Control Panel > Case types to open to the Case Type Explorer.
- On the Case types landing page, in the upper-right corner, click New to create a new case type.
- In the Case type name field, enter Order Lunch.
- Expand Case Template to view the Template list.
- In the Template list, select Customer Service Generic Template.
- Click Next to create the new case.
2 Add properties to the data model
- On the case type, click the Data model tab to view the properties of the case type.
- In the upper right, click Add field to add a new property to the case type.
- In the Add field to Order lunch dialog box, in the Field name field, enter Sandwich.
- In the Type list, select Text (single line), and then click Submit & add another.
- Repeat steps 3 and 4 to add two more fields:
- Toppings
- Drink
- Close the dialog box.
- Click Save to save your case.
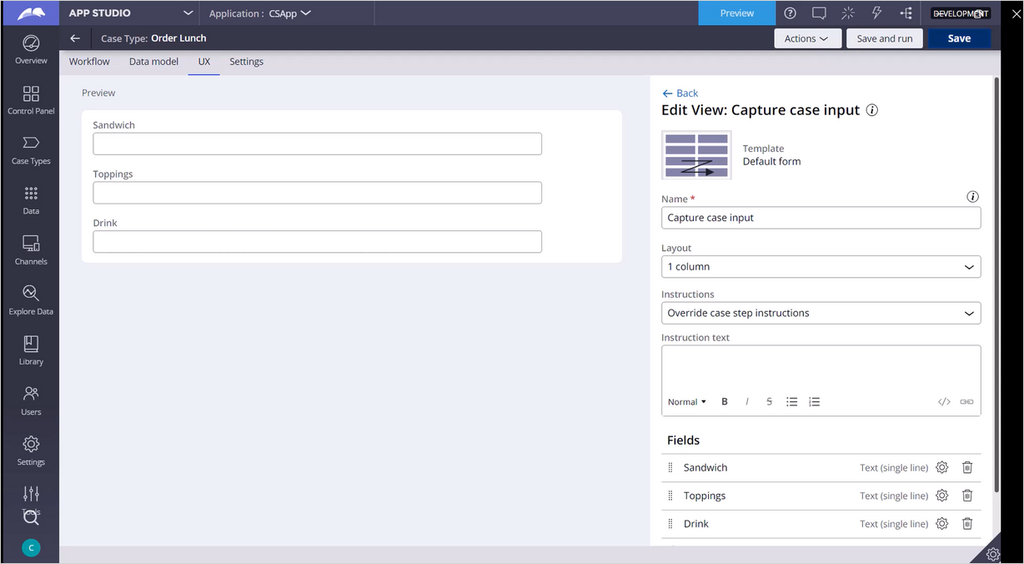
3 Update the Case views
- In the case type, click the UX tab.
- Click on Other views > Capture case input.
- In the Edit View panel, In the Fields section, click + Add.
- Search for Sandwich, then click Add.
- Do the same for the following fields:
- Toppings
- Drink
- Click Save.
- Click Back > Review of Intake case.
- Click on the Work details view
- Repeat steps 3 through to 6.
- Click Save.
Note: When you add new fields to a view, the preview may fail to display. If this happens, you can click Back, then return to the Edit View page of same view to refresh the preview.
4 Add the newly created case to the Interaction Task categories
- In the navigation pane of App Studio, click Control Panel > Case types.
- In the list of case types, click Interaction.
- Click Settings > Case categories.
- In the General category, click gear icon.
- Click Add Task.
- From the dropdown, select Order lunch.
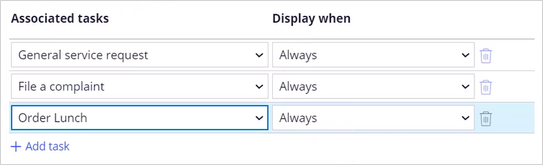
- Click Submit, then Save.
- In the lower-left corner, click the user Icon and then click Log off to Log out of App Studio.
Confirm your work
- On the exercise system landing page, click Pega Infinity™ suite to log in to App Studio.
- In the Username field, enter CSCSR.
- In the Password field, enter password123!.
- In the header of Customer Service, click Create > Demo Pop: Steve Smith, verified to start a new interaction.
- Click Accept to start the interaction.
- On the call interaction, click Add Case > Order Lunch.
- In the Capture case details view, enter details for the lunch order, and then click Submit.
- Click Wrap up, and then click Submit.
Available in the following mission:
If you are having problems with your training, please review the Pega Academy Support FAQs.
Want to help us improve this content?