Creating a view
Archived
4 Tasks
20 mins
Scenario
Now that the stages and steps for the MyTown311 Service Request case life cycle are configured, the mayor and the services coordinator have determined the information that is necessary to add to certain steps. Configure the views for those steps with previously configured fields that gather and display the information.
The following table provides the credentials you need to complete the challenge.
| Role | User name | Password |
|---|---|---|
| Application Developer | author@mytown | pega123! |
Challenge Walkthrough
Detailed Tasks
1 Add editable fields to views
- In the App Studio navigation panel, click Case types > Service Request to display the Service Request case life cycle.
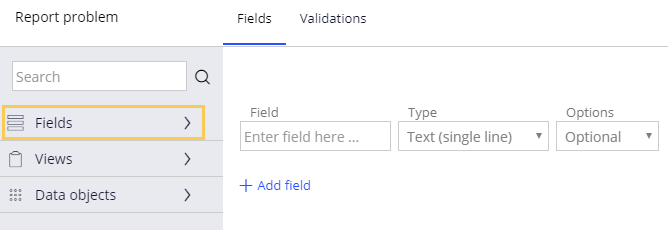
- In the Service Request case type, click the Report problem step to open the contextual property panel on the right.
- In the contextual property panel, click Configure view to add fields to the view.
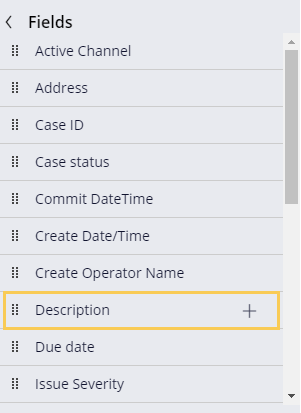
- In the menu on the left, click Fields to display the fields available in your data model.
- Hover over Description and click the Plus icon. The Description field is displayed.
- From the Options drop-down, select Required.
Note: If there is an empty field row in the display for configuring the view, delete it by clicking the Trash can icon on the right.
- Click Submit.
- Click Save to save your work.
- Repeat steps 1-7 to create the remaining fields by using the information from the following table.
Tip: When a step has multiple fields, you can add them all and then Submit and Save them together.
Stage
Step
Field Name
Field Type
Required or Optional
Submission
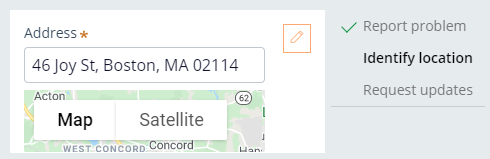
Identify location
Address
Location
Required
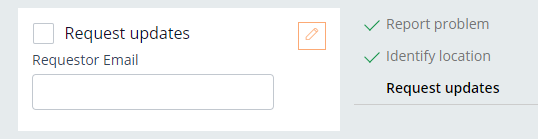
Request updates
Request updates
Boolean
Optional
Request updates
Requestor Email
Email
Optional
Review
Schedule repair
Due date
Date only
Required
Schedule repair
Note to Technical team
Text (paragraph)
Optional
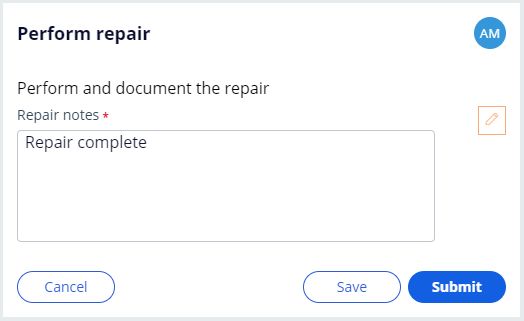
Resolution
Perform repair
Repair notes
Text (paragraph)
Required
2 Add read-only fields to views
-
In the Service Request case type, click the Review repair step to open the property panel on the right.
-
In the property panel, click Configure view to add fields to the view.
-
Add fields by using the information from the following table.
Stage
Step
Field Name
Field Type
Editable or Read-only
Resolution
Review repair
Note to Technical team
Text (paragraph)
Read-only
Review repair
Repair notes
Text (paragraph)
Read-only
3 Remove fields from the Create view
- In the Service Request case type, click the Views tab.
- Click Create to open the Create view.
- Click Edit this view to edit the Create view.
Note: By default, every field in the Service Request data model is added to the Create view. However, the data model may contain fields that should not be presented on the Create view.
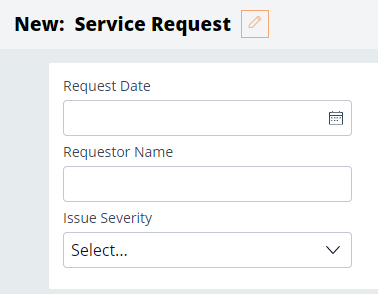
- Click the Trash icon to delete all fields except for Request Date, Requestor Name, and Issue Severity.
- Click Submit.
- Click Save to save your work.
4 Confirm your work (section not graded)
Note: As you advance through the case, enter any required information and verify that each view displays the desired fields.
-
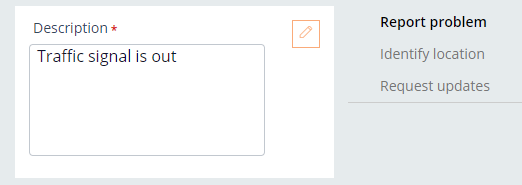
In the upper right, click Save and run to create a new service request. The Create view is displayed.
-
In the Create view, click Done to advance to the Report problem view.
-
In the Report problem view, click Continue to advance to the Identify location view.
- In the Identify location view, click Continue to advance to the Request updates view.
- In the Request updates view, click Finish to complete the Submission process and advance to the Schedule repair view.
- In the Schedule repair view, click Submit to display the Perform repair view

- In the Perform repair view, click Submit to display the Approval view.
- In the Approval view, click Approve to resolve the case.