Exposing integration by using a data type
Archived
11 Tasks
20 mins
Scenario
Front Stage needs to know if the probability of precipitation equals or exceeds 40 percent during the an event. At present, the weather forecast queries a data transorm. Front Stage now wants to query a true weather forecast service the day before an event.
The forecast is performed for the location where the event is being held, as opposed to the user's browser location. Given that the role of the user is Facility Coordinator, assume the browser user is in close proximity to the event.
The following table provides the credentials you need to complete the exercise.
| Role | Operator ID | Password |
|---|---|---|
| Administrator | Admin@Booking | rules |
Using the existing data class FSG-Data-Precipitation-Forecast, simulate a weather forecast service query that returns the probability of precipitation for each day of an event.
Create and interface a data page to pull the weather forecast. The parameters when querying the service are:
- StartDate
- EndDate
- Latitude
- Longitude
The response is a list of pages where each page resembles the FSG-Data-Precipitation class.
{ "forecast":[ { "Date":"20170731" ,"Probability":"35" ,"Unit":"Percent" }, { "Date":"20170801" ,"Probability":"40" ,"Unit":"Percent" } ] }
Enable geolocation at the case type level and portal level. When enabled, the pxRequestor system page contains the following location fields:
- pxRequestor.pyLatitude
- pxRequestor.pyLongitude
Use any weather URL for the simulated weather service (for example, http://weatherforecast.com). Develop a UI to display the request parameters. The REST response contains as many elements as the number of days the event is held. Post-process the response to identify the first day where the probability of precipitation equals or exceeds 40 percent.
Detailed Tasks
1 Detailed steps
To complete the assignment, you will:
- Create a new RainForecast REST Connector.
- Create a new D_ForecastService data page.
- Configure the new D_ForecastService data page to use the REST Connector.
- Create a Simulation Activity as the Web Service is not available.
- Configure the RainForecast REST Connector to use the simulation activity.
- Enable Geolocation tracking to capture the location of the operator.
- Create and configure a ForecastService property to use the new D_Forecast data page.
- Modify the Weather case life cycle to conditionally make precipitation preparations.
2 Create a new RainForecast REST Connector
- From the DEV Studio menu, select Configure > Integration > Connectors > Create REST integration to start the New REST Integration wizard.
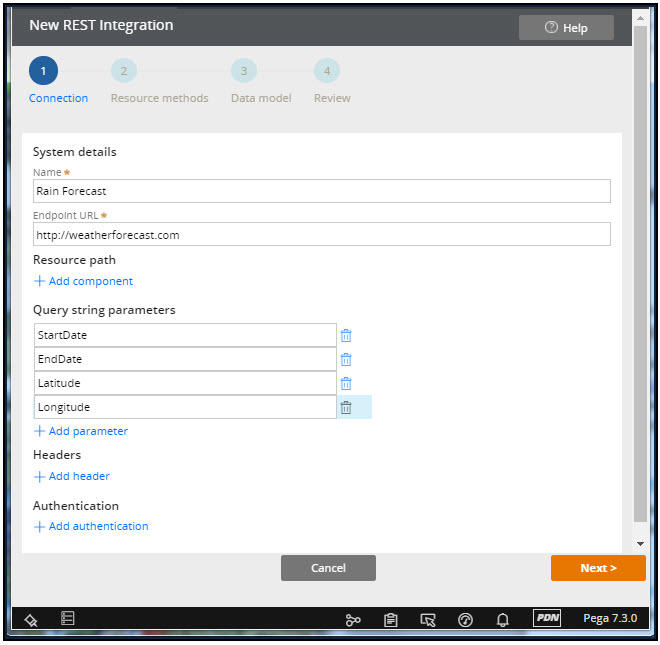
- On the Connection form, enter the following values.
Description Value Name Rain Forecast Endpoint URL http://weatherforecast.com Query string parameters StartDate
EndDate
Latitude
LongitudeWhen you are finished, the completed tab will look like the following image.
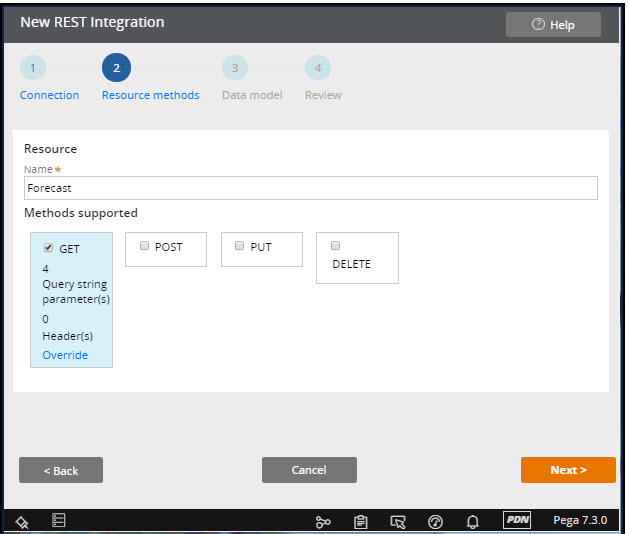
- Advance to the Resource methods form. in the Name field, enter Forecast . Use the default GET method as shown in the following image.
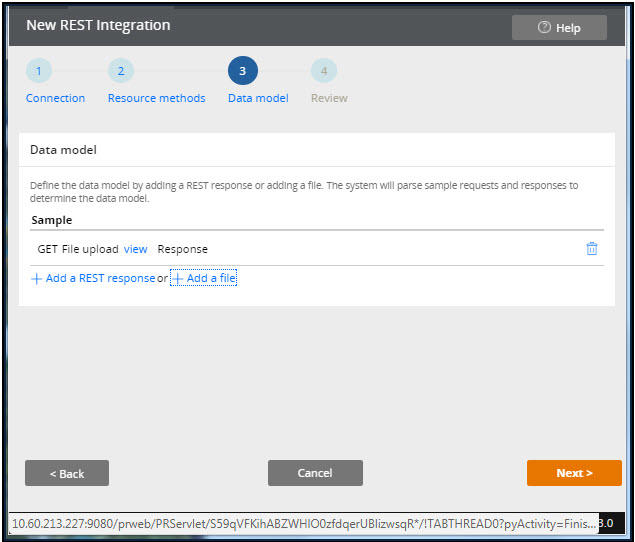
- Advance to the Data model form. Save the example response text to a file. Click + Add a file to add the text file as shown in the following image.
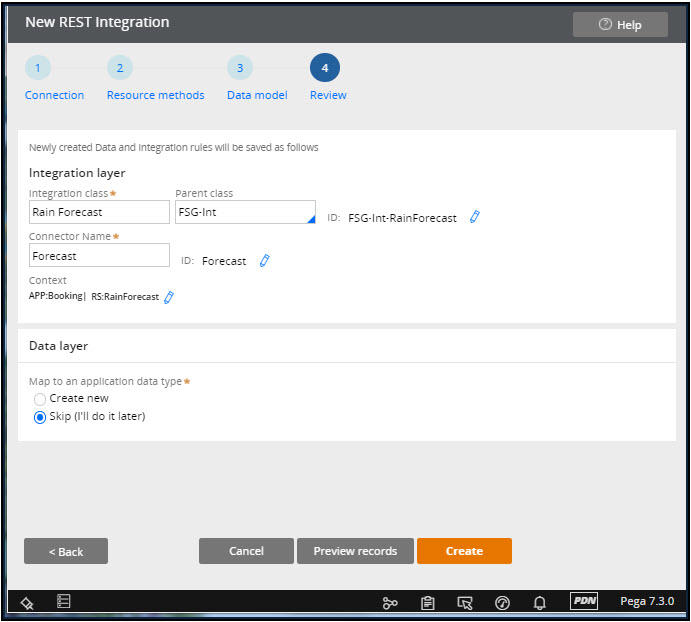
- Advance to the Review form. Change the parent class to FSG-Int. Change the generated class to FSG-Int-RainForecast. Do not generate a Data layer and select Skip (I'll do it later). When finished, the form will look like the following image.
- Click Create to complete REST integration.
3 Create a new D_ForecastService data page
- In the Data Explorer, expand Forecast and select the Forecast data page (D_Forecast).
- Click Save As to save the D_Forecast data page to a new D_ForecastService. Enter the following values:
Field Value Label Forecast Service Identifier D_ForecastService Apply to FSG-Data-Precipitation-Forecast Add to ruleset Weather - Click Create and open to create the new D_ForecastService data page.
- In the Parameters tab of the D_ForecastService data page, delete the pyGUID parameter.
- In the Parameters tab of the D_ForecastService data page, add the following Required Yes, In/Out In parameters:
- StartDate (String)
- EndDate (String)
- Latitude (Decimal)
- Longitude (Decimal)
4 Configure the new D_ForecastService data page to use the new RainForecast REST Connector
- In the Data sources section in the Definition tab of the D_ForecastService data page, update the following values:
Field Value Source Connector Type REST Name Forecast Request Data Transform ForecastRequestGET Response Data Transform ForecastResponseGET - Select the Parameters link under Request Data Transform and enable the Pass current parameter page check box in the Parameters for ForecastRequestGET dialog.
- Select the Parameters link under Response Data Transform. In the Parameters for ForecastResponseGET dialog, enable the Pass current parameter page check box.
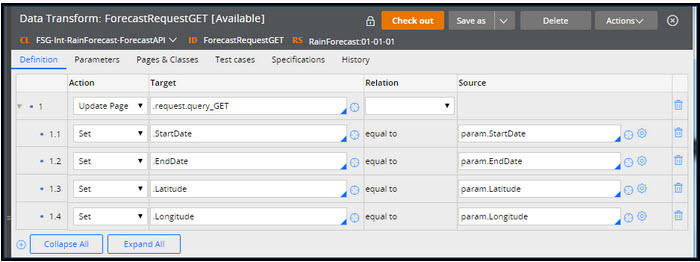
- Create the Request Data Transform ForecastRequestGET using Add to ruleset RainForecast.
- On the Parameters tab, require the same parameters as the D_ForecastListService data page.
- On the Definition tab, select ActionUpdate Page for Target.request.query_GET and Set the properties as shown in the following image.
- Create the Response Data Transform ForecastResponseGET using Add to ruleset RainForecast. Click Create and open and then Save to create and save the auto-generated ForecastResponseGET data transform.
- Save the D_ForecastListService data page.
5 Create a simulation activity for the RainForecast REST connector
Simulate the Forecast REST connector to return as many FSG-Int-RainForecast-Forecast pages as there are days between StartDate and EndDate inclusive by doing the following:
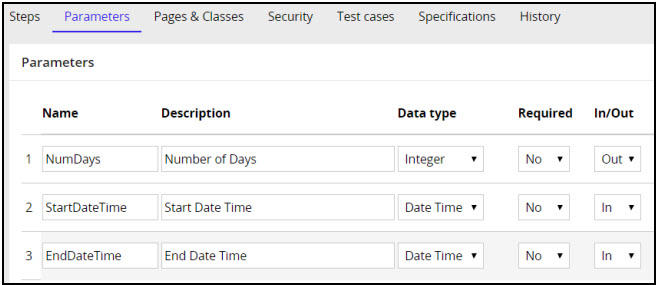
- Create an activity within the FSG-Int-RainForecast-ForecastAPI class and RainForecast ruleset named SimulateRainForecast.
- In the activity Parameters tab, define an Out parameter NumDays (Integer), an In parameter StartDateTime (Date Time), and an In parameter EndDateTime (Date Time). The completed tab should look like the following:
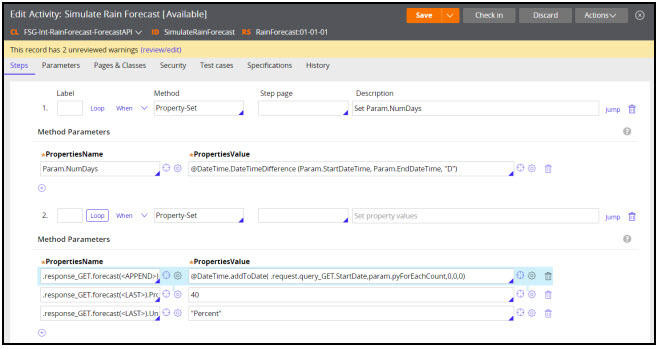
- In the Steps tab for activity step 1, enter Property-Set Param.NumDays = @DateTime.DateTimeDifference (Param.StartDateTime, Param.EndDateTime, "D").
- For activity step 2, enter Repeat For loop, Minimum Value = 0, Max Value = Param.NumDays, Increment = 1. Property-Set the following:
- .response_GET.forecast(<APPEND>).Date = @DateTime.addToDate( .request.query_GET.StartDate,param.pyForEachCount,0,0,0)
- .response_GET.forecast(<LAST>).Probability = 40
- .response_GET.forecast(<LAST>).Unit = “Percent"
The completed Steps tab should look like the following:
- Save the activity for getting the forecast information.
6 Configure the RainForecast REST Connector to use the simulation activity
- Open the Forecast REST connector record, click the Simulations button and add the SimulateRainForecast activity.
- Click one or both context radio buttons (Global and User Session)
The completed Simulations dialog should look like the following.
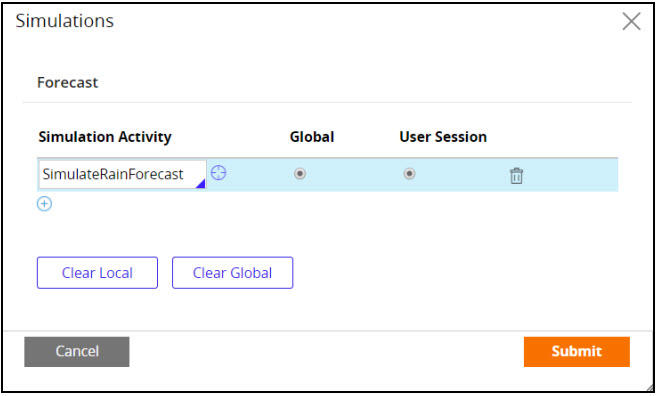
- Click Submit to save your forecast simulation.
- Return to the ForecastResponseGET response data transform and implement as the following:
- In the Parameters tab, delete parameter pyGUID and add the following In parameters:
- StartDate (String)
- EndDate (String)
- Latitude (Decimal)
- Longitude (Decimal)
- In the Definition tab, update step 1 as follows:
Field Value Action Append To Target Primary.pxResults Relation each page in Source DataSource.response_GET.forecast - Click Save to save the updated data transform.
- In the Parameters tab, delete parameter pyGUID and add the following In parameters:
- Create a Post load processing activity for the D_ForecastService data page named PostRainForecastProc using Add to ruleset Weather.
- In the Security tab of the activity, set the PostRainForecastProc Activity type = Load Data Page.
- In the Pages and Classes tab, declare a Page name D_ForecastService.pxResults using Class FSG-Data-Precipitation-Forecast.
- In the Parameters tab, define an Out parameter Name IndexToSave using Data type Integer with Default value 0.
- In the Steps tab, do the following:
- In step 1, enter Property-Set where Param.IndexToSave = 0.
- In step 2, set Loop Repeat to For each embedded page in Step page D_ForecastService.pxResults capturing the first index where Probability >= 40%. To configure the loop, do the following:
- Use MethodProperty-Set where Param.IndexToSave = Param.pyForEachCount.
- Click When and set the condition to Enable conditions before this action with When .Probability>=40 if true Continue Whens if false Exit Iteration.
- In step 3, use Method Exit-Activity and set When to Enable conditions before this action with When Param.IndexToSave==0 if true Exit Activity if false Skip Step.
- In step 4, use Method Page-Copy to CopyFrom D_ForecastService.pxResults (param.IndexToSave) to CopyInto D_ForecastService.
-
In step 5, use Method Property-Set with Step page D_ForecastService.pxResults(param.IndexToSave) to set Primary.Date = .Date, Primary.Probability = .Probability, and Primary.Unit = .Unit.
The completed Steps tab should look like the following.

7 Enable Geolocation tracking and capture the location of the operator.
- From the Cases Explorer, open the Weather case type .
- On the Settings tab in the General section, enable Enable geolocation tracking.
- Create Whenever Used declare expressions for the (FSG-Booking-Work-Weather) Weather.Latitude and Weather.Longitude properties in the Weather ruleset:
- (FSG-Booking-Work-Weather) .Weather.Latitude = pxRequestor.pyLatitude
- (FSG-Booking-Work-Weather) .Weather.Longitude = pxRequestor.pyLongitude
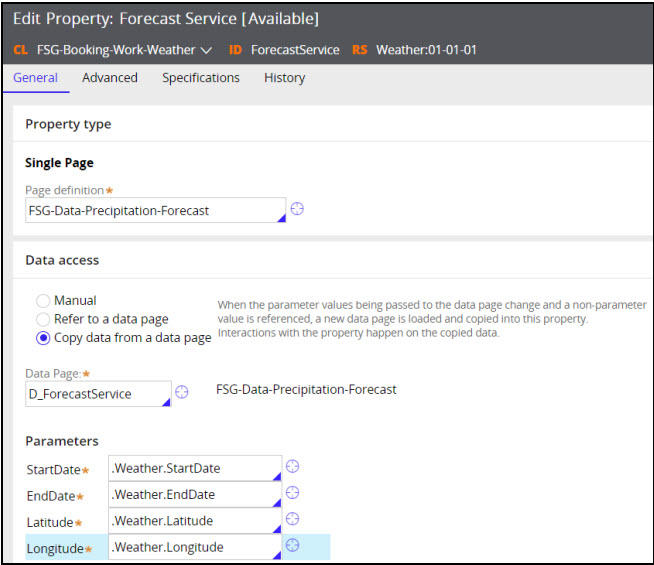
8 Create and configure a ForecastService property to use the new D_Forecast data page
- Copy the (FSG-Booking-Work-Weather) Forecast property to (FSG-Booking-Work-Weather) ForecastService.
- For the new ForcastService property, change Data access from Refer to a data page to Copy from a data page. Change the Data Page to D_ForecastService. Configure the parameter as shown below:
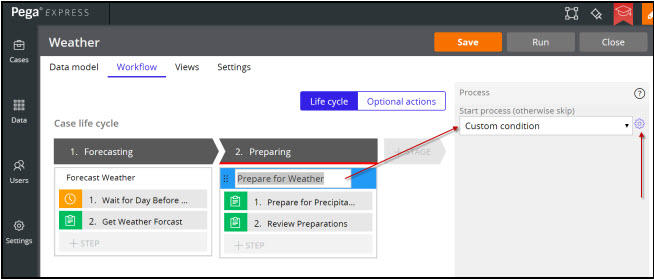
9 Modify the Weather case life cycle to conditionally prepare for precipitation
- In APP Studio, open the Weather case type from the Cases Explorer.
- Change the Start process (otherwise skip) to Custom condition.
- For the Prepare for Weather process in the Preparing stage, use a When condition.
- Next to the condition field, click the gear icon to add the condition as shown in the following image. If .Forecast_service is not displayed, configure the condition as Rain probability is 40 or greater.
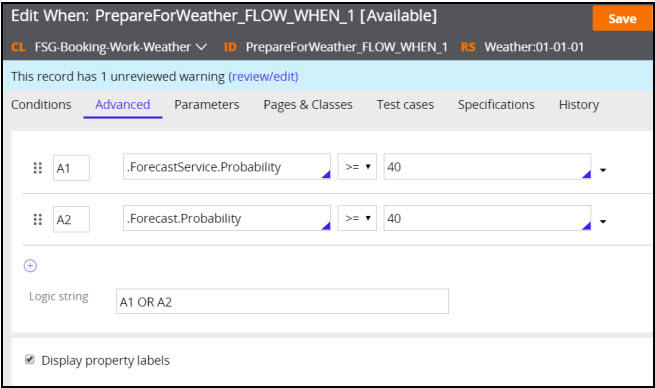
- Save the life cycle to generate the When rule.
- In DEV Studio modify the generated when rule to use .ForecastService.Probability or the Forecast.Probability as shown in the following image.
10 Verify your work
- Create an Event case and advance the case to where child cases are spun off.
- Select Begin for a Weather Case.
- If the case is paused at the Wait for Day before Event step, click Yes (continue). If necessary, click Begin.

The Get Weather Forecast view is displayed.
11 Solution Download
Booking_forecast_weather.zip
(7.94 MB)