Implementing interactions and activities
16 Tasks
45 mins
Scenario
When reviewing a case, the Customer Information window must display the customer account information after accessing the account. You can update the account information while the interaction is active. For data integrity, do not store data in the framework if the customer information is not available in the application.
For each time a new account window is displayed in the CRM application, the user interface should update with the new account information. The automation should check to see if the value is currently active when selecting an account number in the combo box. If the value is active, then action is unnecessary. If the value is not active, then activate the CRMChild window and update the UI with the selected account information. The framework requires activities to communicate between CRMPrj, MainPrj, and ACMESearchPrj to display or update the UI. The interaction-call.xml does not contain all the necessary activities to complete this requirement.
When users have more than one CRM account window open or more than one interaction within the framework, users may switch windows in the CRM application by clicking on the inactive window. When activating a CRM window manually, the UI account information updates to display the new active interaction or account information context values.
The business case states that the search for the nearest store should begin when users click a button on the Customer Information window. The search completes, and the nearest store address is displayed in the Customer Information window. Because the existing projects use the Interaction Framework, the ACMESearchPrj requires it as well. An activity starts on the button click, and the search begins in the ACMESystem. The activity requires a message and a Boolean result to return to the MainPrj so a proper message displays to users when the search completes unsuccessfully. The ACMESearchPrj contains the automations to perform the search, but they require refractoring to update for the activity and Interaction Framework.
Your assignment
In this part of the solution, complete the following tasks:
- Create a procedure automation, Main_P_LoadCustInfoValues, that only moves customer account context values from the Framework to the user interface if the interaction exists within the Framework. When updating the values, make the account number/interaction key the selected item in the combo box.
- Add and configure two activity components to the _GC_CRM and add an automation, CRM_E_IntMgr_InteractionStarted, to start the activities.
- Validate the matching of the interaction key in the framework with the customer account information in the CRM Application.
- If a match exists, store the account information in the framework; if a match does not exist, display a message to the end user.
- In the controller project, add an automation that calls Main_P_LoadCustInfoValues when the Framework has started the activity UpdateDisplay.
- Add 2 activities to the XML file.
Activity Activity Parameter ActivateMDIWindow strAcctNum as String GetNearestStore strResult as String
isSuccess as Boolean
- Create an automation, CRM_E_CRMChild_Activated, that activates an interaction when the window activates.
- Create an automation, Main_E_IntMgr_InteractionActivated, that updates the UI when an interaction activates.
- Create an automation, Main_E_cmbGetAcct_SelectedIndexChanged, that starts an activity when the selected account number is not active.
- Create an automation, CRM_E_ActivateMDIWin_ActivityStarted, that activates the window when the activity starts.
- Add a new activity to the _GC_Main and _GC_ACME to get the nearest store.
- Create an automation, Main_E_btnNearestStore_Click, to start the GetNearestStore activity.
- Create an automation, CRM_E_GetNearestStore_ActivityStarted, to complete the search for the nearest store based on account Zip code.
- Create an automation that displays a message to the user if the nearest store activity fails.
- Modify the Main_P_LoadCustInfoValues to have the nearest store value display during simultaneous interactions.
- Create an automation to update the user interface when the context value changes.
Detailed Tasks
1 Create an automation to display the context values on the user interface<
- In the Solution Explorer, right-click the MainPrj project and select Add > New Folder and name it.
- In the Solution Explorer in the New Folder field, enter Procedures.
- In the Solution Explorer, right-click the Procedures folder and select Add > New Automation to display the Add New Item window.
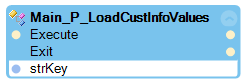
- In the Name field on the Add New Item window, enter Main_P_LoadCustInfoValues and click Add to close the window and open the automation in the design area.
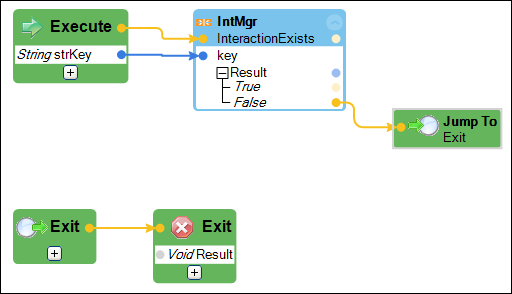
- In the automation, right-click and select Add Entry Point to display an Execute design block.
- On the Execute design block, click the Plus icon to add a parameter.
- On the Execute design block, edit the parameter by:
- Changing the data type to String
- Renaming the param1 to strKey
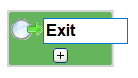
- In the automation, right-click and select Add Exit Point to add an Exit object.
- In the Exit1 point, change the name to Exit.
- In the automation, right-click an open area and select Add Label to add a Label object.
- On the Label1 design block, click Label1 and enter Exit.
- In the automation, right-click and select Jump To > Exit to add a Jump To design block.
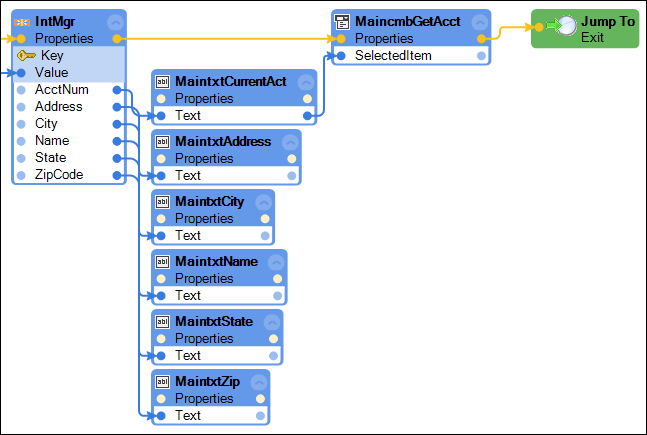
- From the Object Hierarchy, add the following design block to the automation.
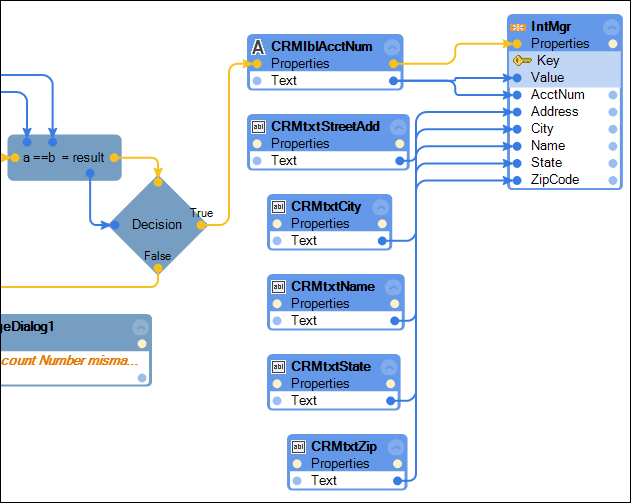
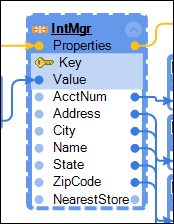
Project Item Source Control Description/Configuration _GC_Main IntMgr.InteractionExists method 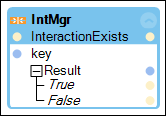
- In the automation, organize and connect the design blocks as shown in the following image.
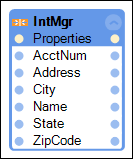
- In the Object Hierarchy from the _GC_Main, drag the IntMgr object to the automation to display the Select InteractionManager Member window.
- On the Select InteractionManager Member window, select the following IntMgr property check boxes:
- AcctNum
- Address
- City
- Name
- State
- Zipcode
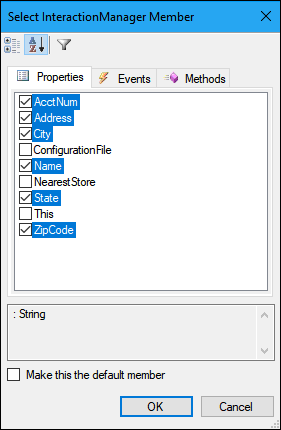
- On the Select InteractionManager Member window, click OK to close the Select Member window and update the design block.
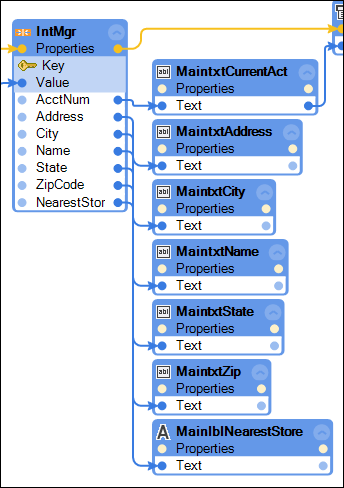
- In the Object Hierarchy from the frmCustInfo, drag the following controls to the automation. The Text property design block of each control is displayed.
- MaintxtCurrentAcct
- MaintxtAddress
- MaintxtCity
- MaintxtName
- MaintxtState
- MaintxtZip
- In the automation, add the following design blocks to the Main_P_LoadCustInfoValues automation.
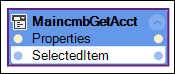
Project Item Source Control Description/Configuration Customer Information MaincmbGetAcct.SelectedItem property In the Object Inspector, use Configure Type to locate the property.
Main_P_LoadCustInfoValues strKey.This property Create a proxy for the strKey input parameter - In the automation, right-click and select Jump > To Exit to add a new Jump To design block.
- In the automation, connect the IntMgr.InteractionExists.True output to the IntMgr.Properties input to display a key icon on the properties design block.
- On the design block, click the Key icon to display a drop-down menu.

- In the drop-down menu, select Key to display a data input parameter on the design block.
- In the automation, connect the strKey.This data output to the IntMgr.Key data input.

- In the automation, connect the remaining design blocks as shown in the following image.
- From the menu bar, select File > Save All to save the automation.
2 Add activity components
- In the Solution Explorer, double-click _GC_CRM.os to open it in a designer window.
- In the Toolbox, expand the Interaction Management section.
- In the Toolbox, drag two Activity components to the global container.
- In _GC_CRM.os, click activity1 to highlight the object and to update the Properties window.
- In the (Name) property in the Properties window, enter CRMactGetCustInfo to change the activity name.
- In the Misc > Activity Name property drop-down in the Properties window, select GetCustomerInformation.

- In the _GC_CRM.os, click activity2 to highlight the object and to update the Properties window.
- In the (Name) property in the Properties window, enter CRMactUpdateDisplay to change the activity name.
- In the Misc > Activity Name property drop-down in the Properties window, select Update Display.
- From the menu bar, select File > Save All to save the activity edits.
3 Add an automation to start the activities
- In the Solution Explorer in the CRMPrj, right-click Events and select Add > New Automation to display the Add New Item window.
- In the Name field on the Add New Item window, enter CRM_E_IntMgr_InteractionStarted.
- On the Add New Item window, click Add to close the window and display the automation in the design area.
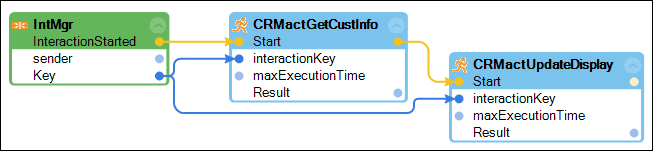
- In the automation, add the following design blocks.
Project Item Source Control Description/Configuration _GC_CRM IntMgr.InteractionStarted event Click the down arrow in the design block to expose the interaction key parameter. _GC_CRM CRMactGetCustInfo.Start method 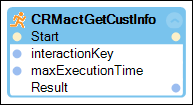
_GC_CRM CRMactUpdateDisplay.Start method 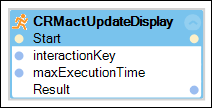
- In the automation, connect the design blocks as shown in the following image.
- From the menu bar, select File > Save All to save your work.
4 Add automation logic to validate the interaction and the account number match
| Project Item Source | Control | Description/Configuration |
|---|---|---|
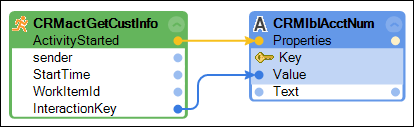
| _GC_CRM | CRMactGetCustInfo.ActivityStarted event | Click the down arrow in the design block to expose the interaction key parameter. |
| CRM | CRMlblAcctNum.Text property | Use the account number to compare to the key value. |
- In the Solution Explorer in CRMPrj, right-click Events and select Add > New Automation to open the Add New Item window.
- In the Name field on the Add New Item window, enter CRM_E_GetCustInfo_ActivityStarted.
- On the Add New Item window, click Add to close the window and open the automation in the design area.
- In the automation, add the following design blocks to the automation.
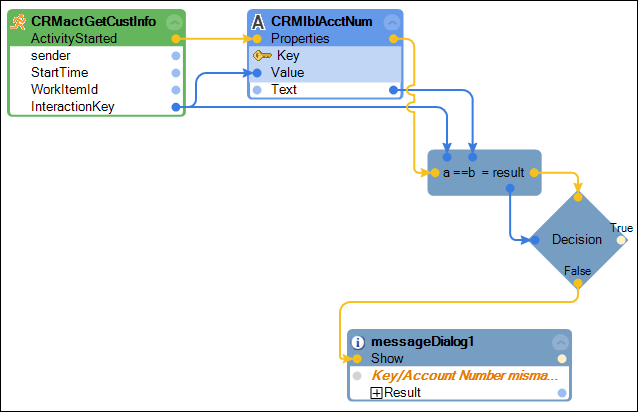
- In the automation, connect the links as shown in the following image. After connecting to the CRMlblAcctNum, the Key icon is displayed to identify the change from None to Key.
- In the Comparisons and Expression section in the Toolbox, drag a Boolean Expression component to the automation.
- In the Properties window, configure the Boolean Expression as follows:
- In the Expression property, enter a = = b.
- In the Identifiers property, click the ellipses and change both datatypes from Double to String.
- On the Boolean Expression in the automation, right-click on the result blue data port and select Make Decision to add a decision design block to the automation.

- In the Advanced section in the Toolbox, drag a MessageDialog component to the automation to display the Choose Method Overload window.
- In the Choose Method Overload window, select (String message): Dialog Result.
- On the Choose Method Overload window, click OK to display the MessageDialog in the automation and on the Local tab at the bottom.
- On the messageDialog1 design block, click text Message and enter Key/Account Number mismatch.
- In the automation, connect the automation links as shown in the following image.
5 Add automation logic to store data to the framework
- In the Object Hierarchy, drag the following controls to the automation to add the Text property design block of each.
- CRMlblAcctNum
- CRMtxtStreetAdd
- CRMtxtCity
- CRMtxtName
- CRMtxtState
- CRMtxtZip
- In the _GC_CRM item In the Object Hierarchy, drag the IntMgr object to the automation to display the Select InteractionManager Member window.
- On the Select InteractionManager Member window, select the following property check boxes:
- AcctNum
- Address
- City
- Name
- State
- Zipcode

- On the Select InteractionManager Member window, click OK to update the design block and close the window.
- In the automation, connect the automation links as shown in the following image. After connecting to the IntMgr properties design block, the Key icon displays to show the change from None to Key.
- From the menu bar, select File > Save All to save your work.
6 Add an activity to _GC_Main
- In the Solution Explorer, double-click the _GC_Main.os to open the file in the design area.
- In the Interaction Management section of the Toolbox, drag an activity component to the global container.
- In the _GC_Main.os, click activity1 to select it and update the Properties window.
- In the (Name) property in the Properties window, enter MainactUpdateDisplay.
- In the Misc > Activity Name property drop-down list in the Properties window, select UpdateDisplay. Adding this activity to the MainPrj Interaction allows the Framework to respond to the starting of the activity in the CRMPrj.

- From the menu bar, select File > Save All to save the edits.
7 Create an automation to update the user interface
- In the Solution Explorer in the MainPrj, right-click Events and select Add > New Automation to display the Add New Item window. .
- In the Name field on the Add New item window, enter Main_E_UpdateDisplay_ActivityStarted.
- On the Add New Item window, click Add to close the window and open the automation opens the design area.
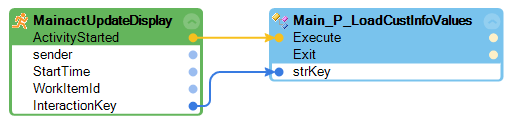
- In the automation, add the following design block.
Project Item Source Control Description/Configuration _GC_Main MainActUpdateDisplay.ActivityStarted event 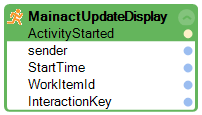
- From the Object Hierarchy, click Main_P_LoadCustInfoValues to highlight the automation.
- In the Object Inspector, click the Show Methods Only (box) icon.
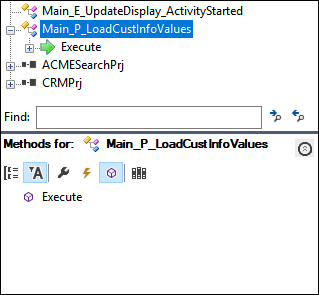
- In the Object Inspector, drag the Execute method to the automation.
- In the automaton, connect the design blocks as shown in the following image.
- From the menu bar, select File > Save All to save your work.
- From the menu bar, select Debug > Start Debugging to test the solution.
- CRM application launches and opens the John Smith account.
- The frmCustInfo window is displayed.
- The John Smith account information appears on the frmCustInfo.
- In the CRM application, click User 2 to open the second account and update the frmCustInfo
- From the drop-down list on the frmCustInfo window, select 23453. Nothing changes on the window and the CRM application.
- From the menu bar, select Debug > Stop Debugging to stop testing the solution.
8 Add activities to the interaction-call.xml
- In the Solution Explorer, double-click _GC_Main to display it in a design window.
- In the _GC_Main window, right-click IntMgr and select Modify Configuration to open the interaction-call.xml in the design area.
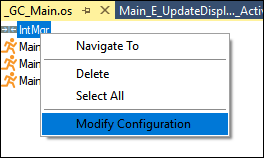
- In the interaction-call.xml, move through the file and locate the Activities section.
- After the last activity item in the Activities section, enter the following information:
<Activity Name=”ActivateMDIWindow”><Value Name=”AcctNumber” Type=”String” /></Activity><Activity Name="GetNearestStore"><Value Name="strResult" Type="String" /><Value Name="isSuccess" Type="Boolean" /></Activity>
- From the menu bar, select File > Save All to save the edits.
- From the menu, select Build > Clean Solution to remove any memory cache.
- From the menu, select Build > Rebuild Solution to recreate the memory cache with the new XML data.
9 Create an automation that activates an interaction when a window activates
- In the Solution Explorer in the CRMPrj, right-click Events and click Add > New Automation to display the Add New Item window.
- In the Name field, enter CRM_E_CRMChild_Activated.
- In the Add New Item window, click Add to close the window and display the automation in the design area.
- In the automation, add the following design blocks.
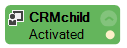
Project Item Source Control Description/Configuration CRM CRMChild.Activated event The automation begins when the window activates.
CRM CRMlblAcctNum.Text property The text property of the activated window contains the interaction key needed to activate the correct interaction in the Framework. _GC_CRM IntMgr.ActivateInteraction method - In the automation , connect the design blocks as shown in the following image.
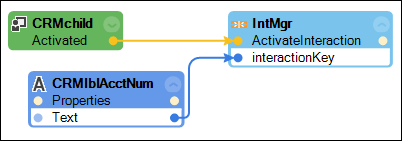
- From the menu bar, select File > Save All to save the automation.
10 Create an automation that updates the UI when an interaction activates
- In the Solution Explorer in the MainPrj, right-click Events and select Add > New Automation to display the Add New Item window.
- In the Name field, enter Main_E_IntMgr_InteractionActivated.
- In the Add New Item window, click Add to close the window and display the automation in the design area.
- In the automation, add the following design blocks.
Project Item Source Control Description/Configuration _GC _Main IntMgr.InteractionActivated event The automation begins when an interaction activates. Click the down arrow to expose the interaction.
Main_P_LoadCustInfoValues automation Main_P_LoadCustInfoValues.Execute method Because a procedure automation already exists to update the UI, call that automation.
- In the automation, connect the design blocks as shown in the following image.

- In the menu bar, select File > Save All to save the automation.
- From the menu bar, select Debug > Start Debugging to test the solution.
- John Smith's information is displayed on the Customer Information window.
- In the CRM application, click User 2. The second account updates on the Customer Information window.
- In the CRM application, click the window with John Smith to activate the window. The Customer Information window updates with John Smith's account.
- In the CRM application, close a window. The Customer Information window updates with the last active window and removes the closed account number from the combo box.
- From the menu bar, select Debug > Stop Debugging to stop testing the solution.
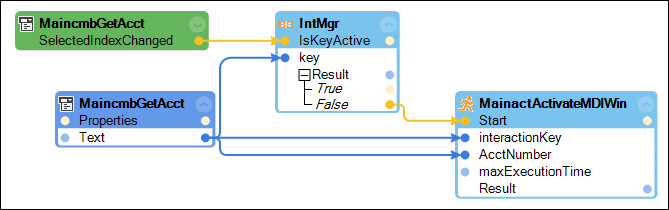
11 Create an automation that starts an activity when the account number selected is not active</h3>
- In Solution Explorer, double click _GC_Main.os to open the file in the design area.
- In the Interaction Management section of the Toolbox, drag an Activity component to the global container.
- In the _GC_Main.os, click activity1 to select the object and update the Properties window.
- In the (Name) property in the Properties window, enter MainactActivateMDIWin.
- In the Misc > Activity Name property drop-down list in the Properties window, select ActivateMDIWindow.
- In the Solution Explorer in the MainPrj, right-click Events and click Add > New Automation to display the Add New Item window.
- In the Name field, enter Main_E_cmbGetAcct_SelectedIndexChanged.
- In the Add New Item window, click Add to close the window and display the automation in the design area.
- In the automation, add the following design blocks.
Project Item Source Control Description/Configuration Customer Information MaincmbGetAcct.SelectedIndexChanged event The automation initiates when the combo box index changes. The SelectedIndexChanged is under the Behavior category in the Configure Type window.
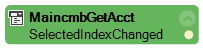
_GC_Main IntMgr.IsKeyActive method Checks to determine if the interaction key is active. Expand the Result.
Customer Information MaincmbGetAcct.Text property Text provides the value to activate the CRM window.
_GC_Main MainactActivateMDIWin.Start method - In the automation, connect the design blocks as shown in the following image.
- In the menu bar, select File > Save All to save the automation.
12 Create an automation that activates the window when the activity starts
- In the Solution Explorer, double-click the _GC_CRM.os to open the file in the design area.
- In the Interacation Management section in the Toolbox, drag an Activity component to the global container.
- In the _GC_CRM.os, click activity1 to select the object and update the Properties window.
- In the (Name) property in the Properties window, enter CRMactActivateMDIWin.
- In the Misc > Activity Name property drop down in the Properties window, select ActivateMDIWin.
- In the Solution Explorer in the CRMPrj, right-click Events and select Add > New Automation to display the Add New Item window.
- In the Name field, enter CRM_E_ActivateMDIWin_ActivityStarted.
- In the Add New Item window, click Add to close the window and display the automation in the design area.
- In the automation, add the following design blocks.
Project Item Source Control Description/Configuration _GC_CRM CRMactActivateMDIWin.ActivityStarted event The automation initiates when the activity starts. Click the down arrow to expose the interaction key.
CRM CRMChild.IsKeyAssigned method Checks to determine if a CRM window exists. Expand the Result.

CRM CRMChild.Activate method (no parameters) 
- In the automation, connect the design blocks as shown in the following image. The Key icon is displayed once you connect the automation links.

- From the Advanced section of the Toolbox, drag a MessageDialog component to the automation to display the Overwrite window.
- On the Overwrite window, select the second radio button and click OK to add the component to the automation.
- In the MessageDialog1 component, click message and enter The key is not found.
- In the automation, connect the CRMChild.IsKeyAssigned False output to the MessageDialog1 input.
- In the menu bar, select File > Save All to save the automation.
- From the menu bar, select Debug > Start Debugging to test the solution.
- John Smith's information is displayed on the Customer Information window.
- In the CRM application, click User 2. The second account updates on the Customer Information window.
- On the Customer Information window, from the Get Account combo box, select 23453 . The Customer Information updates with John Smith's account. In the CRM application, the window for John Smith activates.
- From the menu bar, select Debug > Stop Debugging to test the solution.
13 Update projects for new activity and Framework
- In the global containers for MainPrj and ACMESearchPrj, add a new activity to each global container and update the activity's properties based on the information in the following table
Global Container Property Value _GC_Main (Name)
ActivityName
MainactGetNearestStore
GetNearestStore
_GC_ACME (Name)
ActivityName
ACMEactGetNearestStore
GetNearestStore
- From the menu, select File > Save All to save the activities.
14 Create an automation to start an activity on a button click
- In the Solution Explorer in the MainPrj, right-click Events and select Add > New Automation to display the Add New Item window.
- In the Name field on the Add New Item window, enter Main_E_btnNearestStore_Click.
- On the Add New Item window, click Add to close the window and open the automation in the design area.
- In the automation, add the following design blocks.
Source project Items Design Name Description Customer Information MainbtnNearestStore.Click event When the user clicks the button, the automation initiates. Customer Information MaincmbGetAcct.Text property The text property of the combo box ensure the active interaction for the activity._GC_Main _GC_Main MainactGetNearestStore.Start method This starts the activity on the button click. - In the automation, connect the automation and data links as shown in the following image.
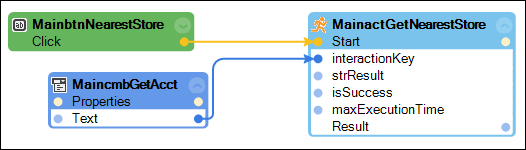
- From the menu bar, select File > Save All to save the automation.
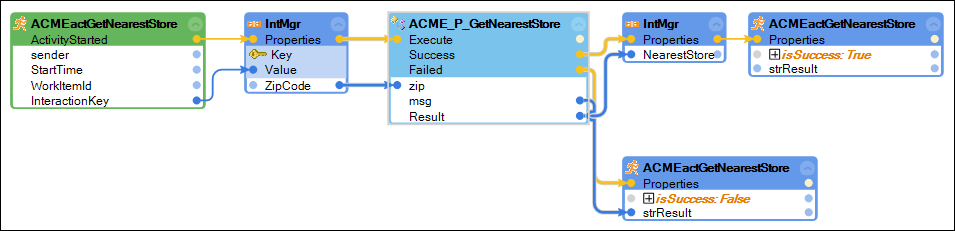
15 Create automations to complete the activity and to validate the ACMESearchSystem
- In the Solution Explorer in the ACMESearchPrj project, right-click Events and select Add > New Automation to display the Add New Item window.
- In the Name field of the Add New Item window, enter ACME_E_GetNearestStore_ActivityStarted.
- On the Add New Item window, click Add to close the window and open the automation opens in the design area.
- In the automation, add the following design blocks.
Source project Items Design Name Description_GC_ACME _GC_ACME ACMEactGetNearestStore.ActivityStarted event Click the down arrow in the design block to expose the interactionkey parameter._GC_ACME _GC_ACME
IntMgr.ZipCode property This collects the zip code from the Framework to pass through the search automations. ACME_P_GetNearestStore Execute method This calls the logic to perform the search of the nearest store based on account zip code._GC_ACME
_GC_ACME
IntMgr.NearestStore property This is used to store the address in the Framework context value. - From the Object Hierarchy, drag the ACMEactGetNearestStore activity component to the automation to display the Select Activity Member window.
- In the Select Activity Member window, select the isSuccess and strResult check boxes, and click OK to close the window and update the design block.
- In the automation, copy and paste the ACMEactGetNearestStore properties design block to create a second design block.
- In the automation, configure the two design blocks as follows:
- For one design block on the IsSuccess property, select True. On the other design block, set the IsSuccess proprty to False.
- In the automation, connect the automation and data links as shown in the following image .
- From the menu bar, select File > Save All.
16 Verify your work
- From the menu bar, select Debug > Start Debugging to test the solution.
- On the Customer Information window, click Find Store.
- The web application launches, logs in, and searches for the nearest store based on the ZIP code.
- The Customer Information window does not return the address as expected.
- From the menu bar, select Debug > Stop Debugging to test the solution.
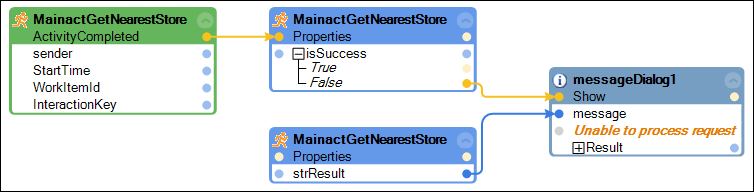
Create an automation to display a fail message to the user
- In the Solution Explorer to the MainPrj project, right-click Events and select Add > New Automation to display the Add New Item window.
- In the Name field of the Add New Item window, enter Main_E_actGetNearestStore_ActivityCompleted.
- On the Add New Item window, click Add to close the window and open the automation opens in the design area.
- In the automation, add the following design blocks.
Source project Items Design Name Description_GC_Main _GC_Main
MainactGetNearestStore.ActivityCompleted event When the activity thread completes, initiate this automation. _GC_Main
MainactGetNearestStore.isSuccess property _GC_Main
MainactGetNearestStore.strResult property - In the Advanced section of the Toolbox, drag the MessageDialog component to the automation to display the Overflow window.
- In the Overflow window, select the third radio button to display a string message and a caption and click OK to create the design block
- In the messageDialog1 design block, click Caption and enter Unable to process request.
- In the automation, connect the automation and data links as shown in the following image.
- From the menu bar, select File > Save All to save the automation.
Modify the Main_P_LoadCustInfoValues to display the nearest store
- In the Solution Explorer, double-click Main_P_LoadCustInfoValues automation to display in the automation in the design area.
- In the Object Hierarchy in _GC_Main, click IntMgr to highlight the component.
- In the Object Inspector, click Show Properties Only to filter to the component's properties.
- In the Object Inspector, drag the NearestStore property to the _GC_Main.IntMgr design block in the automation. A dotted black line surrounds the_GC_Main_IntMgr design block.
- In the Object Hierarchy in the frmCustInfo object, drag the MainlblNearestStore object to the automation to add its Text property.
- In the automation, connect the _GC_Main.IntMgr.NearestStore data output to the frmCustInfo.MainlblNearestStore.Text data input.
- From the menu bar, select File > Save All to save the automation edits.
Update user interface when a context value changes
- In the Solution Explorer to the MainPrj project, right-click Events and select Add > New Automation to display the Add New Item window.
- In the Name field of the Add New Item window, enter Main_E_IntMgr_TextChanged.
- On the Add New Item window, click Add to close the window and open the automation opens in the design area.
- In the automation, add the following design blocks.
Source project Items Design Name Description _GC_Main
IntMgr.OnNearestStoreChanged event When the value of the nearest store changes, initiate this automation. _GC_Main
IntMgr.IsKeyActive method If value changes is from the active key, display the value immediately. If not, it is displayed from the Main_P_LoadCustInfoValues automation. Customer Information MainlblNearestStore.Text property - In the automation, connect the automation and data links as shown in the following image.

- From the menu bar, select File > Save All to save the automation.
- From the menu bar, select Debug > Start Debugging to test the solution.
- On the frmCustInfo window, click Find Store to launch the browser and locate the nearest store.
- On the frmCustInfo window, the store address is displayed.
- From the menu bar, select Debug > Stop Debugging to test the solution.
Available in the following mission:
If you are having problems with your training, please review the Pega Academy Support FAQs.
Want to help us improve this content?