Leveraging the email component application
Archived
6 Tasks
20 mins
Scenario
Front Stage would like to be able to send personalized emails to recipients at scheduled times and dates. Front Stage wants to reuse this capability in multiple applications. This requirement was analyzed by a Lead System Architect and the decision was made that the best solution was to build a component Email application, one on which other applications can be built.
The following table provides the credentials you need to complete the challenge.
| Role | Operator ID | Password |
|---|---|---|
| Admin | [email protected] | install |
| Admin | Admin@FSG | rules |
| Admin | Admin1@FSGEmail | rules |
Note: Before starting this exercise, make sure that you have completed the prior exercises or imported the Booking_Lifecycle_Solution.zip RAP file into your system. This file is accessed through the link available in the related content pane on the right side of the previous exercise.
Note: If this is the first import of Admin@FSG:
[email protected] may have to enable the Admin@FSG operator record then reset the password to “rules”. Also add the FSGEmail:Administrators, FSGEmail010102:Administrators, FSGEmail010103:Administrators, and FSGEmail010104:Administrators Access Groups to the Admin@FSG Operator record.
[email protected] may have to enable the Admin@FSG operator record then reset the password to “rules”. Also add the FSGEmail:Administrators, FSGEmail010102:Administrators, FSGEmail010103:Administrators, and FSGEmail010104:Administrators Access Groups to the Admin@FSG Operator record.
Note: If the Admin@FSG operator record already exists:
Use “advanced/granular” mode when importing the RAP. You will be shown the Operator records included in the RAP. Permit the existing Admin@FSG Operator record to be updated.
Use “advanced/granular” mode when importing the RAP. You will be shown the Operator records included in the RAP. Permit the existing Admin@FSG Operator record to be updated.
Implement a component application that sends emails on a specific date and time. Emails can be edited and personalized for each recipient before being sent. Emails can also be sent manually.
The Front Stage development team has provided you with an Email Editor component that implements the email-editing functionality. Use the Email Editor component to create the FSGEmail application’s reusable case type.
The Front Stage development team wants this capability to be self-testable. In Self-test mode, the Email case must be able to attach a Data-Corr-Email instance prior to creating a second Email subcase. The Email parent case should propogate to the email child case the DateTime property indicating when to send the email. It should also propagate who should own the Email subcase assignments.
Detailed Tasks
1 Design Analysis
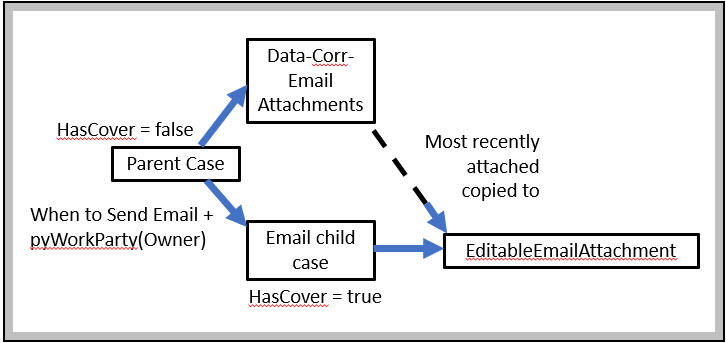
Any primary case, including the Email case itself, should be able to create Email subcases. In the following diagram the top-level case is referenced as the "Parent" and the child case is referenced as the "Child" and represents how the top-level case propagates an editable email attachment to the childcase:
2 Exercise Setup
Completing the detailed steps for this exercise are optional. If you need practice building component applications that leverage Pega components that are designed to be used as built-on applications then you should complete the detailed steps. Otherwise you can simply import the completed solution RAP file (FSGEmail_Solution.zip) and review the completed solution using the following discussion as a guide.
Note: If you choose to import the completed FSGEmail_Solution.zip RAP file there is no need to also import the provided EmailEditor_20170814T145312970_010101.zip RAP file as the email component is already included in the FSGEmail_Solution.zip RAP file.
Importing the Solution RAP
If you choose to skip the development of the solution from scratch and import the Solution RAP, proceed as follows.
- Login as [email protected].
- Import the FSGEmail_Solution.zip RAP file.
- During import enable the Enable advanced mode to provide more granular control over the import process check-box on the File information form.
- During import enable the Enable new operators and overwrite existing operators on import check-box on the Operators form.
- During import enable the Import aged updates check-box if prompted.
- During import enable the Replace with older copy check-box on the Newer version of rule already on the system form if prompted.
- After the successful import, log-out.
- Log-in as Admin@FSG.
- When you first log-in as Admin@FSG you will be in the FSG • 01.01.01 application. This application represents the Organizational layer for all Front Stage Group (FSG) applications.
- Open the application definition for FSG. Notice that there are only two (2) rulesets: FSG and FSGInt and they are both set to Application Validation. Notice also that there are no Case Types defined however there are several Data Classes defined in the Organizational Layer.
- If you want to practice making the configuration changes described in this exercise, you should switch to the FSG • 01.01.03 application as this version has unlocked "working" rulesets.
- Switch to the FSGEmail • 01.01.02 (FSGEmail 01.01.02 Administrator) access group via Booking > Switch Application . The FSG • 01.01.02 (FSGEmail 01.01.02 Administrator) access group is using the FSGEmail • 01.01.02 application and represents the basic configuration that you as an LSA would prepare prior to commencement of DCO. Notice that FSGEmail • 01.01.02 is built on FSG • 01.01.02.
- If you want to practice making the configuration changes described in this exercise, you should switch to the FSGEmail • 01.01.03 application as this version has unlocked "working" rulesets.
- Switch to the FSGEmail 01.01.04 (FSGEmail 01.01.04 Administrator) access group via Booking > Switch Application. The FSGEmail 01.01.04 (FSGEmail 01.01.04 Administrator) access group is using the FSGEmail • 01.01.04 application and represents the completed steps described in this exercise. Notice that FSGEmail • 01.01.04 is built on FSG • 01.01.04.
- By switching back and forth between the unlocked FSGEmail 01.01.03 (FSGEmail 01.01.03 Administrator) and FSGEmail 01.01.04 (FSGEmail 01.01.04 Administrator) access groups you can practice select steps in this exercise while comparing and contrasting your implementation of the configurations described in the provided solution.
Application Configuration:
The FSGEMail • 01.01.04 application is built on the FSG • 01.01.04 application and the checkbox to display the FSGEmail • 01.01.04 application in the New Application Wizard as a tile has been enabled.
Note: If you are attempting to do this exercise from scratch without importing the FSGEmail_Solution.zip RAP file as described or if the EmailEditor_20170814T145312970 01.01.01 component has not been added, then be sure to load and import the EmailEditor_20170814T145312970_010101.zip RAP file into your system. These file is accessed through the link available in the related content pane on the right side of this lesson.
The only rulesets in the FSGEMail • 01.01.04 application are FSGEmail:01-01-04 and FSGEmailInt:01-01-04. Normally there is no need to include rulesets that are not used, but although FSGEmailInt appears to be empty, it is associated with the abstract class FSG-FSGEmail-Int-. referenced in the Cases and Data tab of the FSGEmail application definition.
Email Case Stages:
The Email case contains the four stages listed below.
- Enter Test Data
- Prepare Email
- Edit Send or Skip
- Resolve
The processes used by the two middle stages, Prepare Email and Edit Send or Skip, were provided by the Email Editor component. These two middle stages are skipped When DoesNotHaveCover=true. In other words, these two middle stages are only executed when the case is run as a subcase. This is done by design since the email case is intended to be used only as a subcase.
Enter Test Data Stage:
The Enter Test Data stage in the solution consists of three back-to-back processes.
- EnterTestData_Flow
- SendEmail
- Continue_Test
This is the "Self-Testing" stage that was added to satisfy the requirement that the Email case be self-testing. This stage is skipped when HasCover=true. The only test data needed is the WhenToSendEmail property required by the Email Editor component.
The EnterTestData_Flow process captures the WhenToSendEmail date-time value then adds CurrentOperator as the Owner workparty.
The SendEmail process creates a test PDF, later used as an email attachment, followed by a Utility that calls CorrNew. CorrNew is configured to include all Attachments within the File category. The Correspondence rule provided to CorrNew is configured as “Attach and Hold”. The SendMail shape is not used as doing so would cause the email to be sent in the background as opposed to waiting to be sent.
The first Review assignment in the Continue_Test process is a pause for anyone running a manual test to view and verify that the generated PDF and Data-Corr-Email having been attached. The Owner workparty is also visible.
Edit Send or Skip Stage:
The second Review assignment in the Continue_Test process is a pause to shows that the Email subcase has been successfully created. Click on “Edit Send or Skip” then Submit. Note the Email Editor screen. Click on “Download EML File”. Open the generated EML file. Note the PDF attachment.
3 Detailed construction steps (optional)
Follow the steps below if you want to practice creating the FSGEmail application and implementing the the configurations provided in the solution RAP:
Note: If you have already imported the Solution RAP file then you will need to either create a new application with a different name or switch to the unlocked FSGEmail • 01.01.03 application and skip any steps that have already been configured as described here.
- Create the FSGEmail application. If you already imported the solution RAP then either skip this task or use a different application name, such as "MyEmail".
- Add the component to the application. If you already imported the solution RAP then you can skip this task.
- Create the Email case type and case life cycle. If you already imported the solution RAP file then complete this step using the FSGEmail 01.01.03 (FSGEmail 01.01.03 Administrator) access group as described above.
- Configure the supporting rules in DEV Studio. If you already imported the solution RAP file then complete this step using the FSGEmail 01.01.03 (FSGEmail 01.01.03 Administrator) access group as described above.
- Make the application available in the New Application wizard. If you already imported the solution RAP file then complete this step using the unlocked FSGEmail 01.01.03 (FSGEmail 01.01.03 Administrator) access group as described above.
Create the FSGEmail application
You can skip this step if you imported the FSGEmail_Solution.zip RAP file.
- From your exercise system, log on as [email protected].
- From the Application menu, launch the New Application wizard.
- In the configuration panels, select Custom.
- In the Name your application field, enter FSGEmail.
- Select the Advanced configuration link.
- In the Advanced configuration dialog, do the following:
- Select Implementation as the application structure.
- Enter FSG as the organization name.
- Enter Email as the class layers application.
- Click Save to save your updates and close the dialog.
- In the New Application wizard, click Create application.
- Generate Admin@FSGEmail and Author@FSGEmail Operator ID(s) then open each Operator ID and in the Security tab turn of the "Force password change on next login" checkbox and reset the password to "rules".
- After creating the new FSGEmail application, log off.
- Log in as Admin@FSGEmail.
- Switch to Dev Studio.
- Open the FSGEmail:Administrators access group and set the default portal to "Developer".
Add the EmailEditor component to the application
You can skip this step if you imported the FSGEmail_Solution.zip RAP file.
- Log into the email application as Author@FSGEmail.
- Switch to Dev Studio.
- In the related content pane on the right side of this lesson, click the Email editor component link to access the EmailEditor_20170814_010101.zip RAP file. Then, import the file.
- In the Application record, do the following:
- Add the EmailEditor_20170814T145312970 version 01.01.01 component. You can do this manually, or by selecting Manage components on the Definition tab of the Application record and enabling Email Editor version 01.01.01.
- Remove the FSG and FSGInt rulesets from the Application rulesets stack.
- Specify that FSGEmail is built-on FSG.
- Open the FSGEmail skin and change its Inheritance to "FSG".
Create the Email case type
You can skip this step if you imported the FSGEmail_Solution.zip RAP file.
- Switch to Dev Studio.
- Create a new Email case type in the FSGEmail ruleset.
- Under General in the Settings tab in the Case Designer for the new Email Case Type, set the "Case ID prefix" to "EMAIL-".
Create the Email life cycle
If you imported the FSGEmail_Solution.zip RAP file you can login as Admin1@FSGEmail to complete the rest of these detailed exercise steps.
- Make sure you are using the FSGEmail 01.01.03 access group.
- Switch to App Studio.
- On the Case Designer Workflow tab, add a life cycle that includes the following stages:
- Enter Test Data
- Prepare Email
- Edit, Send, or Skip
- Resolve Email
- On the General tab in the Stage panel, set the first three stages to Automatically move to next stage. Set the Resolve Email stage to Resolve the case.
- In the Enter Test Data stage, add a Collect Information step named Enter Test Data.
- On the General tab in the Step panel, select the Configure view button to open the views dialog. Do the following on the Fields tab:
- Expand the Fields section on the left
- Drag and drop the When To Send Email property beneath the Add field link. This property is part of the Email Editor component and is used to set a future date and time. If the property does not appear it is because there is no relevant record defined for it. Either create a relevant record for it or simply type it in and it will appear automatically.
- In the Options field, select Required.
- Click Submit to save your updates.
- On the Case Designer Workflow tab, select the Enter Test Data stage header and then add a process named Send Email.
- In the Send Email process, delete the default Collect Information step and add a standard Send Email utility step.
Note: This Send Email step serves as a placeholder. The Send Email shape does not recognize correspondence rules configured as Attach & Hold. Later in this exercise, you will replace the Send Email shape with a Utility shape that calls the CorrNew activity to avoid a correspondence error.
- Select the Enter Test Data stage header and add a process named Complete Testing.
- To the Complete Testing process, add the following three steps:
- A Collect Information step named Review Email. Configure the view to show the provided When To Send Email property in read-only mode.
- A Create Case utility step named Create Email Child Case. In the Create the following case field, select Email.
- Another Review Email step by selecting +Step > More > User action > Review Email .
Note: You cannot use a Wait utility step since the case type is the same as the case type you are testing.
- In the Case Designer, open the Settings tab.
- In the Availability field, select Show in 'New' menu. In the Behavior field, select the Skip 'Create' view when users create a new case.
Configure supporting rules in DEV Studio
- Switch to DEV Studio and define the following When rules in the FSG ruleset that apply to Work-:
- HasCover using the condition .pxCoverInsKey exists and has a value.
-
DoesNotHaveCover using the condition .pxCoverInsKey does not exist or has no value.
-
In the Email case Work Parties rule, select the VOE? check box for the Owner work party.
-
In the Cases Explorer, add the Email case type as a child case type of itself.
- In the Cases Explorer, select the Email parent case type.
- On the Case Designer Settings tab, select Data propagation.
- In the Data propagation panel, propagate the following property values:
- .WhenToSendEmail to the property value .WhenToSendEmail.
- .pzInsKey to property value .EmailWorkKey.
- .pyWorkParty to property value .pyWorkParty.
4 Complete the case life cycle
- On the Email case type life cycle on the Workflow tab, select the Enter Test Data stage and enter HasCover for the Skip stage when condition.
- In the Enter Test Data stage, open the Email process.
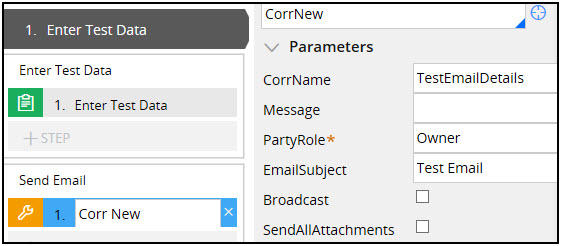
- In the Email process, replace the Send Email shape with a Utility shape that references the CorrNew activity.
- In the Utility shape property panel, do the following:
- In the CorrName field, enter the TestEmailDetails correspondence rule.
- In the PartyRole field, enter Owner.
- In the EmailSubject field enter Test Email.
The step now looks like the following:
Note: You can update the step name to Send Email. - Save your updates.
- On the Workflow tab, in the Complete Testing process, select Create email child case and specify the Email case.
- In the Cases Explorer, select the Email case type and click the Open menu to open the pyDefault Email case type rule.
- In the rule, open the Stages tab.
- Select the Prepare Email stage.
- In the Skip stage when field, specify DoesNotHaveCover.
- In the Automatically launched process section, enter the provided PrepareEmail process.
- Select the Edit, Send, or Skip stage.
- In the Skip stage when field, specify DoesNotHaveCover.
- In the Automatically launched process section, enter the provided EditSendOrSkip process.
Make the application available in the New Application wizard
-
In DEV Studio, from the Application menu, open the FSGEmail Application record.
- On the Application wizard tab, select the Show this application in the New Application wizard check box.
- In the Short Description field, enter FSG Email. In the Application description field, enter Self-test-capable reusable Email case. Pauses email for editing prior to being sent at designated time or can be sent manually.
- Open the Cases & data tab.
- Change the Work ID prefix for the Email Case type to FSGEMAIL-.
- Save the rule.
5 Verify your work
- Create an Email case.
- On the Create view, enter a future date in the When to Send Email field and then click Submit.
- On the Review view, note the attached Email correspondence and then click Submit.
- On the view, under Open Assignments, note that the Email child case paused at the Edit, Send, or Skip assignment.