Promoting a shadow model to active status
5 Tasks
10 mins
Scenario
U+ Bank uses Pega Customer Decision Hub™ to personalize the credit card offers that customers receive on its website. The bank makes a proactive retention offer instead of a credit card offer for customers that are likely to leave the bank soon. As a Data Scientist, you have placed a new churn model in shadow mode in the business operations environment to monitor its performance before deploying the model to the production environment.
The data science team approves the new model and the Team Lead creates a new revision containing a change request to promote the model to active.
As a data scientist, you promote the new model to active.
The Team Lead approves the change, and then the Revision Manager deploys the change.
Use the following credentials to log in to the exercise system:
| Role | User name | Password |
|---|---|---|
| Team lead | TeamLead | rules |
| Data Scientist | DataScientist | rules |
Your assignment consists of the following tasks:
Task 1: Create a new revision
As the Team Lead, create a new revision in the 1:1 Operations Manager portal.
Task 2: Create a new change request and include the churn prediction rule
Include the churn prediction rule in a new change request, to allow modification of the rule by the assigned operator.
Task 3: Assign the change request to promote the shadow model to a Data Scientist
Assign the change request to promote the shadow model in the churn prediction to active status to a Data Scientist.
Task 4: Promote the shadow model to active status
As a Data Scientist, process the change request to promote the shadow model to active.
Task 5: Complete the change request
As a Team Lead, complete and submit the change request to the revision manager for deployment.
Challenge Walkthrough
Detailed Tasks
1 Create a new revision
- On the exercise system landing page, click Pega Infinity™, and then log in to 1:1 Operations Manager as a Team Lead by entering the following credentials:
- In the User name field, enter TeamLead.
- In the Password field, enter rules.
- In the navigation pane of 1:1 Operations Manager, click Revision Management.
- In the CDH standard release section, click the Plus icon to create a new revision.
- Click Submit to create the new revision.
2 Create a new change request and include the churn prediction rule
- In the lower-left corner, click the user icon and select Switch portal > Customer Decision Hub.
Note: If you are asked whether you want to show the Customer Decision Hub portal, click OK.
- In the navigation pane of Customer Decision Hub, click Revision Management to open the Revision Management landing page.
- On the Revision Management landing page, in the Welcome back, Team Lead section, click Update business rules to open the current revision.
- In the upper-right corner, click Actions > Create change request.
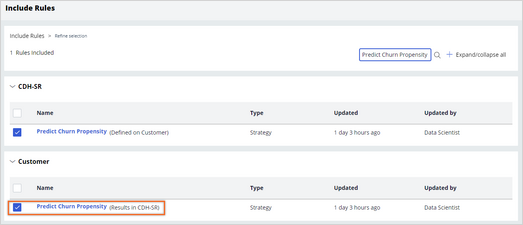
- In the Include Rules section, search for Predict Churn Propensity.
- In the Customer section, select the Predict Churn Propensity to include the prediction rule in the revision.
- In the header of the Include Rules page, click Next.
- On the Refine selection page, in the Included rules section, observe the newly added rule.
3 Assign the change request to promote the shadow model to a Data Scientist
- On the right, in the Change request pane, click Edit to assign an operator to the change request.
- In the Edit Change Request Details window, in the Assign to section, select Operator.
- In the field that is displayed under the Assign to section, enter or select DataScientist.
- In the Name field, enter Promote shadow model.
- In the Description field, enter In the Predict Churn Propensity prediction, promote the new churn model to the active status.
- Click Submit to save the changes made to the change request.
- In the header of the Refine selection page, click Submit to send the change request to the assigned operator.
- In the upper-right corner of Customer Decision Hub, click the user icon, and then select Log off to return to the login screen.
4 Promote the shadow model to active status
- On the login screen, log in as a data scientist:
- In the User name field, enter DataScientist
- In the Password field, enter rules.
- In Customer Decision Hub, in the navigation pane, click Intelligence > Prediction Studio.
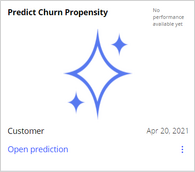
- In the Predictions work area, click the Predict Churn Propensity tile to open the prediction.
- On the Models tab, in the ChurnH2O row, click the More icon, and then select Promote model.
- In the Promote ChurnH2O window, click Promote model.
- In the upper-right corner, click Save.
- In the lower-right corner, click Back to Customer Decision Hub.
- In the Work from 1:1 Operations Manager section, click CR-2 to open the change request.
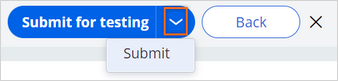
- In the header of the change request, click Submit to submit the change request to the Team Lead.
- Add appropriate comments and click Submit to bypass testing of the change request.
- In the upper-right corner of Customer Decision Hub, click the user icon, and then select Log off to return to the login screen.
5 Complete the change request
- On the login screen, log in to 1:1 Operations Manager as a Team Lead by entering the following credentials:
- In the User name field, enter TeamLead.
- In the Password field, enter rules.
- In the lower-left corner, click the user icon and select Switch portal > Customer Decision Hub.
Note: If you are asked whether you want to show the Customer Decision Hub portal, click OK.
- In the navigation pane of Customer Decision Hub, click Revision Management to open the Revision Management landing page.
- In the Welcome back, Team Lead section, click Update business rules to open the current revision.
- In the Change requests within this revision section, click Promote shadow model to open the change request.
- In the header of the change request, click Approve.
- Enter appropriate comments, and then click Submit to submit the change request to the Revision Manager.
Note: When all change requests in the current revision are completed and approved, the revision manager deploys the revision to the production environment.
This Challenge is to practice what you learned in the following Module:
- MLOps v4
Available in the following mission:
If you are having problems with your training, please review the Pega Academy Support FAQs.
Want to help us improve this content?