Replacing a predictive model
3 Tasks
10 mins
Scenario
U+ Bank uses Pega Customer Decision Hub™ to personalize the credit card offers that a customer receives on its website. The bank makes a proactive retention offer instead of a credit card offer for customers that are likely to leave the bank soon. The bank has recorded historical churn data for its customer base. As a data scientist, you have used this historical data to create a new churn model using an external machine learning application, and now you place the new model in shadow mode in the business operations environment, to monitor its performance.
The revision manager then deploys the change.
Use the following credentials to log in to the exercise system:
| Role | User name | Password |
|---|---|---|
| Data scientist | DataScientist | rules |
| Revision manager | RevisionManager | rules |
Your assignment consists of the following tasks:
Task 1: Create a validation data set
Use ValidationData to create a data set for model validation.
Task 2: Place the new model in shadow mode
Place the ChurnH20 model in shadow mode in the Predict churn propensity prediction.
Task 3: Deploy the change
As a revision manager, deploy the change.
Challenge Walkthrough
Detailed Tasks
1 Create a validation data set
- On the exercise system landing page, click Pega CRM suite to log in to Customer Decision Hub.
- Log in as a data scientist:
- In the User name field, enter DataScientist
- In the Password field, enter rules.
- In Customer Decision Hub, in the navigation pane on the left, click Intelligence > Prediction Studio.
- In Prediction Studio, in the navigation pane on the left, click Data > Data sets to view the list of data sets.
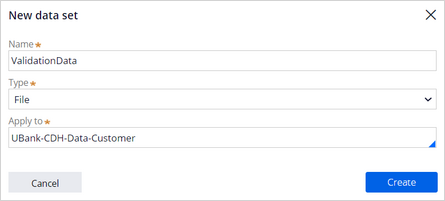
- On the Data sets page, in the upper-right corner, click New to add a new data set.
- Configure the new data set with the following information:
- In the Name field, enter ValidationData.
- In the Type list, select File.
- In the Apply to field, enter or select UBank-CDH-Data-Customer.
- Click Create to build the data set.
- On the File tab of the data set, in the File location section, select Embedded file.
- Download the ValidationData data set to your local machine, and then extract the .csv file
- In the File Management section, click Upload file.
- In the Upload file dialog box, click Choose File.
- Select the ValidationData.csv file.
- In the Upload file dialog box, click Upload.
- In the upper-right corner, click Save.
2 Place the new model in shadow mode
- Download the ChurnH2O.zip file to your local machine and extract the ChurnH2O.mojo file.
- In the navigation pane of Prediction Studio, click Predictions to open the Predictions work area.
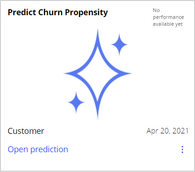
- Click the Predict Churn Propensity tile to open the prediction.
- On the Models tab, in the ChurnPML row, click the More icon, and then select Replace model.

- In the Replace model dialog box, ensure that Model is selected, and then click Next.
- Select the Compare the models check box.
- On the Upload tab, in the Select a PMML, H2O MOJO or Pega OXL file section, click Choose File.
- Select the ChurnH2O.mojo file, and then click Next.

- In the Dataset list, select ValidationData.
- In the Outcome column list, select Outcome.
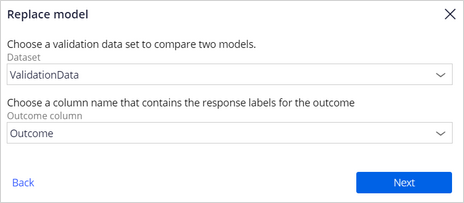
- Click Next.
- In the Model name field, enter ChurnH20.
- Click Replace.
Note: During the process of replacing the model, the status changes to CONFIGURATION IN PROGRESS, VALIDATION IN PROGRESS, and then READY FOR REVIEW.
- In the Churn section, when the status of the ChurnH20 model changes to READY FOR REVIEW, click ChurnH20 (M-2001).

- On the Analysis tab, inspect the model comparison.
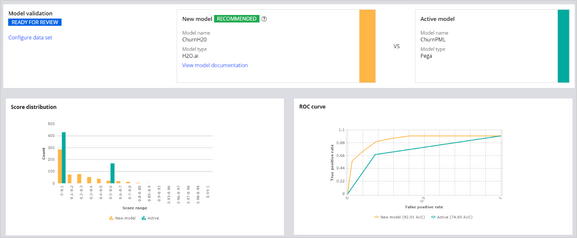
- In the upper-right corner, click Evaluate.
- In the Evaluate ChurnH20 dialog box, confirm that Approve new candidate model and start shadowing (recommended) is selected.
- In the Reason field, enter The new model outperforms the active model, and then click Save to return to the prediction strategy.
- Confirm that the ChurnH2O model is in shadow mode.

- In the lower-left corner, click the user icon and log out.
3 Deploy the change
- Log in as a revision manager:
- In the User name field, enter RevisionManager
- In the Password field, enter rules.
- In Customer Decision Hub, in the navigation pane on the left, click Revision Management.
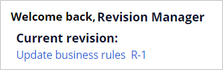
- Click Update business rules R-1 to open the revision that is automatically created during the MLOps process.
- Confirm that the change request Update model 'ChurnH20 (M-1)' is part of the revision.
- In the upper-right corner, click Actions > Deploy revision.
- In the comment field, enter Revision completed.
Note: The revision manager has the option to include the ValidationData data set the data scientist created during the MLOPs process as part of the deployment.
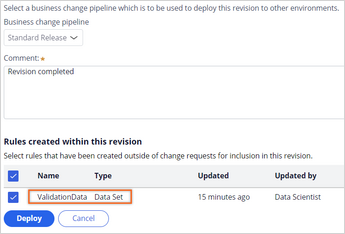
- Click Deploy to start the deployment process through the Business Change pipeline.
Note: This process can take up to several minutes.
- In the upper-right corner, click Refresh. Repeat until the status changes to TEST & ACTIVATE.
- In the page header, click Test or activate this revision.

- In the Test or activate revision dialog box, click Activate for all operators.
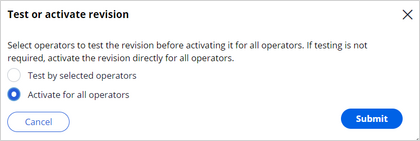
- Click Submit to close the dialog box.
- In the upper-right corner, click Complete revision.
- In the Complete revision dialog box, click Submit.
- In the upper-right corner, click the user icon and log out.
This Challenge is to practice what you learned in the following Modules:
Available in the following mission:
If you are having problems with your training, please review the Pega Academy Support FAQs.
Want to help us improve this content?