Running Pega Customer Decision Hub setup wizard
4 Tasks
45 mins
Scenario
U+ Bank has decided to improve their customers' experience with personalized decisions that predictive and adaptive analytic models drive. To start development, the project team wants to set up the application by running Pega Customer Decision Hub™ setup wizard. As the system administrator, you want to create a new operator with the right access group to launch the setup wizard and configure the application leveraging the financial services data model and Next Best Action designer template.
Use the following credentials to log in to the exercise system:
| Role | User name | Password |
|---|---|---|
| System administrator | SystemAdmin | rules |
Your assignment consists of the following tasks:
Task 1: Create SystemArchitect operator
Log in to Dev Studio to create a new System Architect operator. Update the default access group as of this operator as CDHTemplate:CDHInstall, set up the organization structure, and then update the login password to rules.
Task 2: Set up Customer Decision Hub
Log in to Pega Customer Decision Hub as the System Architect, and then follow the steps of setup wizard to configure the Customer Decision Hub application for U+ Bank.
Task 3: Explore the context dictionary
Log in to App Studio, and then explore the context dictionary and repository settings.
Task 4: Explore the applications
Log in to Dev Studio, and then explore the generated applications and other artifacts setup by the wizard.
Challenge Walkthrough
Detailed Tasks
1 Create SystemArchitect operator
- On the exercise system landing page, click Pega CRM suite to log in to Dev Studio.
- Log in as the system administrator with User name SystemAdmin and Password rules.
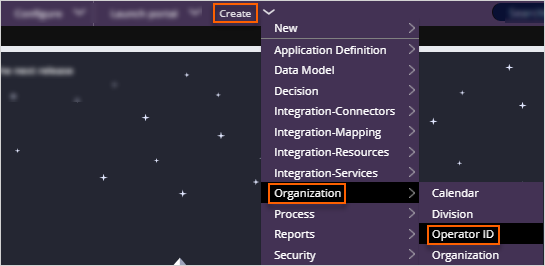
- In the header of Dev Studio, click to Create > Organization > Operator ID to create a new operator.
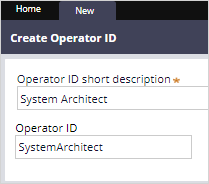
- In the Operator ID short description text box, enter System Architect.
- In the Operator ID field, enter SystemArchitect.
- In the upper right, click Create and open to edit the operator ID record.
- On the Operator ID record, on the Profile tab, in the Application Access section, in the Access Group field, enter CDHTemplate:CDHInstall.
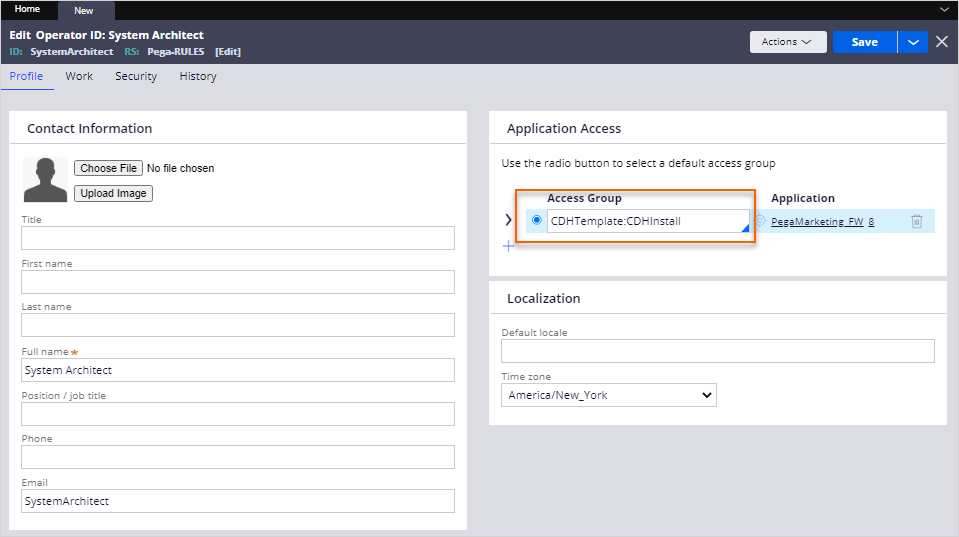 Caution: Ensure that the default access group radio button is selected.
- Click the Work tab to update the organizational unit.
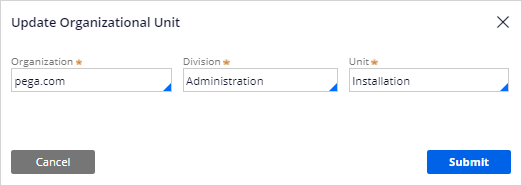
- On the Work tab, in the Routing section, click Update to open the Update Organizational Unit dialog box.

- In the Update Organizational Unit dialog box, complete the following steps:
- In the Organization field, enter or select pega.com.
- In the Division field, enter or select Administration.
- In the Unit field, enter or select Installation.
- Click Submit to close the Update Organizational Unit dialog box.
- On the operator ID record, click the Security tab to update the login credentials.
- On the Security tab, select the Allow rule check out checkbox.
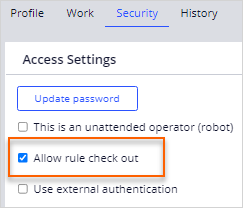
- Click Update password to update the login password for the System Architect operator.
- In the Change Operator ID Password dialog box, in the New password enter rules.
- In the Confirm new password field, enter rules, and then click Submit.

- In the upper-right corner of the operator ID record, click Save.
- In the lower-left corner, click the user icon, and then select Log off to log out of Dev Studio.
2 Set up Customer Decision Hub
- Log in as the setup operator with User name SystemArchitect and Password rules.
- In the Customer Decision Hub setup wizard, click Retail banking.

- At the bottom of the page, click Next.
- In the Select a repository list, select CDHData, and then click Next.
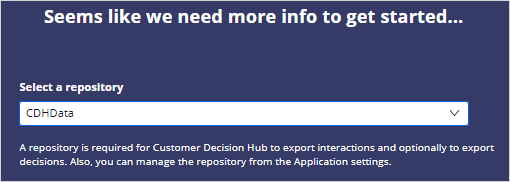 Note: The CDHData is a preconfigured AWS S3 repository for the exercise. In Pega Cloud® services, a Pega Cloud File Storage is preconfigured for you as a default repository. You can select this repository or a different one as your decision repository. On client-cloud and on-premise installations, users can later set up the repository or select a repository if one already exists. The system administrator can configure the repository in Dev Studio by selecting Create > SysAdmin > Repository.
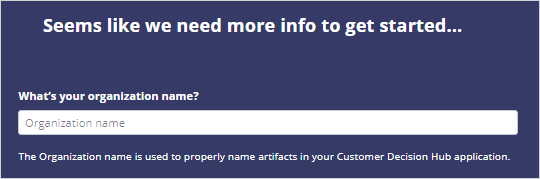
- In the What's your organization name? field enter UBank, and then click Next.
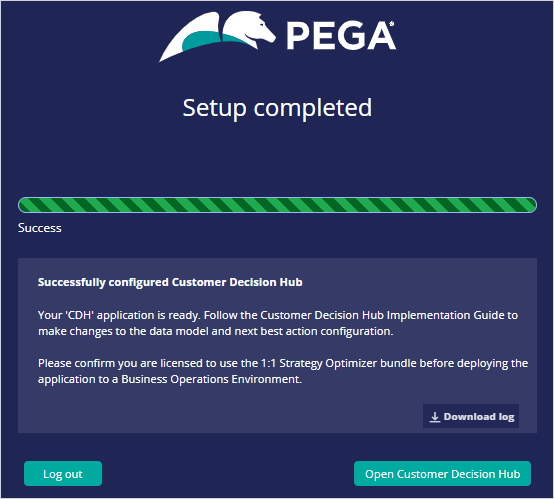
- On the Review your configuration step, click Start.
Caution: This process may take up to 20 - 25 minutes. During this time, the setup wizard creates new applications, applies the financial data model, generates the context dictionary, applies the Next-Best-Action Designer template, and creates data flows to export interaction data.
- When the setup is complete, click Open Customer Decision Hub to log in to App Studio.
 Caution: The setup wizard automatically updates the System Architect operator ID record with the CDH:CDHAdmins access group.
3 Explore the context dictionary
- In the navigation pane of App Studio, click Settings > Context Dictionary to review the context entities.
- On the Context Dictionary page, in the PRIMARY CONTEXT section, click the Gear icon to review the settings of the customer context.
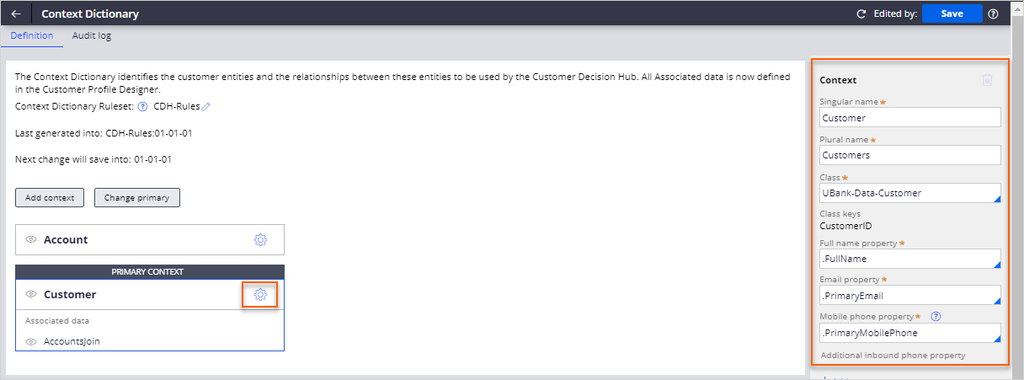 Note: The setup wizard uses the organization name to build the primary context as UBank-Data-Customer and assigns required attributes.
- On the right, in the Context pane, review the Associated data section.
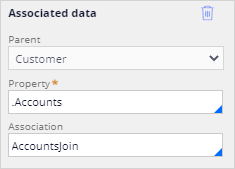 Note: The setup wizard creates a new page list property, .Accounts, and builds the Association with the account class by using an AccountsJoin association.
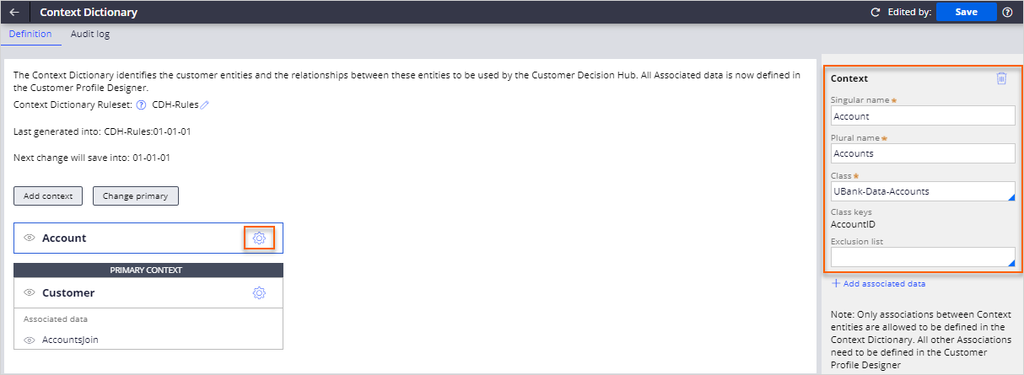
- On the Context Dictionary page, in the Account section, click the Gear icon to review the settings of the account context.
- In the navigation pane of App Studio, select Settings > Application to review the repository configuration.
- In the Data export location section, confirm that the Repository field is configured to CDHData.

4 Explore the generated applications
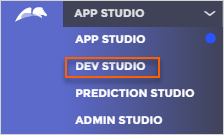
- In the header of App Studio, click App Studio > Dev Studio to switch workspaces.
- In the header of Dev Studio, click Application > Definition to explore the application record.

- On the Definition tab, review the following information:
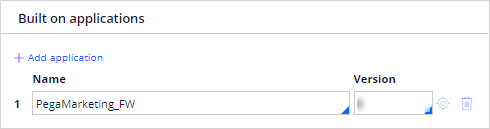
- In the Built on applications section, verify that the Customer Decision Hub implementation application is built on the PegaMarketing_FW.
- In the Enabled components section, verify that the FinancialServicesXCARDataModel is installed.

- In the Application rulesets section, verify that the rulesets are in place.
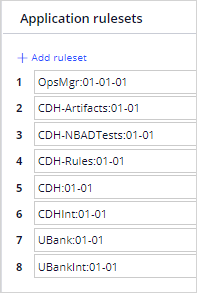 Note: The OpsMgr:01-01-01 ruleset is automatically added to the ruleset stack to support change management and store artifacts that are generated in the Business Operations Environment (BOE) of Pega 1:1 Operations Manager™.
- In the Built on applications section, verify that the Customer Decision Hub implementation application is built on the PegaMarketing_FW.
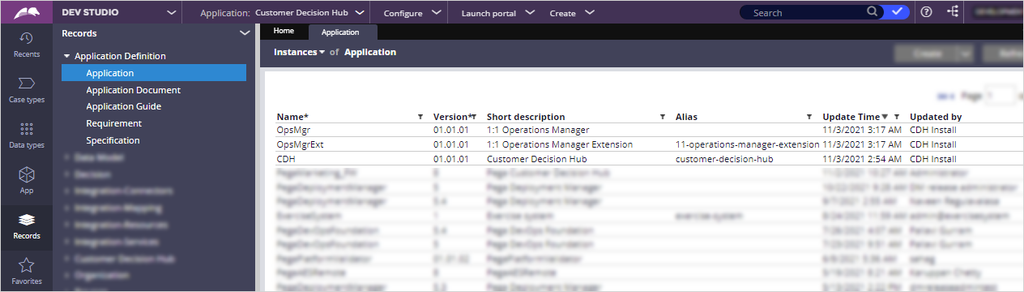
- In the navigation pane of Dev Studio, click Records > Application Definition > Application to review the application records.
- Confirm that there are two new applications along with Customer Decision Hub:
- 1:1 Operations Manager
- 1:1 Operations Manager Extension
 Caution: 1:1 Operations Manager (OpsMgr) is the overlay application where the content team manages day-to-day activities such as creating, updating, and deleting new actions and treatments. Use this appliciation in the BOE environment only. Do NOT use the application in the development environment. 1:1 Operations Manager application is created to prepare and support change management when the BOE environment is ready.
1:1 Operations Manager Extension (OpsMgrExt) is the application where the project team can extend and customize the user experience of 1:1 Operations Manager, such as customizing the approval processes and adding or remove new properties to screens.
Customer Decision Hub is the enterprise application where project team and enterprise capabilities teams work in order to develop the foundation of customer decision hub and extend integration points with new channels.
- In the navigation pane of Dev Studio, click Configure > Decisioning > Decisions > Data Flows > Real-time Processing to review the real-time data flow list.
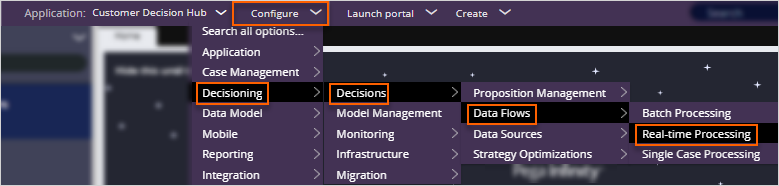
- On the Real-time processing tab, verify that WriteDataToDecisionFiles and WriteDataToInteractionFiles data flows are generated.
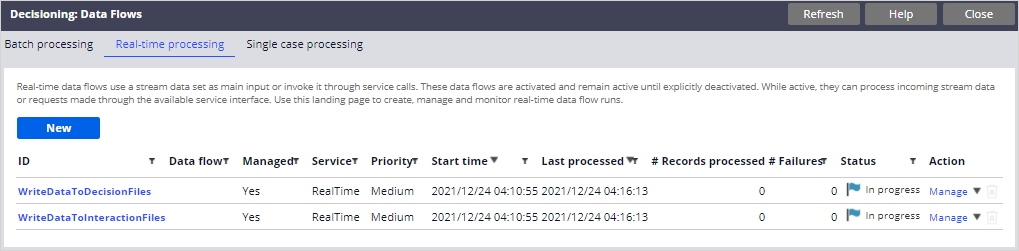 Caution: The WriteDataToDecisionFiles data flow writes every Customer Decision Hub decision to the Amazon S3 repository for auditing purposes. The WriteDataToInteractionFiles data flow writes every interaction history record that Customer Decision Hub captures to the Amazon S3 repository.
In a real-life scenario, the WriteDataToDecisionFiles data flow is inactive by default. This data flow can be activated by setting the decision/writeToStream dynamic system setting to true. In the exercise system, the decisioin/writeToStream dynamic system setting is set to true.
- In the header of Dev Studio, click Launch portal > Customer Decision Hub to launch the Customer Decision Hub portal.
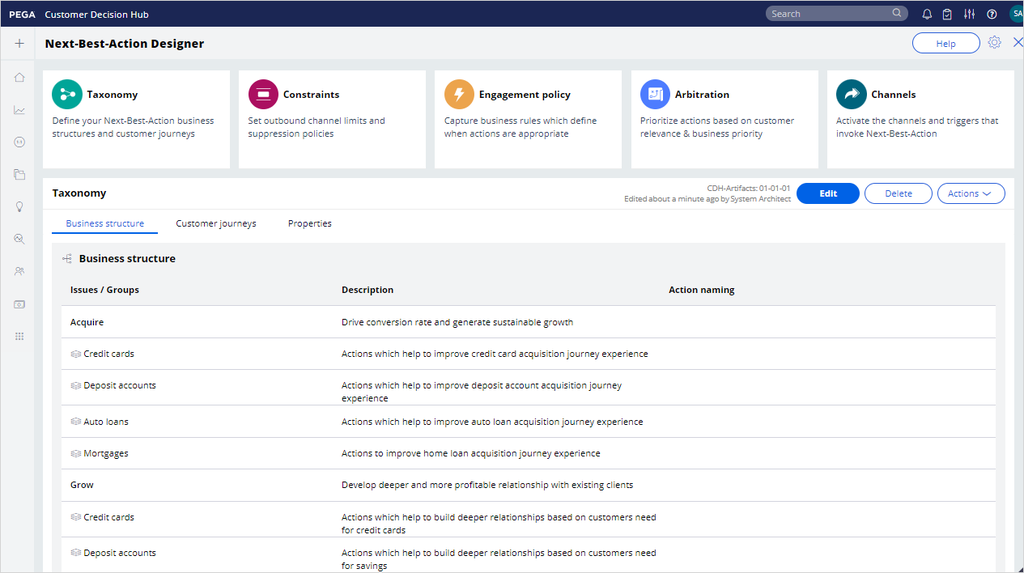
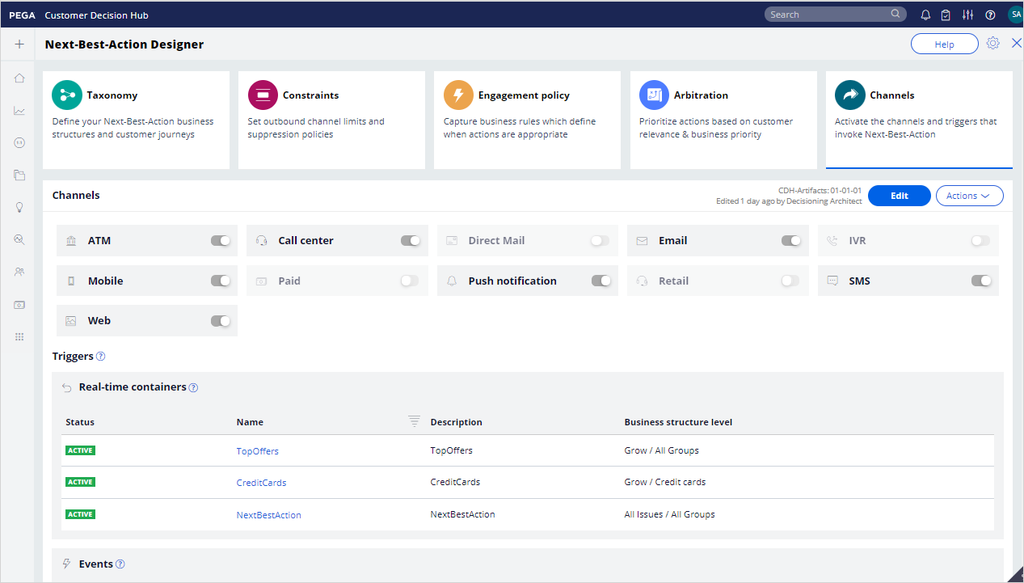
- In the navigation pane of Customer Decision Hub, click Next-Best-Action > Designer to open Next-Best-Action Designer.
- Review the Next-Best-Action Designer settings for each tile:
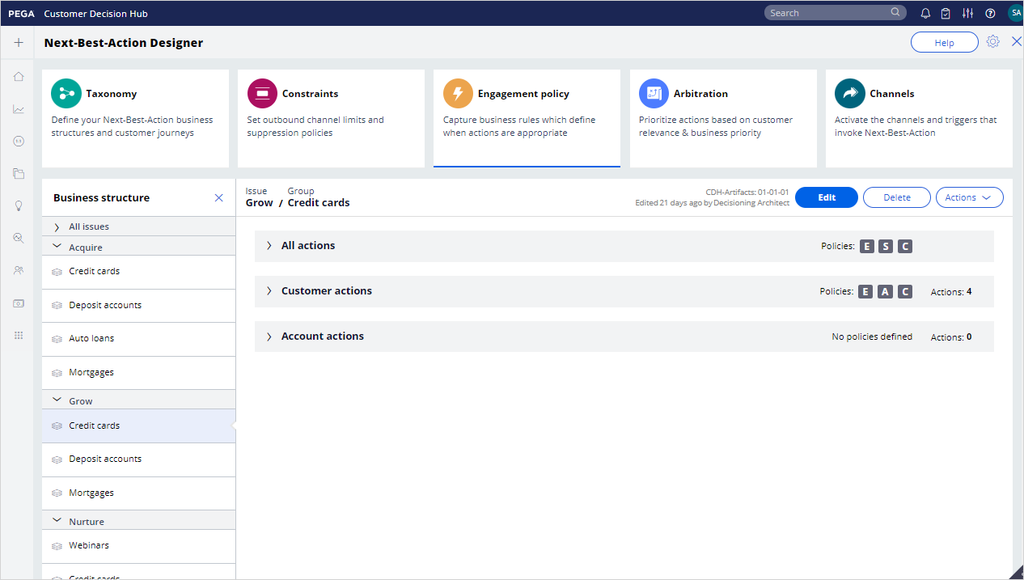
- Click Taxonomy tab to review the business structure in Next-Best-Action Designer.
- Click Constraints to review pre-defined contact policy library.

- Click Engagement policy to review available engagement policies.
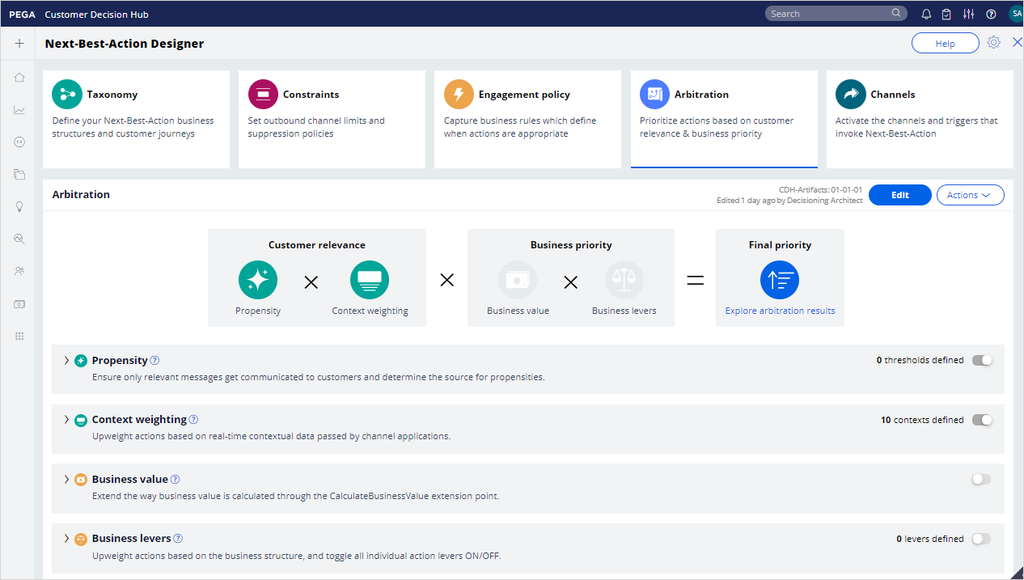
- Click Arbitration to verify the prioritization algorithm.
- Click Channels tab to review available channels, real-time, and event-driven containers.
- Click Taxonomy tab to review the business structure in Next-Best-Action Designer.
This Challenge is to practice what you learned in the following Module:
Available in the following mission:
If you are having problems with your training, please review the Pega Academy Support FAQs.
Want to help us improve this content?