Simulating an external data source
Archived
3 Tasks
10 mins
Scenario
During roadside assistance, a service provider performs minor mechanical repairs. Requests for roadside assistance must identify the vehicle so that the service provider can prepare for the service call. For example, certain vehicles might require a flat-bed tow truck or a higher octane fuel blend.
To allow service providers to prepare for a service call, stakeholders want to ensure that users enter only a valid combination of make, model, and year for a vehicle. As part of the initial application release, a listing of vehicle models is sourced from an external system. Before the external source is configured and tested, stakeholders want to simulate the process of providing the year, make, and model of a vehicle.
Configure a simulated data source for vehicle model data to validate the Identify vehicle view. A separate developer has configured the layout and behavior of the view. You create a simulated data source for the drop-down list of vehicle models to use until the external system with the data source is configured and tested.
Note: For this exercise, two models of vehicles are sufficient to test the view. The list of models is filtered based on the year and make.
The following table provides the credentials you need to complete the challenge.
| Role | User name | Password |
|---|---|---|
| Application Developer | author@gogoroad | pega123! |
Note: Your practice environment may support the completion of multiple challenges. As a result, the configuration shown in the challenge walkthrough may not match your environment exactly.
Challenge Walkthrough
Detailed Tasks
1 Simulate a data source to the data object
- In the navigation pane of App Studio, click Data to open the Data objects and integrations landing page.
- On the Data objects and integrations landing page, click the Vehicle models data object to configure a simulated data source.
- Click the Data pages tab.
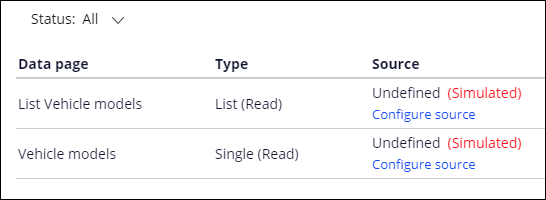
- Click Create simulated sources to add a simulated data source to the data object. The Rule generation status dialog box is displayed.
- In the Rule generation status dialog box, click to acknowledge that a set of data pages with simulated sources is successfully created. The updated Data pages with simulated data sources are listed.
Note: Refresh the browser to view the data pages if they are not automatically displayed.
2 Add simulated data to the data object
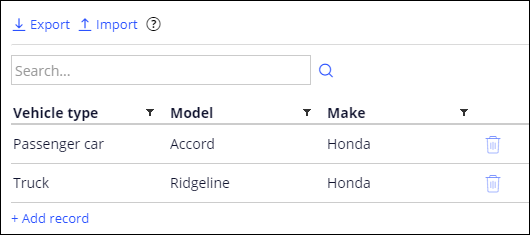
- In the Vehicle models data object, click the Records tab to add data records to the data object.
- Click Add record to add a row to the list of data records.
- In the empty row, in the Vehicle type field, enter Truck.
- In the Model field, enter Ridgeline.
- In the Make field, enter Honda.
- Repeat steps 2-5 to add a second record to the data object, using the information in the following table.
Field Value Vehicle type Passenger car Model Accord Make Honda - In the upper right, click to complete the configuration of the simulated data source.
3 Reference the simulated data source
- In the header of App Studio, click Preview to return to the User portal.
- In the Landing pages menu on the left, click Create > Assistance Request to create a new case.
- Advance the case to the Identify vehicle step, entering information in any required fields.
- In the upper-right corner, click Design to enable design mode.

- On the Identify vehicle form, hover over the vehicle information fields, and then click Edit this section to configure the view to access the simulated data source.
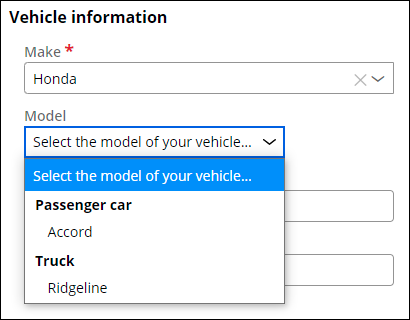
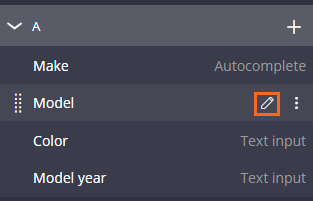
- In the section properties pane on the right, to the right of the Model field, click Edit this "Dropdown" to display the Dropdown properties, which contains the configuration options for the source of the list that populates the control.
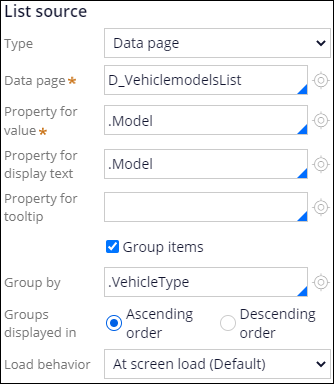
- In the List source section, in the Type drop-down list, select Data page to populate the drop-down by using one of the data pages you configured. The properties pane displays additional fields to configure access to the data page.
- In the Data page field, enter or select D_VehiclemodelsList to access a list of the records from the simulated source.
- In the Property for value field, enter or select .Model to use the model name as the value of the field in the form. The Property for display text field automatically updates to reference the .Model property.
- Select the Group items check box to group the list items in the drop-down field. The properties pane updates to display the Group by field.
- In the Group by field, enter or select .VehicleType to group the drop-down entries by vehicle type.
- Click to complete the configuration of the Identify vehicle form.
- Click the Design to exit design mode.
Confirm your work
- In the Make field, enter or select Honda.
- Click the Model drop-down list to display the entries defined for the simulated data source.