Externe Datenquelle simulieren
4 Aufgaben
10 Min.
Szenario
Bei der Pannenhilfe führt ein Service-Provider kleinere mechanische Reparaturen durch. Bei Anfragen auf Pannenhilfe muss das Fahrzeug genau benannt werden, damit sich der Service-Provider auf den Serviceabruf vorbereiten kann. Bestimmte Fahrzeuge können z. B. einen Tieflader-Abschleppwagen oder eine Kraftstoffmischung mit höherer Oktanzahl voraussetzen.
Damit sich Service-Provider auf einen Serviceabruf vorbereiten können, wollen die Beteiligten sicherstellen, dass die Nutzer für ein Fahrzeug nur eine gültige Kombination aus Marke, Modell und Baujahr eingeben. Bei der ersten Version der Anwendung wird eine Liste von Fahrzeugmodellen aus einem externen System bezogen. Vor der Konfiguration und der Erprobung der externen Quelle möchten die Beteiligten, dass die Angabe von Baujahr, Marke und Modell eines Fahrzeugs simuliert wird.
Konfigurieren Sie eine simulierte Datenquelle für Fahrzeugmodelldaten, mit der Sie die Ansicht Identify vehicle prüfen können. Ein eigener Entwickler hat das Layout und das Verhalten der Ansicht konfiguriert. Sie erstellen eine simulierte Datenquelle für die Drop-down-Liste der zu verwendenden Fahrzeugmodelle, bis das externe System mit der Datenquelle konfiguriert und getestet ist.
Hinweis: Um die Ansicht zu prüfen, genügen bei dieser Übung zwei Fahrzeugmodelle. Die Liste der Modelle wird anhand des Baujahrs und Modells gefiltert.
In der folgenden Tabelle finden Sie die Anmeldedaten, die Sie zur Durchführung der Challenge benötigen.
| Rolle | Benutzer ID | Kennwort |
|---|---|---|
| Application Developer | author@gogoroad | pega123! |
Challenge-Schritte
Genaue Übungsschritte
1 Simulate a data source to the data object
- In App Studio, click Data > Data objects and integrations to open the Data objects and integrations landing page.
- From the Data objects and integrations landing page, click the Vehicle Models data object to configure a simulated data source.
- Click the Data views tab.
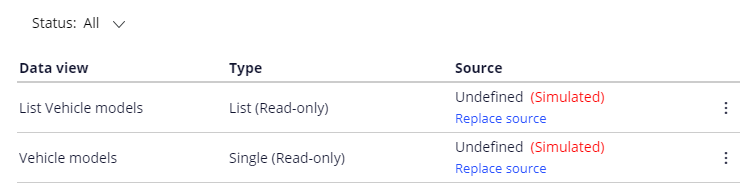
- Click Create simulated sources to add a simulated data source to the data object. The Rule generation status dialog box is displayed.
- In the Rule generation status dialog box, click to acknowledge that a set of data views with simulated sources is successfully created. The updated Data views with simulated data sources are listed.
2 Add simulated data to the data object
- In the Vehicle models data object, click the Records tab to add data records to the data object.
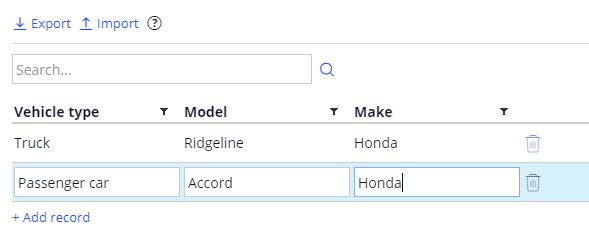
- Click Add record to add a row to the list of data records.
- In the empty row, in the Vehicle type field, enter Truck.
- In the Model field, enter Ridgeline.
- In the Make field, enter Honda.
- Repeat steps 2-5 to add a second record to the data object, using the information in the following table.
Field Value Vehicle type Passenger car Model Accord Make Honda - Click to complete the configuration of the simulated data source.
3 Reference the simulated data source
- Click Preview application to return to the Case Manager portal.
- In the upper-left corner of the Case Manager, click New > Assistance Request to create a new case.
- Advance the case to the Identify vehicle step, entering information in any required fields.
- On the Identify vehicle form, position the pointer over the vehicle information fields to display the Configure this view icon.
- Click Configure this view to configure the view to access the simulated data source.
- Click the Model drop-down field to display the configuration pane for the view containing the drop-down control.
- Click the Model drop-down field again to display the configuration pane for the drop-down control, which contains the configuration options for the source of the list that populates the control.
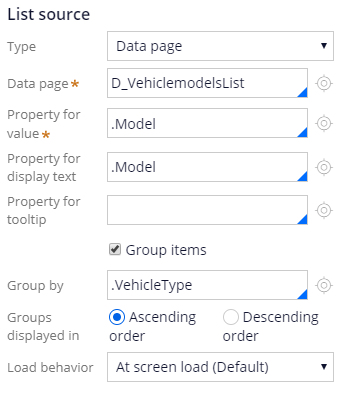
- Under List source, from the Type drop-down list, select Data page to populate the drop-down by using one of the data views you configured. The configuration pane displays additional fields for configuring access to the data view.
- In the Data page field, enter or select D_VehiclemodelsList to access a list of the records from the simulated source.
- In the Property for value field, enter or select .Model to use the model name as the value of the field in the form. The Property for display text field automatically updates to reference the
.Modelproperty. - Select the Group items check box to group the list items in the drop-down field. The configuration pane updates to display the Group by field.
- In the Group by field, enter or select .VehicleType to group the drop-down entries by vehicle type.
- Click to complete the configuration of the Identify vehicle form.
- In the Dropdown configuration pane, click the Close icon.
- In the section configuration pane, click the Close icon.
4 Confirm your work
- In the Identify vehicle form, in the Model year field, enter 2015.
- In the Make field, enter Honda.
- Click the Model drop-down to display the entries defined for the simulated data source.

In der folgenden Mission verfügbar:
If you are having problems with your training, please review the Pega Academy Support FAQs.
Möchten Sie uns dabei helfen, diesen Inhalt zu verbessern?