
Customizing the user interface for agents
2 タスク
15 分
シナリオ
You have been asked to make the following changes to the Pega Customer Service user interface (UI), which is displayed when a customer service representative logs in.
To complete this challenge:
Task 1: Change the label Avg monthly balance to Average monthly balance.
Task 2: Modify the Address Change service request to use a three-column layout.
Use the following credentials to log in to the exercise system:
| Role | User name | Password |
|---|---|---|
| Application administrator | CSAppAdmin | password123! |
チャレンジ ウォークスルー
詳細なタスク
1 Change the Avg monthly balance field label to Average monthly balance
- Log in to the Interaction Portal with username CSAppAdmin and password password123!.
- Click Preview Application to access the Interaction Portal.
- Click New > Demo Screen Pops > Demo Pop - CONNOR to start an interaction with Sara Connor.
- Click Accept to accept the incoming call. The composite view for Sara Connor is displayed.
- Click Design to enable design mode.
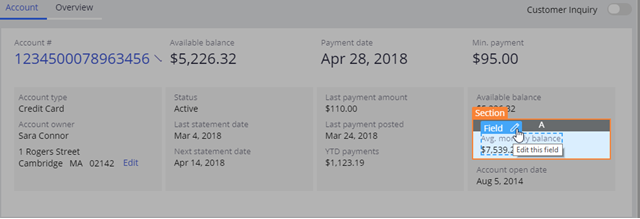
- Hover over the Avg monthly balance label, and then click the edit icon to enable edit mode.
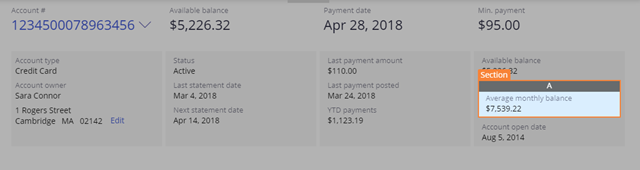
- Inside the section, hover over the label to display the Field selection, and then click the edit icon. The label properties are displayed in the pane on the right.
- In the Label field of the properties panel, enter Average monthly balance.
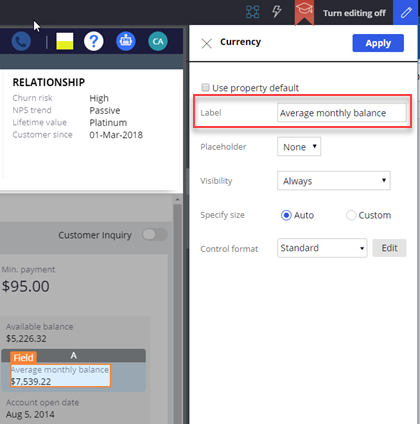
- Click Apply to save your update.
- In the upper-left corner of the pane, click X to close the edit view.
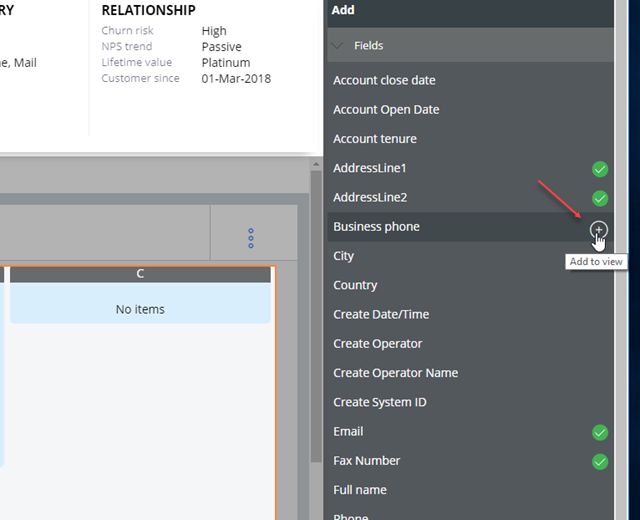
2 Modify the Address Change service request to use a three-column layout and add a Business phone field to the new column
- Click Add Task, and then double-click Address Change to start the case.
- Click Design to enable design mode.
- Hover over the Address line 1 area and click the edit icon to edit the section.
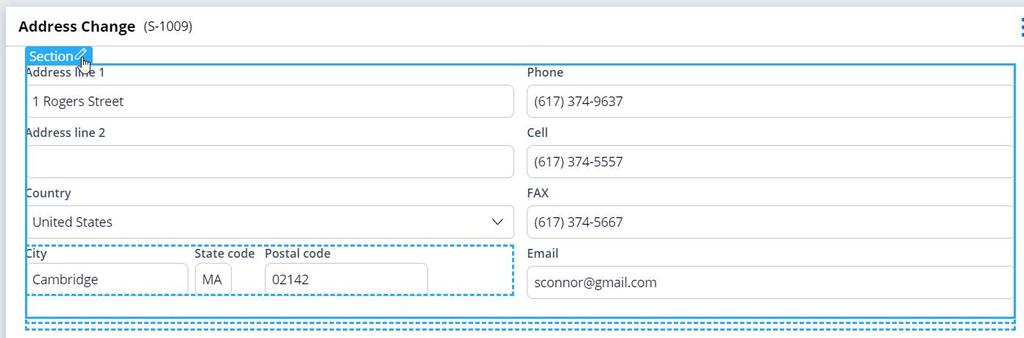
- From the pane on the right, click Change to display the available design templates.
- Click on the 3 Column design template icon to change this layout from the current two-column layout to the new three-column layout.
- In the pane on the right, on the C tab, click the Add icon to view the available reusable fields.
- Hover over the Business phone field, and then click the Add to view icon to add the field to column C. After the screen refreshes, the Business phone field is applied to column C.
- In the upper-left corner of the pane, click X to close the view, and then click X again to close the pane.
- Click Wrap Up to conclude the interaction with Sara.
- Click Submit to close the interaction.
このモジュールは、下記のミッションにも含まれています。
If you are having problems with your training, please review the Pega Academy Support FAQs.