Designing an approval process
Automating the approval process is another value-added feature of Pega applications. In Pega Platform™, the approval process is a decision point, where an individual decides to approve or reject a Case.
For Ren, there are two different points in the process that require approval. The first is the approval of the team supervisor, Gab. The second approval is from the Requester. The sequence of events for Ren’s ideal process flow is as follows:
- When a Creative Content team member completes a project, it is routed to the team supervisor, Gab, for review and approval.
- If Gab approves, the project is routed to the Requester for review and approval.
- If the Requester approves the project, the Case is resolved.
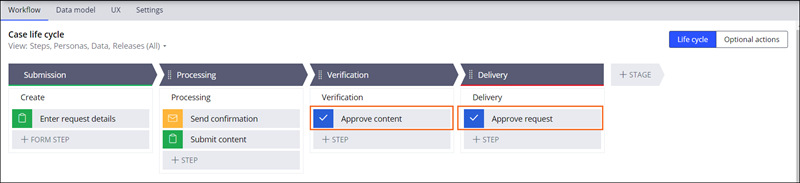
The Approve/Reject Steps associated with Ren's ideal process flow are already set in the Content Request Case Type. They are labeled Approve content and Approve request.
Each Approve/Reject Step, identified by the checkmark icon, marks a decision point in the Case Type that requires human interaction. Ren can configure the actions that are taken in response to either the Supervisor or Requester approving or rejecting the content submission.
With the Approve/Reject Steps in place, Ren's next task is to configure the routing.
Routing the approvals
As with the Collect information Steps, Ren's routing choices for an approval Step are:
- Specific user
- Work queue
- Use business logic
To design the approval process, Ren selects Specific user for both the Approve content and Approve request Steps.
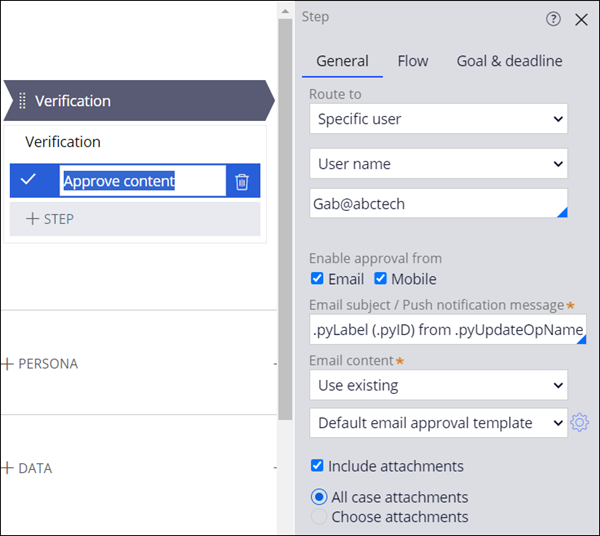
To route work for the Approve content Step, Ren does the following:
- Click the Approve content Step to open the contextual properties pane on the right.
- On the General tab, under the Route to section, enter the following information into the fields:
- Specific user
- User name
- Gab@abctech
Ren follows similar steps for the Approve request Step:
- Click the Approve request Step to open the contextual properties pane.
- Under the Route to section, enter the following information into the fields:
- Specific user
- User reference field
- Create Operator
By selecting Create operator, the Approve request Step is routed to the individual who created the Case.
Configuring the views
In Ren's application the views for both the supervisor and requester Approve/Reject Steps will be similar.
Note: In Pega applications, a view is what the end-user sees when they access the live application.
The Approve content Step will contain a single new field called Supervisor review.
Ren completes the following steps to create the view:
- Click the Approve content Step to open the contextual properties pane.
- On the General tab, click .
- Click the icon to delete the Notes field.
- Click +Add.
- Click Fields.
- Click Create new field.
- In the Name field, enter Supervisor review.
- In the Type list, select
- Click for the field.
Ren adds fields for the Completed project and the Project notes (Edit mode: Read-only), and then clicks Submit to save the view.
Ren repeats the steps above to create a similar view for the Approve request Step, adding the Requester review field. He also adds fields for the Completed project, Project notes (Edit mode: Read-only), and Supervisor Review (Edit mode: Read-only), and then clicks Submit to save the view.
Enabling email and mobile approval
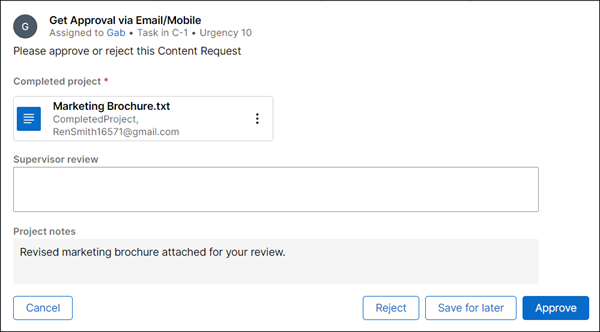
Ren and Gab have decided to enable approval for both email and mobile devices. This allows the Case to be approved or rejected outside of the Pega application and the Web Portal.
In both cases, the user specified in the routing will receive a notification via email, text, or both, as in this Case. The user will be able to access the project and process the approval or rejection from within the notification.
To configure the functionality for the Approve content Step, Ren completes the following steps:
- Click on the Approve content step to open the contextual property pane.
- On the General tab, in the Enable approval from section, select both the Email and Mobile check boxes.
- Ren has decided to use the default templates for both the Email subject/Push notification messages and the Email Content sections, so no changes need to be made to these settings.
- Select the Included attachments check box.
- Select the All case attachments radio button.
- Click .
The following image shows the Approve request Step's configuration in App Studio:
In the following image, see the result of the App Studio configuration in the Web portal:
Ren follows the same steps to configure email and mobile notifications for the Approve request Step.
Review the following video to see Ren design the approval process for both the Approve content and Approve request Steps.
Note: The user interface depicted in the videos associated with this mission might differ slightly from your own due to alternate versions of the Pega Platform. This video has no audio and no closed captions.
Check your knowledge with the following interaction:
In your environment
In your own Pega environment, configure an approval process. You can mirror Ren’s application, or configure the approval process for your own situation.
This Topic is available in the following Module:
If you are having problems with your training, please review the Pega Academy Support FAQs.
Want to help us improve this content?