Calculating fields using decision tables
2 Tasks
15 mins
Scenario
GoGoRoad stakeholders want to ensure customer satisfaction by allowing the application of discounts based on whether the service provider is on time or late. Customers are offered a greater discount based on how late the service provider arrived. You are directed to add a calculated field to the Review service summary Step in the Assistance Request Case Type. The calculation is based on a decision table.
Note: The framework of this challenge uses the Constellation architecture of Pega Platform™. To practice this challenge on the Traditional UI architecture, see the Calculating fields using decision tables version 8.8 challenge.
The following table provides the credentials you need to complete the challenge.
| Role | User name | Password |
|---|---|---|
| Application Developer | author@gogoroad | pega123! |
Note: Your practice environment may support the completion of multiple challenges. As a result, the configuration shown in the challenge walkthrough may not match your environment exactly.
Challenge Walkthrough
Detailed Tasks
1 Add fields to the data model
- In the Pega instance for the challenge, enter the following credentials:
- In the User name field, enter author@gogoroad.
- In the Password field, enter pega123!.
- In the navigation pane of App Studio, click Case Types > Assistance Request to display the Assistance Request Case Life Cycle.
- In the top menu, click on the menu tab.
- In the Data model page, click to display a dialog box.
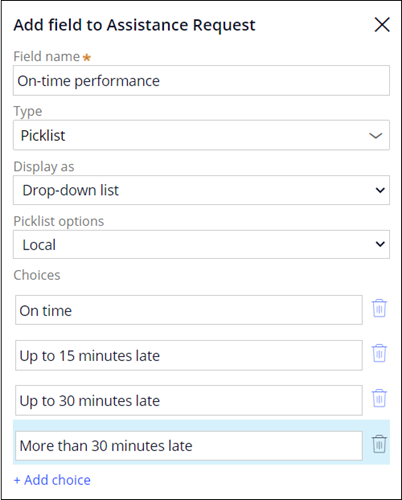
- In the Add field to Assistance Request dialog box, in the Field name field, enter On-time performance to name the field.
- In the list, select Picklist.
- In the Choices section, click Add choice to display an empty field.
- In the empty field, enter On time as a picklist value.
- Repeat steps 7-8 to add three additional picklist values: Up to 15 minutes late, Up to 30 minutes late, and More than 30 minutes late.
- Click to submit the picklist values.
- In the Add field to Assistance Request dialog box, in the Field name field, enter Service credit to name the field.
- In the Type list, select Currency.
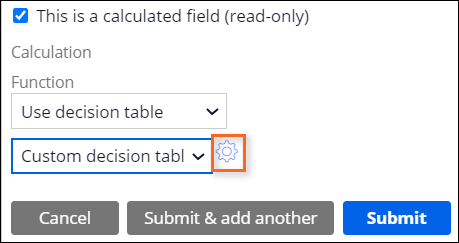
- Click Advanced, and then select the This is a calculated field (read-only) check-box.
- In the Function list, select Use decision table. The second list defaults to Custom decision table.
- To the right of the Custom decision table field, click the Gear icon to open the Evaluate service credit dialog box to build the decision table.
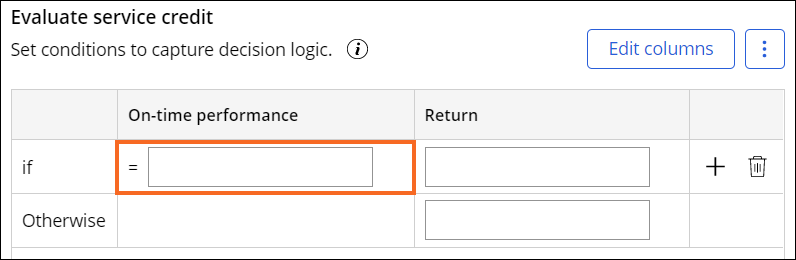
- In the Evaluate service credit dialog box, click Add columns to display the Add columns dialog box.
- In the Column list, select On-time performance. The Comparator value defaults to Equal to.
- Click Submit to define the first column of the decision table.
- Under the On-time performance column, click the empty cell, and then enter Up to 15 minutes late.
- In the Return column, enter .ServiceTotal * .05.
- To the right of the first cell of the Return column, click Add row.
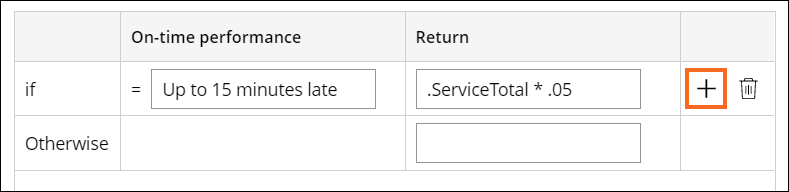
- Repeat Steps d-f to configure the decision table with the information from the following table.
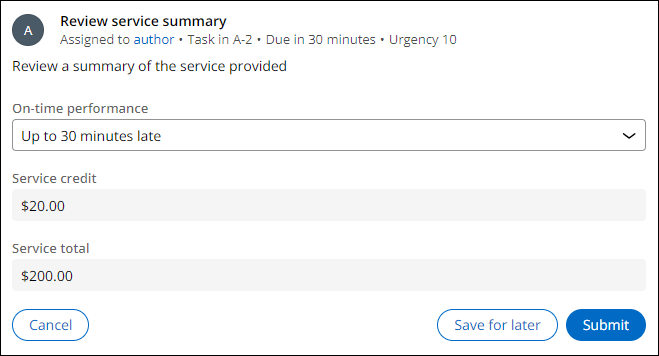
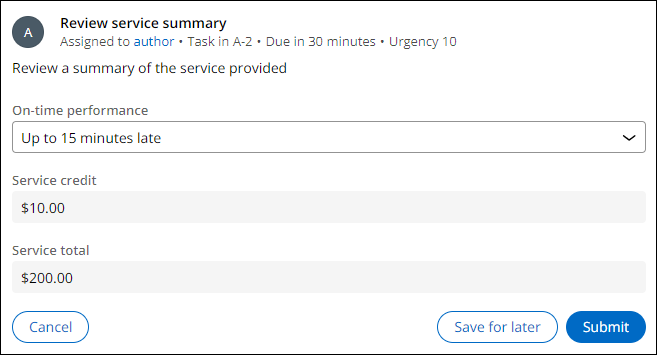
On-time performance Return Up to 30 minutes late .ServiceTotal * .1 More than 30 minutes late .ServiceTotal * .25 Otherwise 0 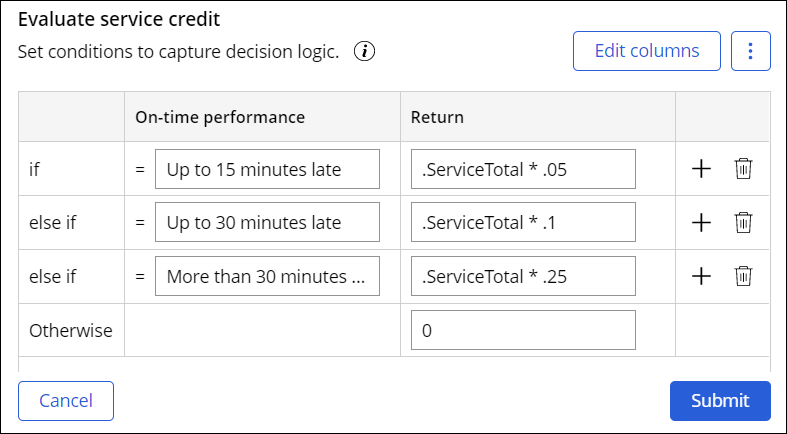
- Click Submit to close the decision table.
- Click Submit to add the calculated field.
- Click Save to save your changes to the Data Model.
2 Create the View for the Review service summary Step
- Click on the menu tab to display the Assistance Request Case Life Cycle.
- In the Resolution Stage, click the Review service summary Step to open the Step properties pane on the right.
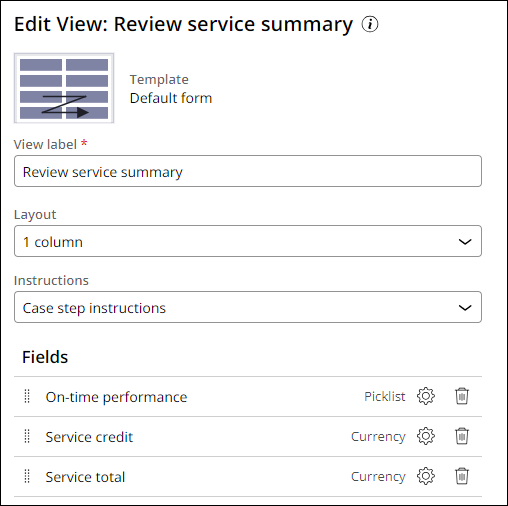
- In the Step properties pane, click Configure View to configure the Step View.
- On the Display tab, in the Edit View: Review service summary pane, click Add to add a field to the Review service summary View.
- Click Fields to display the fields available in your Data Model.
- Select On-time performance, Service credit and Service total.
- Click .
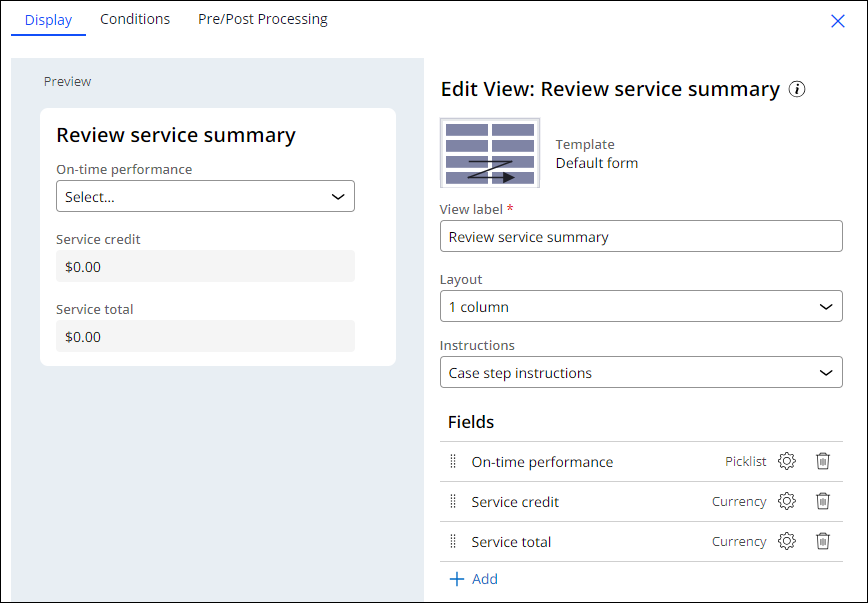
- To the right of the Service credit field, click the Gear icon to open the Configure field: Service credit dialog box.
- In the dropdown list, select Read-only.

- Click .
- Repeat steps 8-10 for the Service total field.
- Click .
- Click Save.
Confirm your work
- In the Assistance Request Case Type, click Save and run to create a new Assistance Request Case.
- Advance the Case to the Enter customer information View and select [email protected] from the Customer ID list.
Note: If you select a Customer ID with Gold coverage, the Invoice customer Process is skipped.
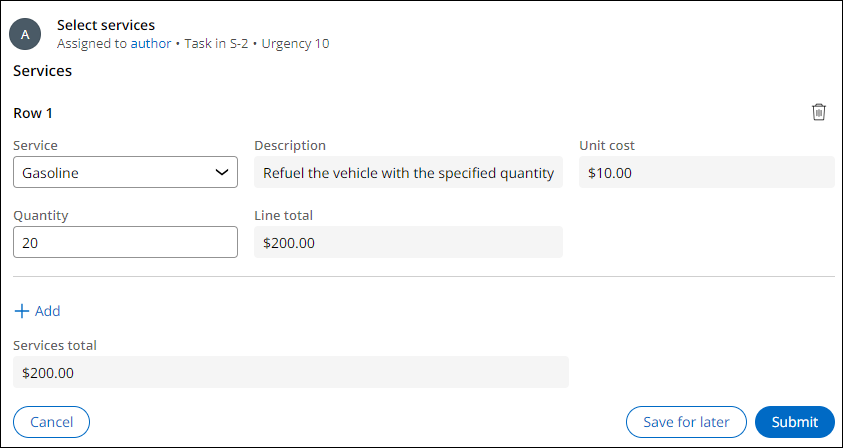
- Advance the Case to the Select services Step.
- In the Select services Step, in the Service list, select Gasoline.
- In the Quantity field, enter 20, and then click Submit.
- In the Step, in the On-time performance list, select Up to 30 minutes late.
- Note the value of the Service credit field updates.
- In the On-time performance list, select Up to 15 minutes late.
- Note the value of the Service credit field updates.
This Challenge is to practice what you learned in the following Module:
Available in the following missions:
If you are having problems with your training, please review the Pega Academy Support FAQs.
Want to help us improve this content?