Constructing Views in Constellation for BAs
6 Tasks
40 mins
Scenario
For users to interact with the GoGoRoad application, a user interface (UI) must be created. Highlighting the advantages of Constellation during both application development and maintenance, you, as a Pega BA, have advocated building the GoGoRoad application's UI using the Constellation architecture.
User stories
As a GoGoRoad CSR, I want to select the type of service requested from a drop-down list so that I can quickly identify the issue and provide that information to the service provider.
As a GoGoRoad CSR, I want to select the customer making the assistance request from a drop-down list of customers so that I can quickly access all of the information stored about the customer.
As a GoGoRoad CSR, I want to enter the address associated with the service request so that I can dispatch the service provider to the correct location.
As a GoGoRoad CSR, I want to enter the information associated with the vehicle in need of service so that I can provide that information to the service provider.
As a GoGoRoad CSR, I want to enter the information associated with the customer's payment method to ensure that GoGoRoad and the service provider are paid for services rendered.
As a GoGoRoad CSR I want to select the services rendered for the Assistance Request instance so that we can invoice the customer correctly.
Technical notes documented by the System Architect
- The Identify issue View contains a new field named Service type of the Picklist Field Type. The Service type field is mandatory.
- The Identify customer View contains a drop-down list that references the Customer (AR) data relationship.
- The Identify location View contains the Service address (AR) Embedded Data data relationship.
- The Identify vehicle View contains a new field called Vehicle information (AR), which references the Vehicle information data object as a single-record Embedded Data relationship.
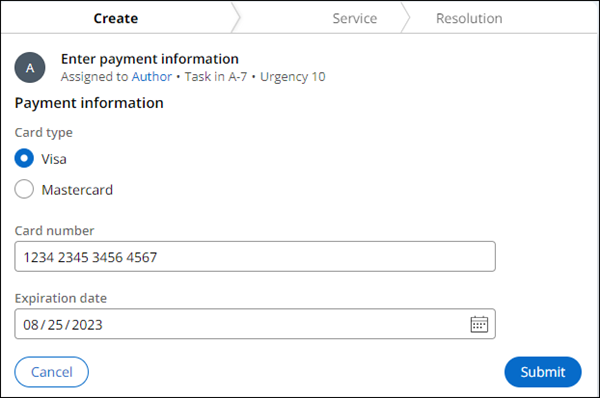
- The Enter payment information View contains a new field called Payment information (AR) which references the Payment information data object as a single-record Embedded Data relationship.
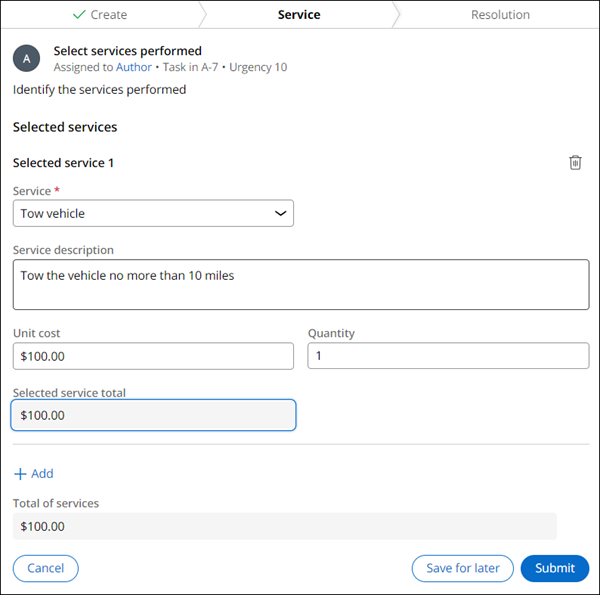
- The Select services performed View contains a Selected services (AR) data relationship which references the Selected service data object as a multiple-record Embedded Data relationship.
- The Select services performed View contains a previously-created, calculated field called Total of services, which is a sum of all the services selected in the View.
The following table provides the credentials you need to complete the challenge:
| Role | User name | Password |
|---|---|---|
| Business Architect | author@gogoroad | pega123! |
Challenge Walkthrough
Detailed Tasks
1 Configure the Identify issue View
- In the Pega instance for the challenge, enter the following credentials:
- In the User name field, enter author@gogoroad.
- In the Password field, enter pega123!.
- In the navigation pane of App Studio, click Case Types > Assistance Request to access the Assistance Request Case Type.
- In the Assistance Request Case Life Cycle, in the Create Stage, click the Step, and then in the contextual properties pane to the right, click .
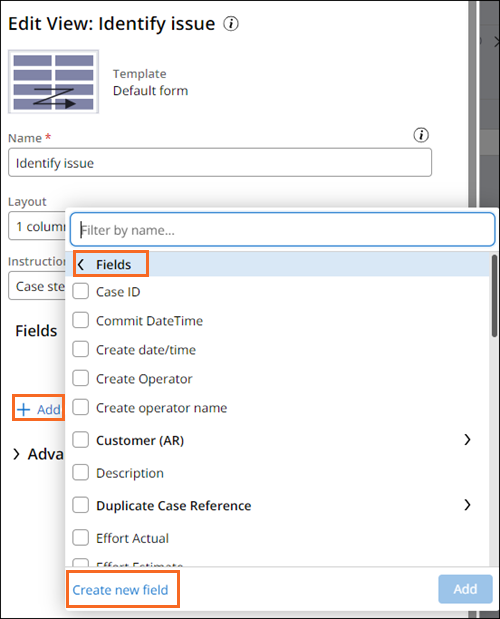
- In the window, in the Fields section, click .
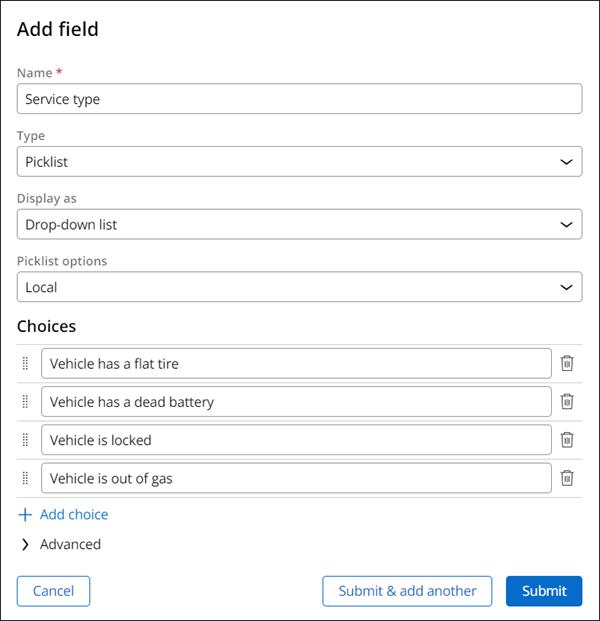
- In the Add field dialog box, in the Name field, enter Service type.
- In the Type field, confirm that the system defaults to Picklist.
- In the first choice for the Service type Picklist, enter Vehicle has a flat tire
- Click
- Repeat steps 7-8 to add the remaining choices:
- Vehicle has a dead battery
- Vehicle is locked
- Vehicle is out of gas
- Click .
- In the window, to the right of the Service type field, click the Configure icon.
- In the window, in the Conditions section, in the Required field, select .
- Click to close the dialog box.
- Click to save the Identify issue View.

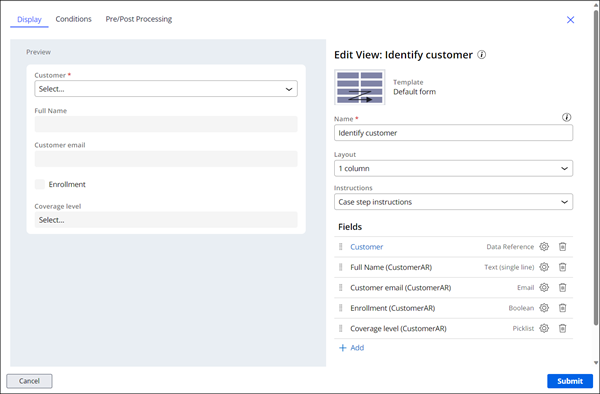
2 Configure the Identify customer View
- In the Assistance Request Case Life Cycle, click the Step, and in the contextual properties pane to the right, click .
- In the window, in the Fields section, click
- In the Fields list, select Customer (AR) and click .

- In the window, in the Fields section, click Customer (AR).
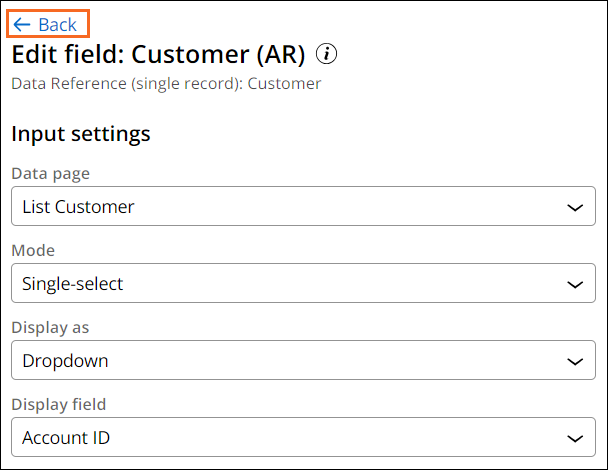
- In the dialog box, complete the following:
- Confirm the Data page field is List Customer
- Confirm the Mode field is Single-select
- For the Display as, field select Dropdown.
- Confirm the Display field field is Account ID.
- Click to close the window,
- In window, click Add > Fields.
- In the dialog box, expand the Customer (AR) field.
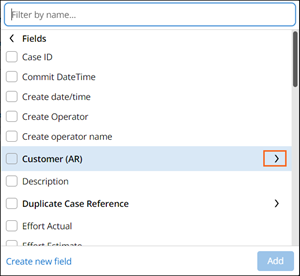
- In the dialog box, click Fields.
- In the list of available Customer (AR) fields, select the checkboxes for Coverage level, Customer email, Enrollment, and Full name, and then click Add.
- To the right of the Coverage level field, click the Configure icon.
- In the dialog box, in the Edit mode field, select Read-only, then click .
- Repeat steps 11-12 to se the Customer email, Enrollment, and Full name fields as Read-only.
- Use the Drag handle to reorder the Read-only fields as Full name, Customer email, Enrollment, and Coverage level.
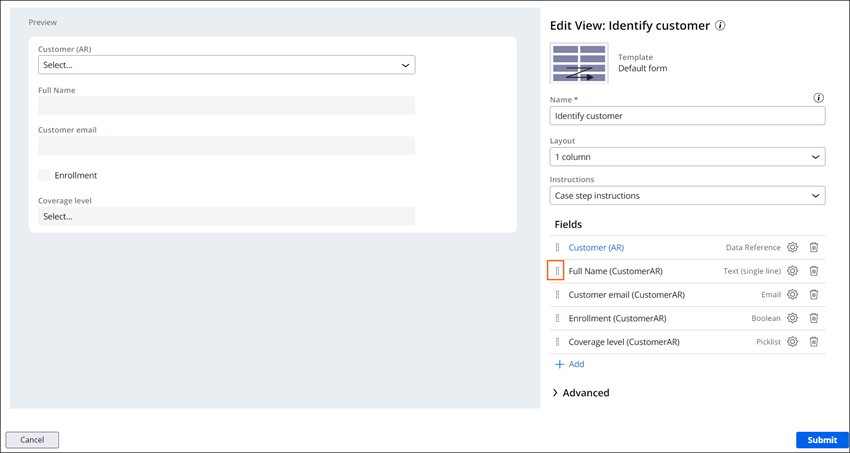
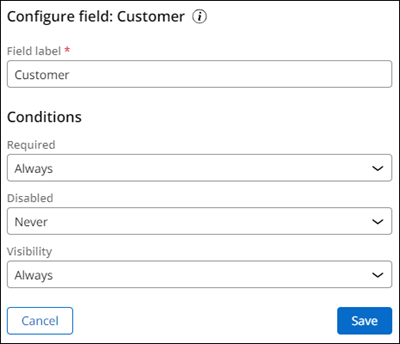
- To the right of the Customer (AR) field, click icon.
- In the dialog box, update the Field label to Customer.
- In the section, in the Required field, select .
- Click .
- Click to save the Identify customer View.
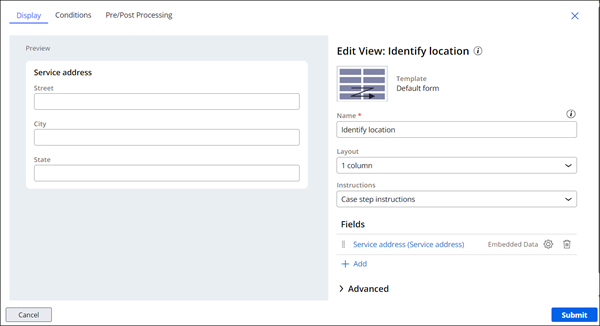
3 Configure the Identify location View
- In the Assistance Request Case Life Cycle, click the Identify location Step, and in the contextual properties pane to the right, click .
- In the window, in the Fields section, click .
- In the list of fields, select Service address (AR), and click .
- In the window, click Service address (AR) (Service address) .
- In the window, in the section, click the icon to remove the Primary fields View.
- In the section, click Add > Fields.
- In the list of fields, select City, State, and Street, and then click .
- Using the Drag handle, reorder the fields as Street, City, and State.
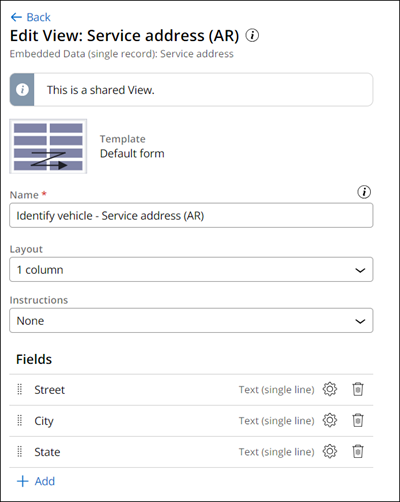
- Click to return to the window.
- To the right of the Service address (AR) (Service address) field, click the icon
- Update the Field label field, enter Service address.
- Click .
- Click to save the Identify location View.
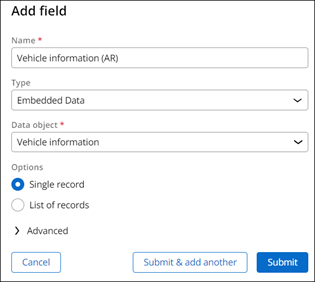
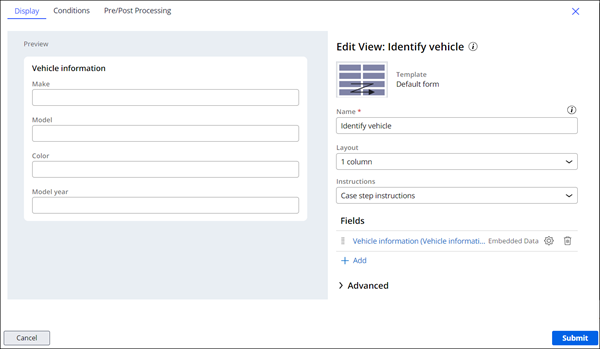
4 Configure the Identify vehicle View
- In the Assistance Request Case Life Cycle, click the Identify vehicle Step, and in the contextual properties pane to the right, click .
- In the window, in the Fields section, click .
- In the Add field window, in the Name field, enter Vehicle information (AR).
- In the Type field, select Embedded Data.
- In the Data object field, select Vehicle information.
- In the Options field, select Single Record.
- Click to create the Vehicle information (AR) data relationship.
- In the window, click Vehicle information (AR) (Vehicle information).
- In the Fields section, click the icon to remove the Primary fields View, and then click Add > Fields.
- In the list of fields, select Color, Make, Model, and Model year, and then click .
- Drag the Color field between the Model and Model year fields.
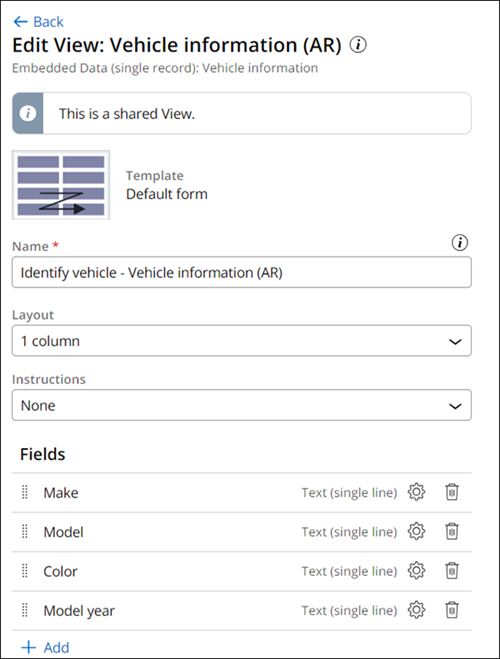
- Click Back to return to the window.
- To the right of the Vehicle information (AR) (Vehicle information) field, click the icon.
- Update the Field label to Vehicle information.
- Click .
- Click to save the Identify vehicle View.
5 Configure the Enter payment information View
- In the Assistance Request Case Life Cycle, click the Enter payment information Step, and in the contextual properties pane to the right, click .
- In the window, in the Fields section, click .
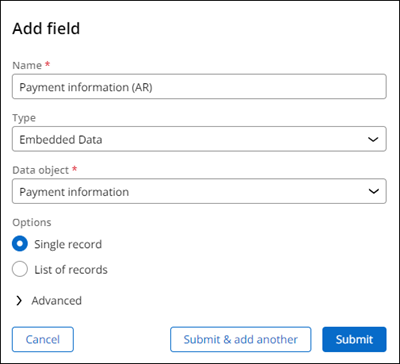
- In the Add field dialog box, in Name, enter Payment information (AR).
- In the Type field, select Embedded Data.
- In the Data object field, select Payment information.
- In the Options field, select Single Record.
- Click to create the Payment information (AR) data relationship.
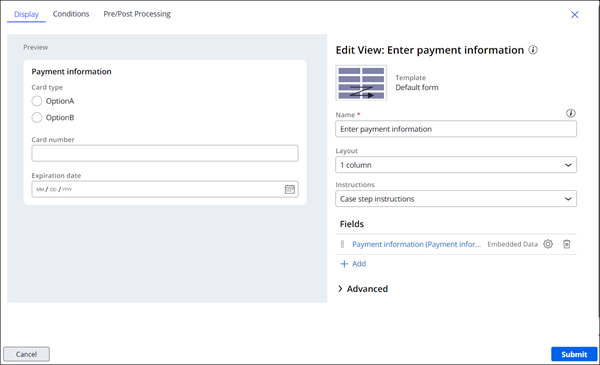
- In the window, click Payment information (AR) (Payment information).
- In the Fields section, click the icon to remove the Primary fields View, and then click Add > Fields.
- In the list of fields, select Card number, Card type, and Expiration date, and then click .
- Using the Drag handle, reorder the fields as Card type, Card number, and Expiration date.

- Click to return to the window.
- To the right of the Payment information (AR) (Payment information) field, click the icon.
- In the dialog box, update the Field label to Payment information.
- Click .
- Click to save the Enter payment information View.
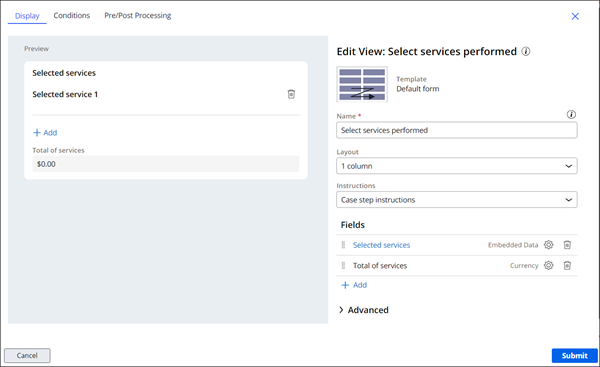
6 Configure the Select services performed View
- In the Assistance Request Case Life Cycle, click the Select services performed Step, and in the contextual properties pane to the right, click .
- In the window, in the Fields section, click .
- In the list of fields, select Selected services (AR), and then click .
- In the window, click Selected services (AR).
- In the window, in the Display as field, select Field Group.
- In the Select View item field, select Selected service view.
- In the Item label field, enter Selected service.
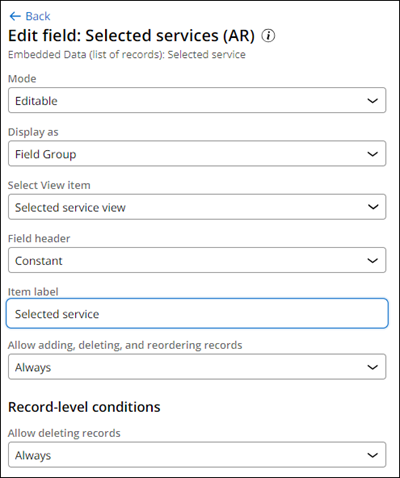
- Click Back to return to the window.
- To the right of the Selected Services (AR) field, click the icon.
- In dialog box, to update the Field label, enter Selected services.
- Click .
- In the window, click Add > Fields > Total of services > Add.
- To the right of the Total of services field, click the Configure icon.
- In the Edit mode field, select Read-only, and then click .
- Click to save the Select services performed View.
- Click to save your work.
Confirm your work
- In the Assistance Request Case Type, click to open the Web portal window.
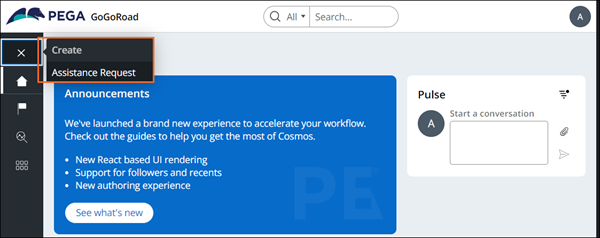
- In the Web portal window, in the navigation pane, click Create > Assistance Request to create a new instance of the Assistance Request Case Type.
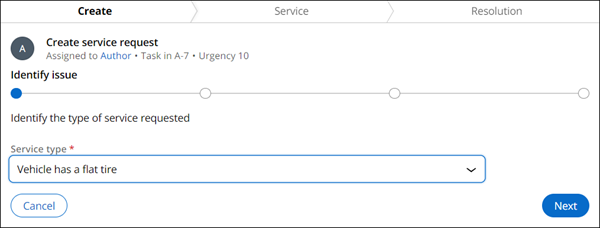
- In the Identify issue Step, select a Service type, then click .
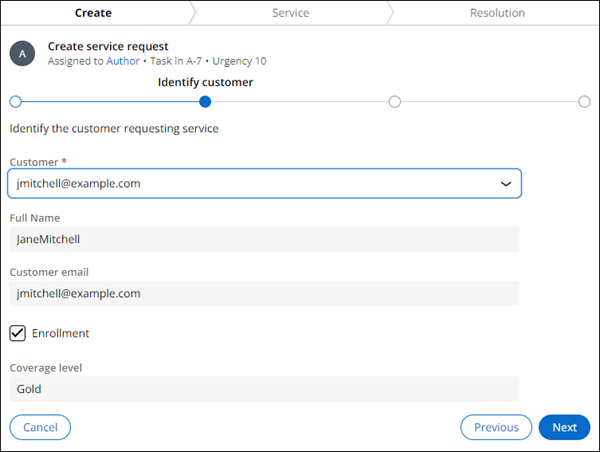
- In the Identify customer Step, select a Customer, for example [email protected], and then click .
- In the Identify location Step, enter an address, then click .

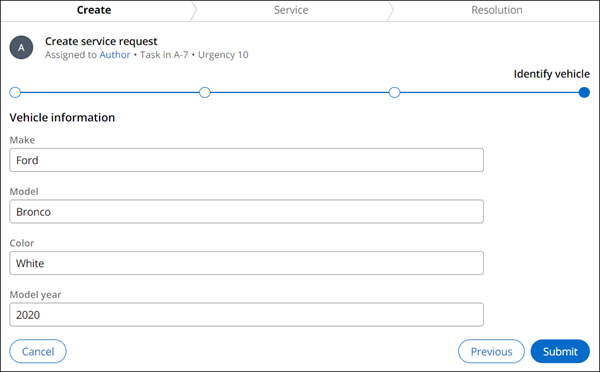
- In the Identify vehicle Step, enter the vehicle information and then click .
- In the Enter payment information Step, enter the payment information and then click .
- In the Select services performed Step, in the Service list select a service and enter a value in the Quantity field.
- Confirm that the Total of services section displays a value.
This Challenge is to practice what you learned in the following Module:
Available in the following mission:
If you are having problems with your training, please review the Pega Academy Support FAQs.
Want to help us improve this content?