Configuring a chatbot with web messaging
Web messaging enables customers to interact with your customer service application from an embedded chat window. Chatbots help you address customer issues more efficiently to reduce the need for a customer service representative.
For example, when customers use an embedded chat window on a website to report a missing part for their purchased mobile phone, the chatbot responds by asking for more details about the issue and starting a service request automatically.
Video
Transcript
This demonstration shows you how to configure a chatbot with a web messaging connection.
U+ Bank, a retail bank, wants to let its customers open an account by using a digital messaging channel to interact with the Bank application through web messaging bots (chatbots).
These chatbots can handle any request from customers and allow agents to focus on other customer issues. If needed, a chatbot session can be transferred to an agent.
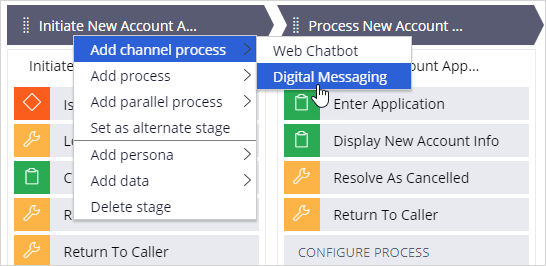
To implement the business requirement, you first need to create a parallel flow to the Open new account case type in App Studio. On the Initiate New Account Application stage, click the More icon to select the Digital Messaging in the Add channel process section. A parallel process for digital messaging is added to the workflow.
Now, open the parallel flow to build the chatbot conversation by adding various conversation types such as Send a message, Ask a question, and Conversation flow shapes to the flow.
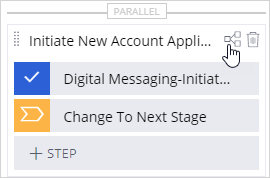
Expand the Digital Messaging-Process New Account Application step by clicking the Add icon.

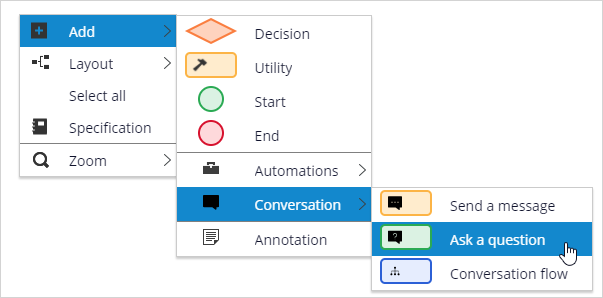
To add a question shape to the canvas, right-click on the canvas, and then select Add > Conversation > Ask a question. Each question shape prompts the customer to provide information that is necessary to open a new account.
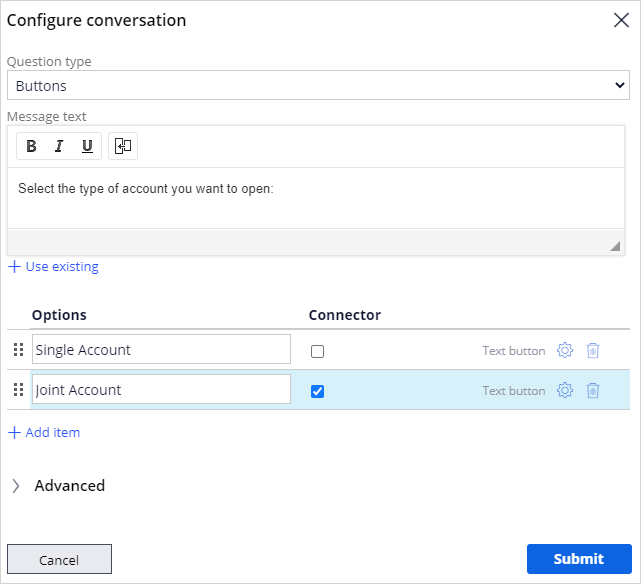
Now, configure the view for the question. In the Question type list, you can choose the appropriate question type to build the conversation. The available question types are Open ended, Buttons, Quick replies, Yes or No.
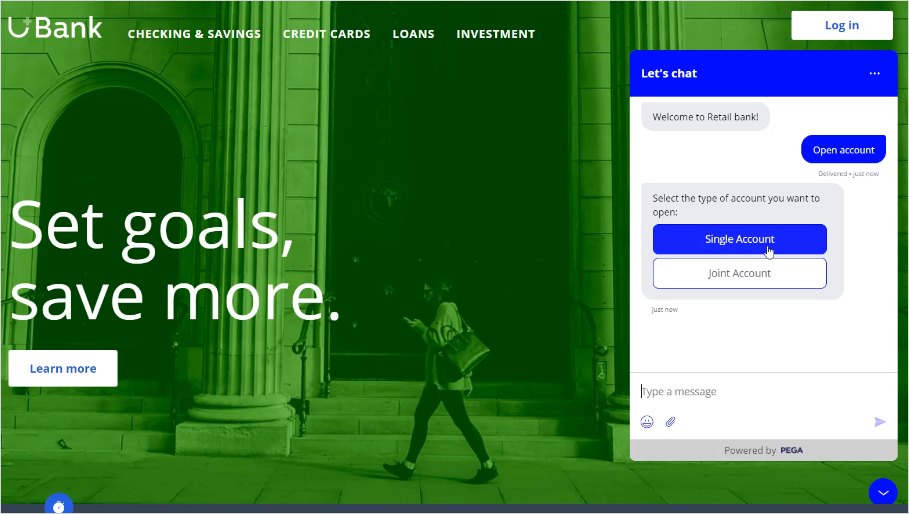
In this case, first, choose the Buttons question type to learn the type of account that the customer wants to open. For example, does the customer want to open a Single Account or a Joint Account?
Now, fill in the required fields. In the Message text box, enter the message text and add option items to the question. The option items act as button selections for end users.
Check the Connector for one of the option items to build the navigational path in the flow.
You can observe that there are now two navigational paths for the option items.
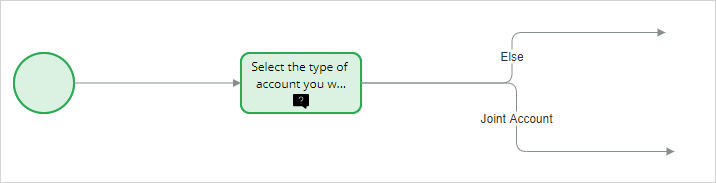
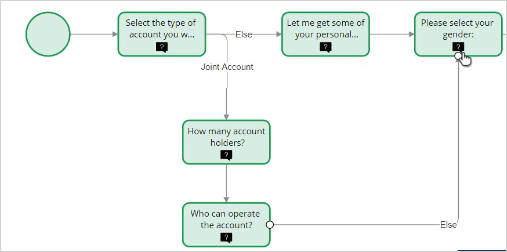
For the Else connector navigational path, continue to build the conversation.
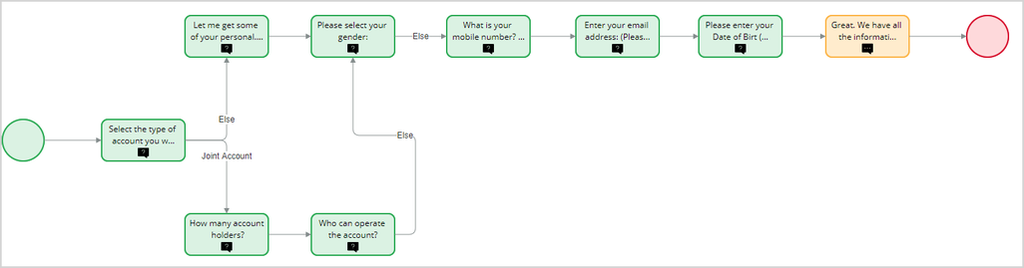
Now, collect personal details such as full name, gender, mobile number, email address, and date of birth from customers by using the appropriate question types. For example, to get the full name of a customer, use the Open ended question type. To know the gender of the customer, use the Buttons question type, as there are option items for gender.
Once the configuration is complete, send a confirmation message to the customer by using the Send a message shape.
To end the Else connection navigational path, add the End shape to the Else flow.
Now, for the Joint Account connection navigational path, ask questions to get the information about the Joint account holders. In this instance, first, add the Open ended question to know how many people can open the Joint account.
Now, add a Buttons question to know who can operate the Joint account, such as primary account holder, secondary account holder, or both.
Finally, connect the Else path to the Please select your gender question of the Single Account navigational path to continue with the rest of the flow.
Save the updated workflow. Now that you have successfully configured the parallel process for the digital messaging channel, you need to add the parallel process to your channel so that the chatbot is available to all customers.
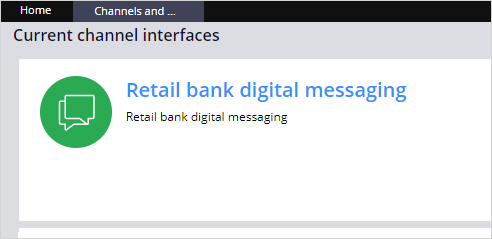
Navigate to Channels. The system displays the Channels landing page. On the Current channel interfaces, choose the already-created digital messaging channel, Retail bank digital messaging.
In the Content section of the Configuration tab, click Add case type to add cases for the Digital Messaging interface, which helps your customer open and access a case by entering a specific command.
In the Case type list, you can select a case type that you want to create when the user enters a specific command. In the Create case command field, you can enter the text that triggers the system to create the case. Submit and save the changes to update your chatbot configuration.
Now, it is time to test the chatbot. On the U+ Bank website, open the chat widget to have a conservation with the chatbot to open a new account. Enter the request Open account in the chat window to trigger your case. Make sure that the request uses the exact case command that you entered in the Create case command field for the channel.
The chatbot walks the customer through the questions to gather the required information. The chatbot confirms when it has received the information required to open an account.
This Topic is available in the following Module:
If you are having problems with your training, please review the Pega Academy Support FAQs.
Want to help us improve this content?