Modular deployment strategies
Dedicating a ruleset to a single case type helps to promote reuse in your Pega Platform™ applications. Other reasons to dedicate a ruleset to a single case type include:
- Achieving continuous integration (CI) branch-based development.
- Encouraging case-oriented user stories by using Agile Studio to manage project software releases.
- Managing branches that contain rules that originate from different rulesets. When this occurs, the system generates a branch ruleset, and the generated ruleset prepends the name of the original ruleset to the name of the branch.
- Accommodating multiple user stories in a branch.
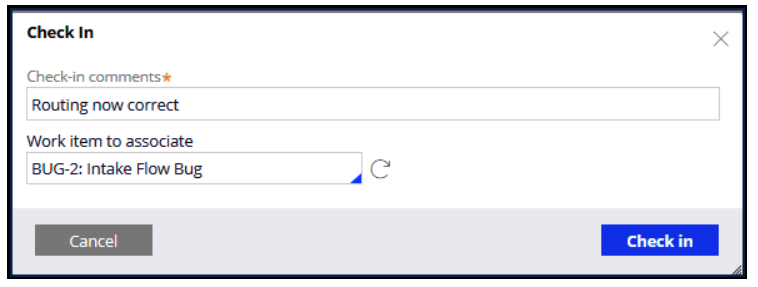
- Simplifying the ability to populate the Work item to associate field in Agile Workbench when checking a rule in to a branch.
The following figure shows how to map the Agile Workbench work item when you check in a rule in to a branch:
The system also creates a backlog work item when you create a project in Agile Studio. The Agile Studio backlog can prepopulate with a user story for each foundation application case type when developing an application built on a foundation application. Users can then select case types that are appropriate for the minimal lovable product (MLP) release from that backlog.
Deployment Manager is a workspace where you can manage CI/CD pipelines, including support for branch-based development. It can automatically trigger a Dev-to-QA deployment when a branch successfully merges into the primary application. The rules checked into that branch must only belong to the primary application for this to occur.
When a case type class is created within a case type-specific ruleset, it adds the rules that Dev Studio generates to that ruleset despite supporting the development of multiple case types within the same application.
Branch-based development review
You manage application branches by using the App Explorer in Dev Studio.The following figure shows an example of a branch that a user sets up for an event booking application:

While it is not necessary to dedicate a branch to a single case type, as shown in the following figure, doing so simplifies the branch review process:

When users save a case-related rule in a case-specific ruleset to a branch, the system generates a case-specific branch ruleset if one does not already exist. Changes made in Dev Studio that affect that rule occur in the branch ruleset's version of that rule. On the creation of a branch ruleset, the system places it at the top of the ruleset stack of the application, as shown in the following figure:

You initiate the merge of a single on the Branches tab of Application Explorer by right-clicking the branch name, as shown in the following figure:

At the end of the merge process, the branch is empty if users do not select the Keep all source rules and rulesets after merge option. As a result, the branch is ready to use for the next sets of tasks, issues, or bugs defined in Agile Studio.
Branch-based development in Deployment Manager
Consider a scenario in which the Deployment Manager application, running on a separate orchestration server, is configured to automatically initiate a delivery when a single-branch merge completes an application successfully. Also, suppose the development environment application, built on the same PegaDevOpsFoundation application, configures the RMURL (Release Manager URL) Dynamic System Setting (D-S-S) to point to the orchestration server’s PRRestService. When initiating a single-branch merge, the development environment sends a request to the Deployment Manager application. The Deployment Manager application orchestrates the packaging of the application within the development environment, the publishing of that package to a mutual Dev/QA repository, and the import of that package into the QA environment.
Application packaging
The initial screen of the Application Packaging wizard asks you which built-on applications and the application you want to package to include in the generated product rule. Note that components are also mentioned, a component being a Rule-Application where pyMode = Component.
Multiple applications referencing the same ruleset are highly discouraged. After saving an application rule to a new name, warnings appear in both applications, one for each dual-referenced ruleset.
The deployment strategy is different when the production application you want to deploy depends on other multiple built-on component applications.
If the product file contains database schema changes as a part of the deployment and your organization policies do not support applying the Database schema changes automatically, you need to generate the SQL for schema changes. The database administrator manually runs the SQL before continuing with the deployment of the rules.
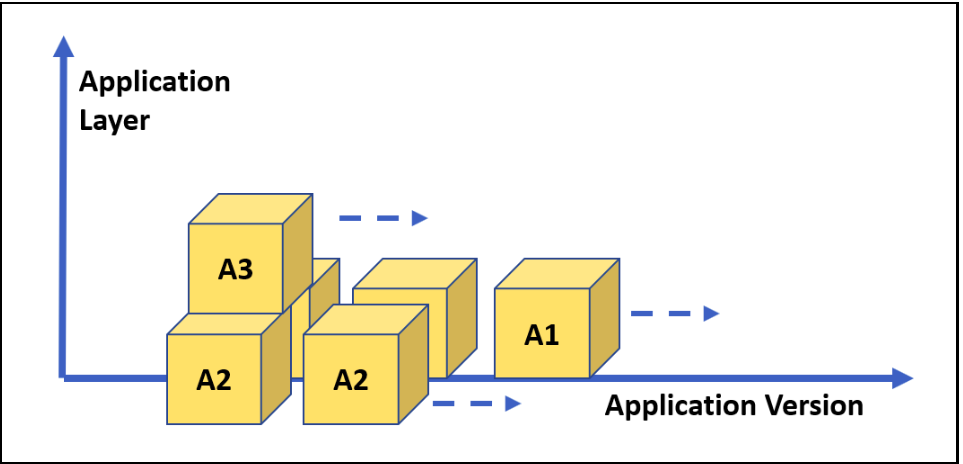
In the following diagram, applications A1 and A2 undergo versioning. Application A3 is built on A1 and A2. Applications A1 and A2 are not productions application. However, applications A1 and A2 can be deployed to other development team environments, such as where application A3 is developed. It is the responsibility of application A3 responsibility to observe the version change made by applications A1 and A2. Application A3 must also decide when to change its versions to reflect the version changes under it.
Consider the example of the FSG Booking application. The FSGEmail application is packaged first, followed by the Hotel application, followed by the Booking application.
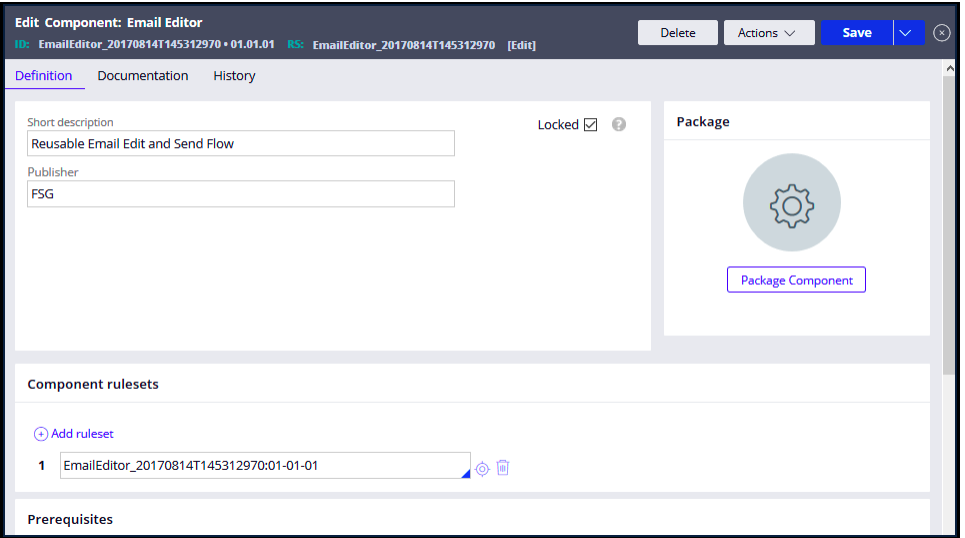
While it is possible to define a product rule that packages a component only, there is no need to do so. You can package the component byusing the component rule itself, as shown in the following figure:
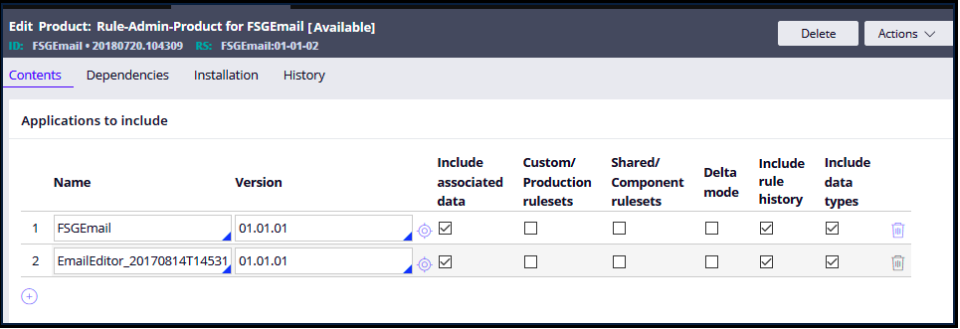
Deployment Manager supports pipelines for rule application instances where pyMode = Application and pyMode = Component. Include those components in the packaging when an application contains one or more components.
The following figure shows a component that is packaged in the Product rule along with an application that uses the component. The component is EmailEditor, and the application is FSGEmail.
The Open-Closed principle applied to packaging and deployment
The goal of the Open-Closed principle is to eliminate ripple effects. A ripple effect occurs when an object changes its interface instead of defining a new interface and deprecating the existing interface. The primary interface for applications on which other applications are built, such as FSGEmail and Hotel, is the data required to construct the new interface using data propagation. If the EmailEditor component mandates a new property, the FSGEmail application needs to change its interface to applications that are built on top of it, such as the Hotel application. The Hotel application needs to change its built-on interface to allow the Booking application to supply the value for the new mandated property.
By deploying applications separately and in increasing dependency order, the EmailEditor component change eventually becomes available to the Booking application without breaking that application or the applications that are under it.
Note: It is not a best practice to update all three applications (FSGEmail, Hotel, and Booking) by using a branch associated with the Booking application.
Check your knowledge with the following interaction:
This Topic is available in the following Module:
If you are having problems with your training, please review the Pega Academy Support FAQs.
Want to help us improve this content?