
Kaskadierende Genehmigungen mit Berichtsstruktur konfigurieren
3 Aufgaben
10 Min.
Szenario
GoGoRoad-Stakeholder möchten Gebietsleitern gestatten, mit zunehmendem Servicewachstum neue Lieferanten als Dienstanbieter hinzuzufügen. Wenn der Anbieter The Automobile Association (TAA) ist und bereits eine Beziehung mit GoGoRoad hat, wird der Case „Add Vendor“ an den Vorgesetzten des Gebietsleiters zur Genehmigung weitergeleitet. Ist der Anbieter nicht TAA, wird der Case-Typ „Add Vendor“ zur zweiten Genehmigung an einen Direktor weitergeleitet. Fügen Sie dem Case-Typ „Add Vendor“ einen Step „Approval“ hinzu, um das beschriebene Verhalten zu unterstützen.
In der folgenden Tabelle finden Sie die Anmeldedaten, die Sie zur Durchführung der Challenge benötigen.
| Rolle | Benutzername | Kennwort |
|---|---|---|
| System Architect | author@gogoroad | pega123! |
Challenge-Schritte
Genaue Übungsschritte
1 Create the when conditions
- From the navigation pane of Dev Studio, click App.
- Right-click NewVendor, and then click Create > Decision > When.
- In the Label field, enter Vendor is TAA.
- Click Create and open to create the when rule.
- In the Select drop-down, select Name in the New vendor data object.
- In the second drop-down, keep the default value of is equal to.
- In the third drop-down, enter TAA.
- Click Save to save the when rule.
- To the right of Save, click the down arrow.

- Click Save as to save a copy of the Vendor is TAA when rule.
- In the Label field, enter Vendor is not TAA.
- Click Create and open to create the when rule.
- In the second drop-down list, select is not equal to.

- Click Save to save the when rule.
2 Configure the Approve Vendor step
- In the navigation pane, click Case types > New vendor to open the New vendor case type.
- In the Approval process, click Step > Approve/Reject.
- Name the step Approve vendor.
- With the Approve vendor step selected, from the General tab of the properties pane, in the Approval flow type drop-down, select Cascading.
- In the Approval based on drop-down, keep the default value of Reporting structure.
- In the Approval to be completed by drop-down, keep the default value of Reporting manager.

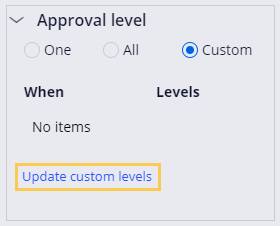
- Expand the Approval level section.
- In the Approval level section, select Custom.
- Click Update custom levels to update the custom approval levels. A dialog box is displayed.
- In the dialog box, click Add custom approval to add a when rule.
- In the When field, enter or select VendorIsTAA.
- In the Levels of approval field, enter 1.
- Click Add custom approval to add a when rule.
- In the When field, enter or select VendorIsNotTAA.
- In the Levels of approval field, enter 2.
- Click Submit to close the dialog.

- Click Save to save the New vendor case type.
3 Confirm your work
- Click Save and run to create a New vendor case instance.
- In the Collect vendor information step, in the Name field, enter TAA.
- Click Submit.
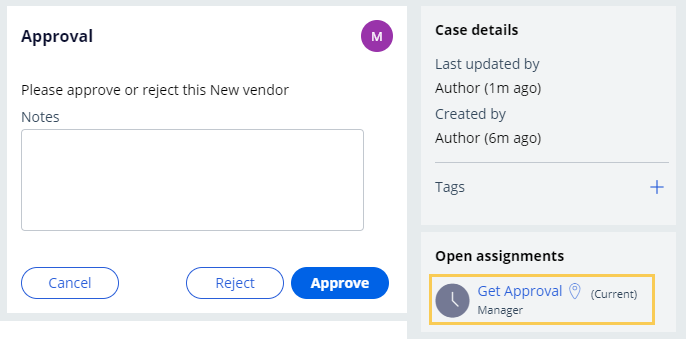
- From the Actions menu, click Approval to display the first approval.
- In the Approval view, verify that the open assignment is assigned to the Manager.
- Click Approve to resolve the case.
- Create a New vendor case instance.
- In the Collect vendor information step, in the Name field, enter Pega Towing.
- Click Submit.
- From the Actions menu, click Approval to display the first approval.
- In the Approval view, verify that the open assignment is assigned to the Manager.
- Click Approve.
- From the Actions menu, click Approval to display the second approval.
- In the Approval view, verify that the open assignment is assigned to the Director.

In der folgenden Mission verfügbar:
If you are having problems with your training, please review the Pega Academy Support FAQs.
Möchten Sie uns dabei helfen, diesen Inhalt zu verbessern?