
Microjourney documentation
Key building blocks of a Pega Platform application
In the Pega Express™ delivery approach, the key building blocks, known as the three pillars of an application, include:
- Microjourneys™, cases, and strategies
- Personas and channels
- Data and interfaces
Every Pega Platform™ application is built on the three pillars, as shown in the following image.
Note: The data for these three pillars can be captured directly in the Pega Platform™ by using App Studio 8.4 onwards.
The three pillars
Describing a Microjourney in the context of the three pillars ensures that project team members work through all of the key dependencies (such as integrations) before the project starts. That helps uncover any major roadblocks. Take a look at each of the three pillars and how they work.
Microjourneys, cases, and strategies
This pillar:
- Identifies the Microjourney that the Pega Platform application can configure
- Documents the overall journey for the customer that achieves all or a subset of their business outcomes
- Can be delivered as a solution in 60-90 days or less
- May be achieved by one or more case types in Pega Platform
Personas and channels
This pillar:
- Establishes the different user groups, roles, and personas, who will interact with the Microjourney (for example, an end customer and a call center agent)
- Identifies which channels the Microjourney touches, for example, mobile, web, or call center
Data and interfaces
This pillar:
- Identifies the data required to support the Microjourney
- Notes the sources of that data
These three pillars form the foundation of a Pega Platform application. Once the Microjourneys are identified, the next step is to capture key information for each Microjourney.
Benefits of capturing the Microjourney
Defining the three pillars allows you to articulate what the "to be" Microjourney is and what the solution may look like from a business perspective. By documenting the three pillars, the Pega Express project delivery team can pick up, interpret, and consider solutions. With this level of detail included, the Microjourney results in a higher quality definition of the scope to be delivered during the remainder of the project.
Once the key building blocks of the application are clearly defined, your team can estimate the work effort so you know how quickly you can go live.
Note: Since a Microjourney is described from a business perspective, the client also understands - in business terms - what is going to be built.
Options for capturing your Microjourney
Using the Pega Express approach, you have two options for capturing information about each Microjourney.
- Using Pega application version 8.4 and above, you can directly capture the three pillars within Pega App Studio.
- Alternatively, you can capture key information in an estimation tool, called the Case Type Backlog.
The Case Type Backlog and other tools to support your Microjourney are available on the Pega Express Delivery Resources page.
Note: 'Out of the Box' Prescriptive Microjourneys are also available for Pega products, use the Community site to find out what is available with each release.
Option 1: Direct capture of the three pillars into App Studio 8.4+
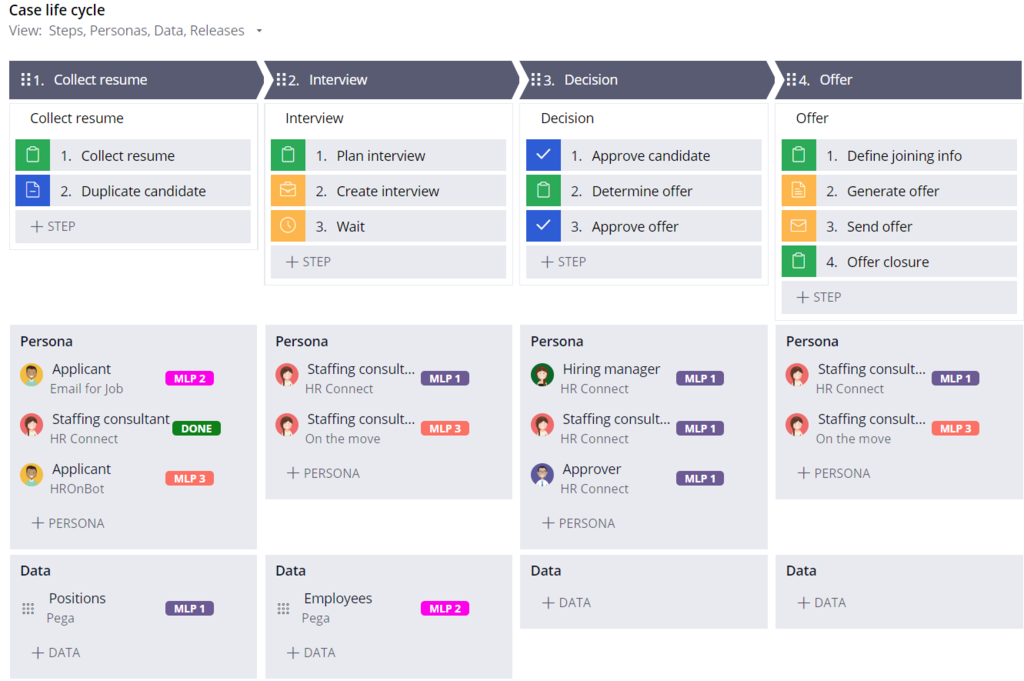
With Pega version 8.4 and above, you can capture the three pillars directly into App Studio. For additional information on Pega App Studio, review the Pega Academy topic App Studio benefits. See the following image as an example:
Option 2: Direct capture of the three pillars into the Case Type Backlog tool
If you are not yet using Pega version 8.4 or higher, you can capture the three pillars directly in the Case Type Backlog tool. The Case Type Backlog tool is Excel-based and can be found in the Prepare section of the Pega Express Delivery Resources page.
Use the following steps to populate your Case Type Backlog:
| STEP | DETAIL |
|---|---|
| 1 |
Download and save a local copy of the Case Type Backlog Tool. Name the file after the project on which you are about to embark. |
| 2 | Populate the Project Summary tab, filling in all the boxes. |
| 3 | In the Assumptions tab, log all of the assumptions made in capturing the three pillar information for your Microjourneys. |
| 4 | Populate in the Microjourney tab the Microjourneys that you have captured through your discovery work. |
| 5 | Complete the Case Type tab. Remember to record the average complexity and the channel coverage in percentages. |
| 6 | Complete the Supporting Features tab. |
| 7 | Complete the Interfaces tab. |
| 8 | Complete the Persona tab. |
| 9 | Review the Work Backlog tab, which should be a summary of all the information you have populated. Note: Column P is used to mark the Minimum Lovable Product (MLP) release in which each feature is delivered. |
| 10 | Review the entire document to ensure there are no blank rows in the spreadsheets. |
| 11 | Finally, review and update the Project Attribute tab. For example, adjust the Scrum Maturity and the Highly Regulated Industry flag if your organization is new to scrum or requires additional validation testing like a pharmaceutical company or a financial institution. |
Prepopulated Case Type Backlogs for strategic applications
Prepopulated Case Type Backlogs are available for Pega's Strategic Applications. You can use these and tailor them to your project. Ask your Pega representative for a copy.
Check your knowledge with the following interaction.
This Topic is available in the following Module:
If you are having problems with your training, please review the Pega Academy Support FAQs.
Want to help us improve this content?