Updating an organizational structure
Updating an organizational structure
As companies grow, system architects may extend the existing organizational structure to reflect an organizational change. You may have to add new organization levels, work groups, and work queues. You associate operators with an organization structure to define how work is routed to the operator.
When you create a new application using the New Application wizard, you specify an organization. Pega provides a default division and unit for that organization. For example, if you enter TGB as the organization, the system creates a division named Div and a unit named Unit. You have the option to name the division and unit that you want in your new organization.
The example in this topic assumes that an organization has a Human Resources (HR) unit. Due to business expansion, the company intends to add a unit named Benefits that reports to the HR unit. Operators that belong to the unit are also in a new work group that contains a new work queue.
Follow these steps to update the organization in this example:
- Add a new unit to the hierarchy.
- Create a new work group.
- Create a new work queue.
- Associate the work queue with the work group.
- Associate the unit and work group with an operator.
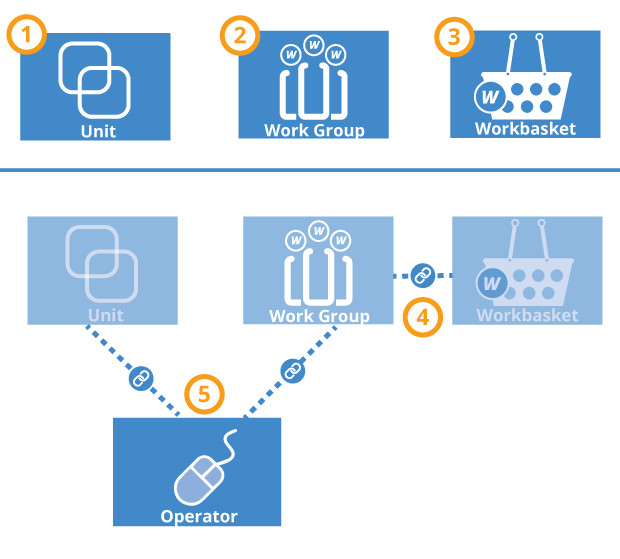
Caution: Because of mutual dependencies, a work queue or a work group must already exist before either instance can be created. You cannot create both the work queue and the work group at the same time. For example, when you create a new work group, you must use an existing work queue — this is required value. After you create a new work queue, go back to the work group, and update the work queue.
The following image shows the sequence of steps using the previous example.
Note: You can create new organization records such as units, work groups, and work queues from the Records Explorer. In the Organization category, select a rule type, right-click, and click +Create.
Adding a level to the organization hierarchy
Use the chart on the Organizational Chart landing page to add levels to an organization. The chart helps you see where in the hierarchy you are adding a level. From the Dev Studio menu, select Configure > Org & Security > Organization > Organizational Chart to open the landing page. You can also access organizational charts on the Chart tab on Organization, Division, and Unit records.
To add a layer, select an entry in the organizational hierarchy. Right-click to display a menu that lets you add organizations, divisions, and units. Organization names are unique and cannot be used in more than one hierarchy. For example, a division cannot belong to more than one organization, or a unit cannot belong to more than one division.

In this example, a sub-unit named Benefits has been added to its parent unit, HR.

For more information on how to use the chart, see the Help topic Organization form – Chart tab.
Adding a work group
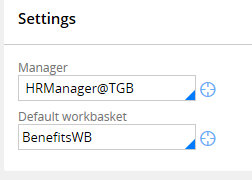
From the Records Explorer, create a work group record. By convention, end the work group name with an at sign (@) and an organization name, such as Benefits@TGB. In the Manager field, enter a work group manager for reporting and routing purposes. In the Default work queue field, select a work queue. The standard router activity ToDefaultwork queue uses this value to locate a work queue, based on the work group associated with the current operator. For example, you can enter the default organization work queue such as default@TGB. After you create a new work queue for the work group, you update this default work queue with the new one.
Save the work group record, but leave it open. Next, enter the name of the new work queue in the Default work queue field. To help users and developers easily distinguish work queue and operator identifiers, choose a naming convention specifically for work queues. For example, include WQ as a part of the name as shown in the following example. Then, click the crosshairs icon to open a Create Work queue form.
Adding a work queue
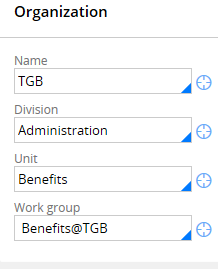
Complete the New Work queue form and create the record. In the Organization section on the work queue form, select the organization in the Name field, and then complete the Division and Unit fields. In the Work group field, enter the name of a work group that uses this work queue. This field determines which work queues appear in a Team Work Queue list on the Manager portal. Save the record to associate the work queue with the work group.
Return to the open work group record and save it. The work queue you created is now the default work queue of the work group.
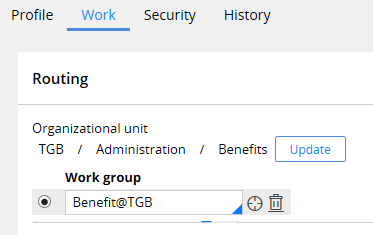
Updating the operator record
Open an operator record that you want to associate with the new level. On the Work tab, update the Organization unit values. Then, in the Work group field, select the work group you want to associate with the operator. Finally, add the work group to the Work queue field.